In this tutorial, you will learn how to perform face detection with OpenCV and Haar cascades.
This guide, along with the next two, were inspired by an email I received from PyImageSearch reader, Angelos:
Hi Adrian,
I’ve been an avid reader for PyImageSearch for the last three years, thanks for all the blog posts!
My company does a lot of face application work, including face detection, recognition, etc.
We just started a new project using embedded hardware. I don’t have the luxury of using OpenCV’s deep learning face detector which you covered before, it’s just too slow on my devices.
What do you recommend I do?
To start, I would recommend Angelos look into coprocessors such as the Movidius NCS and Google Coral USB Accelerator. Those devices can run computationally expensive deep learning-based face detectors (including OpenCV’s deep learning face detector) in real-time.
That said, I’m not sure if these coprocessors are even an option for Angelos. They may be cost-prohibitive, require too much power draw, etc.
I thought about Angelos’ question for a bit and then went back through the archives to see if I had a tutorial that could help him out.
To my surprise, I realized I had never authored a dedicated tutorial on face detection with OpenCV’s Haar cascades!
While we can obtain significantly higher accuracy and more robust face detections with deep learning face detectors, OpenCV’s Haar cascades still have their place:
- They are lightweight
- They are super fast, even on resource-constrained devices
- The Haar cascade model size is tiny (930 KB)
Yes, there are several problems with Haar cascades, namely that they are prone to false-positive detections and less accurate than their HOG + Linear SVM, SSD, YOLO, etc., counterparts. However, they are still useful and practical, especially on resource-constrained devices.
Today you’ll learn how to perform face detection with OpenCV. Next week we’ll cover other Haar cascades included in OpenCV, namely eye and mouth detectors. And in two weeks, you’ll learn how to use dlib’s HOG + Linear SVM face detector and deep learning face detector.
To learn how to perform face detection with OpenCV and Haar cascades, just keep reading.
OpenCV Face detection with Haar cascades
In the first part of this tutorial, we’ll configure our development environment and then review our project directory structure.
We’ll then implement two Python scripts:
- The first one will apply Haar cascades to detect faces in static images
- And the second script will utilize OpenCV’s Haar cascades to detect faces in real-time video streams
We’ll wrap up the tutorial with a discussion of our results, including the limitations of Haar cascades.
Configuring your development environment
To follow this guide, you need to have the OpenCV library installed on your system.
Luckily, OpenCV is pip-installable:
$ pip install opencv-contrib-python
If you need help configuring your development environment for OpenCV, I highly recommend that you read my pip install OpenCV guide — it will have you up and running in a matter of minutes.
Having problems configuring your development environment?

All that said, are you:
- Short on time?
- Learning on your employer’s administratively locked system?
- Wanting to skip the hassle of fighting with the command line, package managers, and virtual environments?
- Ready to run the code right now on your Windows, macOS, or Linux systems?
Then join PyImageSearch University today!
Gain access to Jupyter Notebooks for this tutorial and other PyImageSearch guides that are pre-configured to run on Google Colab’s ecosystem right in your web browser! No installation required.
And best of all, these Jupyter Notebooks will run on Windows, macOS, and Linux!
Project structure
Before we can learn how to apply face detection with OpenCV’s Haar cascades, let’s first review our project directory structure.
Start by accessing the “Downloads” section of this tutorial to retrieve the source code and example images:
$ tree . --dirsfirst
.
├── images
│   ├── adrian_01.png
│   ├── adrian_02.png
│   └── messi.png
├── haar_face_detector.py
├── haarcascade_frontalface_default.xml
└── video_face_detector.py

1 directory, 6 files
We have two Python scripts to review today:
haar_face_detector.py: Applies Haar cascade face detection to input images.video_face_detector.py: Performs real-time face detection with Haar cascades.
The haarcascade_frontalface_default.xml file is our pre-trained face detector, provided by the developers and maintainers of the OpenCV library.
The images directory then contains example images where we’ll apply Haar cascades.
Implementing face detection with OpenCV and Haar Cascades
Let’s get started implementing face detection with OpenCV and Haar cascades.
Open the haar_face_detector.py file in your project directory structure, and let’s get to work:
# import the necessary packages
import argparse
import imutils
import cv2

# construct the argument parser and parse the arguments
ap = argparse.ArgumentParser()
ap.add_argument("-i", "--image", type=str, required=True,
	help="path to input image")
ap.add_argument("-c", "--cascade", type=str,
	default="haarcascade_frontalface_default.xml",
	help="path to haar cascade face detector")
args = vars(ap.parse_args())
Lines 2-4 import our required Python packages. We’ll need argparse for command line argument parsing, imutils for OpenCV convenience functions, and cv2 for our OpenCV bindings.
Lines 7-13 parse our required command line arguments, including:
--image: The path to the input image where we want to apply Haar cascade face detection.--cascade: The path to the pre-trained Haar cascade detector residing on disk.
With our command line arguments parsed, we can load our Haar cascade from disk:
# load the haar cascade face detector from
print("[INFO] loading face detector...")
detector = cv2.CascadeClassifier(args["cascade"])

# load the input image from disk, resize it, and convert it to
# grayscale
image = cv2.imread(args["image"])
image = imutils.resize(image, width=500)
gray = cv2.cvtColor(image, cv2.COLOR_BGR2GRAY)
A call to cv2.CascadeClassifier on Line 17 loads our face detector from disk.
We then load our input image, resize it, and convert it to grayscale (we apply Haar cascades to grayscale images).
The final step is detection and annotation:
# detect faces in the input image using the haar cascade face
# detector
print("[INFO] performing face detection...")
rects = detector.detectMultiScale(gray, scaleFactor=1.05,
	minNeighbors=5, minSize=(30, 30),
	flags=cv2.CASCADE_SCALE_IMAGE)
print("[INFO] {} faces detected...".format(len(rects)))

# loop over the bounding boxes
for (x, y, w, h) in rects:
	# draw the face bounding box on the image
	cv2.rectangle(image, (x, y), (x + w, y + h), (0, 255, 0), 2)

# show the output image
cv2.imshow("Image", image)
cv2.waitKey(0)
Lines 28-30 then detect the actual faces in our input image, returning a list of bounding boxes, or simply the starting and ending (x, y)-coordinates where the faces are in each image.
Let’s take a look at what each of these arguments means:
scaleFactor: How much the image size is reduced at each image scale. This value is used to create the scale pyramid. To detect faces at multiple scales in the image (some faces may be closer to the foreground, and thus be larger, other faces may be smaller and in the background, thus the usage of varying scales). A value of1.05indicates that we are reducing the size of the image by 5% at each level in the pyramid.minNeighbors: How many neighbors each window should have for the area in the window to be considered a face. The cascade classifier will detect multiple windows around a face. This parameter controls how many rectangles (neighbors) need to be detected for the window to be labeled a face.minSize: A tuple of width and height (in pixels) indicating the window’s minimum size. Bounding boxes smaller than this size are ignored. It is a good idea to start with(30, 30)and fine-tune from there.
Finally, given the list of bounding boxes, we loop over them individually and draw the bounding box around the face on Lines 34-36.
Haar cascade face detection results
Let’s put our Haar cascade face detector to the test!
Start by accessing the “Downloads” section of this tutorial to retrieve the source code, example images, and pre-trained Haar cascade face detector.
From there, you can open a shell and execute the following command:
$ python haar_face_detector.py --image images/messi.png
[INFO] loading face detector...
[INFO] performing face detection...
[INFO] 2 faces detected...
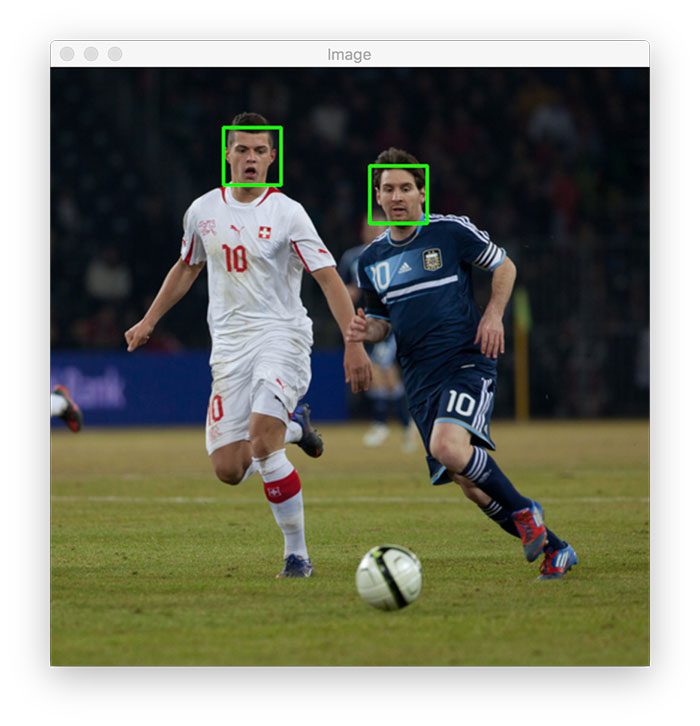
As Figure 2 shows, we’ve been able to detect both faces in the input image successfully.
Let’s try another image:
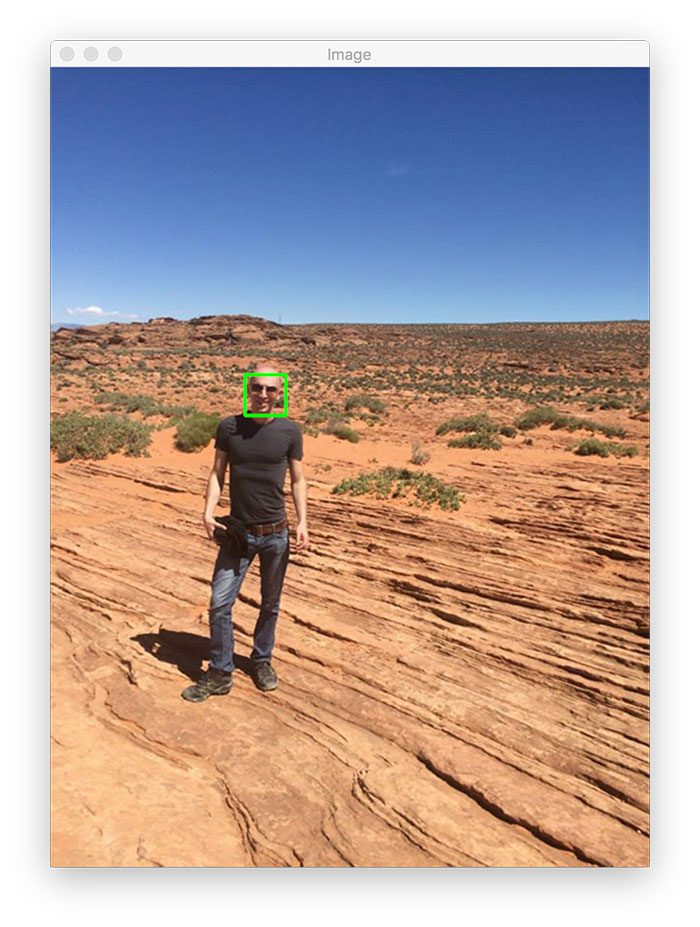
$ python haar_face_detector.py --image images/adrian_01.png
[INFO] loading face detector...
[INFO] performing face detection...
[INFO] 1 faces detected...
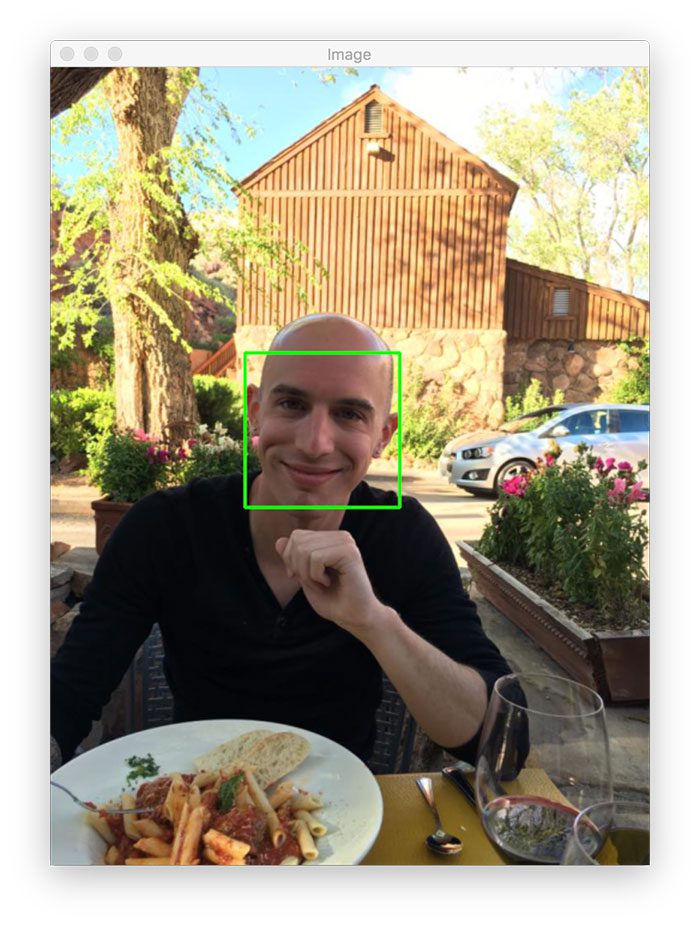
Sure enough, my face has been detected.
The following image poses a bit of a problem, though, and demonstrates one of the largest limitations of Haar cascades, namely, false-positive detections:
$ python haar_face_detector.py --image images/adrian_02.png
[INFO] loading face detector...
[INFO] performing face detection...
[INFO] 2 faces detected...
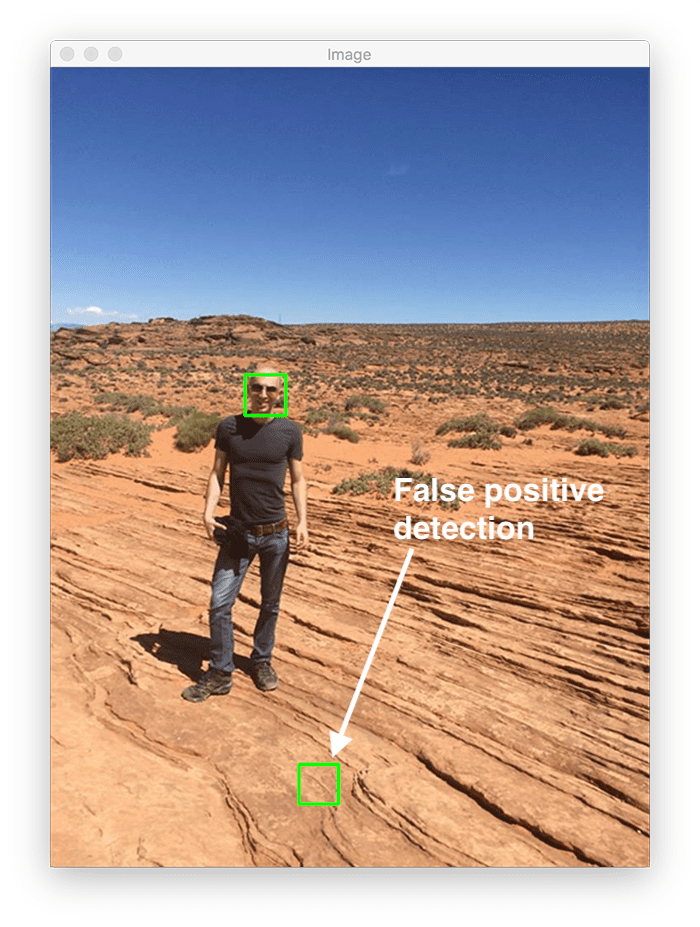
While you can see that my face was correctly detected, we also have a false-positive detection toward the bottom of the image.
Haar cascades tend to be very sensitive to your choice in detectMultiScale parameters. The scaleFactor and minNeighbors being the ones you have to tune most often.
When you end up with false-positive detections (or no face is detected at all), you should go back to your detectMultiScale function and attempt to tune the parameters by trial and error.
For example, our original call to detectMultiScale looks like this:
rects = detector.detectMultiScale(gray, scaleFactor=1.05,
	minNeighbors=5, minSize=(30, 30),
	flags=cv2.CASCADE_SCALE_IMAGE)
Through experimentation, I found that I could still detect my face while removing the false-positive by updating the minNeighbors from 5 to 7:
rects = detector.detectMultiScale(gray, scaleFactor=1.05,
	minNeighbors=7, minSize=(30, 30),
	flags=cv2.CASCADE_SCALE_IMAGE)
After doing that, we obtain the correct results:
$ python haar_face_detector.py --image images/adrian_02.png
[INFO] loading face detector...
[INFO] performing face detection...
[INFO] 1 faces detected...
This update worked because the minNeighbors parameter is designed to help control false-positive detections.
When applying face detection, Haar cascades are sliding a window from left-to-right and top-to-bottom across the image, computing integral images along the way.
When a Haar cascade thinks a face is in a region, it will return a higher confidence score. If there are enough high confidence scores in a given area, then the Haar cascade will report a positive detection.
By increasing minNeighbors we can require that Haar cascades find more neighbors, thus removing the false-positive detection we saw in Figure 4.
Again, the above example highlights the primary limitation of Haar cascades. While they are fast, you pay the price via:
- False-positive detections
- Less accuracy (as opposed to HOG + Linear SVM and deep learning-based face detectors)
- Manual parameter tuning
That said, in resource-constrained environments, you just cannot beat the speed of Haar cascade face detection.
Implementing real-time face detection with Haar cascades
Our previous example demonstrated how to apply face detection with Haar cascades to single images.
Let’s now learn how to perform face detection in real-time video streams:
# import the necessary packages
from imutils.video import VideoStream
import argparse
import imutils
import time
import cv2
Lines 2-6 import our required Python packages. The VideoStream class allows us to access our webcam.
We have only a single command line argument to parse:
# construct the argument parser and parse the arguments
ap = argparse.ArgumentParser()
ap.add_argument("-c", "--cascade", type=str,
	default="haarcascade_frontalface_default.xml",
	help="path to haar cascade face detector")
args = vars(ap.parse_args())
The --cascade argument points to our pre-trained Haar cascade face detector residing on disk.
We then load the face detector and initialize our video stream:
# load the haar cascade face detector from
print("[INFO] loading face detector...")
detector = cv2.CascadeClassifier(args["cascade"])

# initialize the video stream and allow the camera sensor to warm up
print("[INFO] starting video stream...")
vs = VideoStream(src=0).start()
time.sleep(2.0)
Let’s start reading frames from the video stream:
# loop over the frames from the video stream
while True:
	# grab the frame from the video stream, resize it, and convert it
	# to grayscale
	frame = vs.read()
	frame = imutils.resize(frame, width=500)
	gray = cv2.cvtColor(frame, cv2.COLOR_BGR2GRAY)

	# perform face detection
	rects = detector.detectMultiScale(gray, scaleFactor=1.05,
		minNeighbors=5, minSize=(30, 30),
		flags=cv2.CASCADE_SCALE_IMAGE)
Inside our while loop, we:
- Read the next
framefrom the camera - Resize it to have a width of 500 pixels (smaller frames are faster to process)
- Convert the frame to grayscale
Lines 33-35 then perform face detection using our Haar cascade.
The final step is to draw the bounding boxes of the detected faces on our frame:
	# loop over the bounding boxes
	for (x, y, w, h) in rects:
		# draw the face bounding box on the image
		cv2.rectangle(frame, (x, y), (x + w, y + h), (0, 255, 0), 2)

	# show the output frame
	cv2.imshow("Frame", frame)
	key = cv2.waitKey(1) & 0xFF

	# if the `q` key was pressed, break from the loop
	if key == ord("q"):
		break

# do a bit of cleanup
cv2.destroyAllWindows()
vs.stop()
Line 38 loops over the rects list, containing the:
- Starting
xcoordinate of the face - Starting
ycoordinate of the face - Width (
w) of the bounding box - Height (
h) of the bounding box
We then display the output frame on our screen.
Real-time Haar cascade face detection results
We are now ready to apply face detection in real-time with OpenCV!
Be sure to access the “Downloads” section of this tutorial to retrieve the source code and pre-trained Haar cascade.
From there, open a shell and execute the following command:
$ python video_face_detector.py
[INFO] loading face detector...
[INFO] starting video stream...
As you can see, our Haar cascade face detector is running in real-time without an issue!
If you need to obtain real-time face detection, especially on embedded devices, then consider utilizing Haar cascade face detectors.
Yes, they are not as accurate as more modern face detectors, and yes, they are prone to false-positive detections as well, but the benefit is that you’ll gain tremendous speed, and you’ll require less computational power.
Otherwise, if you’re on a laptop/desktop, or you can use a coprocessor such as the Movidius NCS or Google Coral USB Accelerator, then use deep learning-based face detection. You’ll obtain far higher accuracy and still be able to apply face detection in real-time.
What’s next?

Would you enjoy learning how to successfully and confidently apply OpenCV to your projects?
Are you worried that configuring your development environment for Computer Vision, Deep Learning, and OpenCV will be too challenging, resulting in confusing, hard to debug error messages?
Concerned that you’ll get lost sifting through endless tutorials and video guides as you struggle to master Computer Vision?
No problem, because I’ve got you covered. PyImageSearch University is your chance to learn from me at your own pace.
You’ll find everything you need to master the basics (like we did together in this tutorial) and move on to advanced concepts.
Don’t worry about your operating system or development environment. I’ve got you covered with pre-configured Jupyter Notebooks in Google Colab for every tutorial on PyImageSearch, including Jupyter Notebooks for our new weekly tutorials as well!
Best of all, these Jupyter Notebooks will run on your machine, regardless of whether you are using Windows, macOS, or Linux! Irrespective of the operating system used, you will still be able to follow along and run the code in every lesson (all inside the convenience of your web browser).
Additionally, you can massively accelerate your progress by watching our video lessons accompanying each post. Every lesson at PyImageSearch University includes a detailed, step-by-step video guide.
You may feel that learning Computer Vision, Deep Learning, and OpenCV is too hard. Don’t worry; I’ll guide you gradually through each lecture and topic, so we build a solid foundation, and you grasp all the content.
When you think about it, PyImageSearch University is almost an unfair advantage compared to self-guided learning. You’ll learn more efficiently and master Computer Vision faster.
Oh, and did I mention you’ll also receive Certificates of Completion as you progress through each course at PyImageSearch University?
I’m sure PyImageSearch University will help you master OpenCV drawing and all the other computer vision skills you will need. Why not join today?
Summary
In this tutorial, you learned how to perform face detection with OpenCV and Haar cascades.
While Haar cascades are significantly less accurate than their HOG + Linear SVM, SSD, YOLO, etc., counterparts, they are very fast and lightweight. This makes them suitable for use on embedded devices, particularly in situations where coprocessors like the Movidius NCS and Google Coral USB Accelerator are unavailable.
Next week we’ll discuss other OpenCV Haar cascades, including eye and mouth detectors.
To download the source code to this post (and be notified when future tutorials are published here on PyImageSearch), simply enter your email address in the form below!

Download the Source Code and FREE 17-page Resource Guide
Enter your email address below to get a .zip of the code and a FREE 17-page Resource Guide on Computer Vision, OpenCV, and Deep Learning. Inside you'll find my hand-picked tutorials, books, courses, and libraries to help you master CV and DL!
The post OpenCV Face detection with Haar cascades appeared first on PyImageSearch.