In this tutorial, you will learn how to blur and anonymize faces using OpenCV and Python.
Today’s blog post is inspired by an email I received last week from PyImageSearch reader, Li Wei:
Hi Adrian, I’m working on a research project for my university.
I’m in charge of creating the dataset but my professor has asked me to “anonymize” each image by detecting faces and then blurring them to ensure privacy is protected and that no face can be recognized (apparently this is a requirement at my institution before we publicly distribute the dataset).
Do you have any tutorials on face anonymization? How can I blur faces using OpenCV?
Thanks,
Li Wei
Li asks a great question — we often utilize face detection in our projects, typically as the first step in a face recognition pipeline.
But what if we wanted to do the “opposite” of face recognition? What if we instead wanted to anonymize the face by blurring it, thereby making it impossible to identify the face?
Practical applications of face blurring and anonymization include:
- Privacy and identity protection in public/private areas
- Protecting children online (i.e., blur faces of minors in uploaded photos)
- Photo journalism and news reporting (e.g., blur faces of people who did not sign a waiver form)
- Dataset curation and distribution (e.g., anonymize individuals in dataset)
- … and more!
To learn how to blur and anonymize faces with OpenCV and Python, just keep reading!
Blur and anonymize faces with OpenCV and Python
In the first part of this tutorial, we’ll briefly discuss what face blurring is and how we can use OpenCV to anonymize faces in images and video streams.
From there, we’ll discuss the four-step method to blur faces with OpenCV and Python.
We’ll then review our project structure and implement two methods for face blurring with OpenCV:
- Using a Gaussian blur to anonymize faces in images and video streams
- Applying a “pixelated blur” effect to anonymize faces in images and video
Given our two implementations, we’ll create Python driver scripts to apply these face blurring methods to both images and video.
We’ll then review the results of our face blurring and anonymization methods.
What is face blurring, and how can it be used for face anonymization?
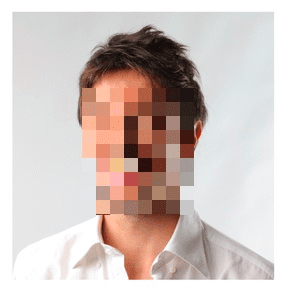
Face blurring is a computer vision method used to anonymize faces in images and video.
An example of face blurring and anonymization can be seen in Figure 1 above — notice how the face is blurred, and the identity of the person is indiscernible.
We use face blurring to help protect the identity of a person in an image.
4 Steps to perform face blurring and anonymization
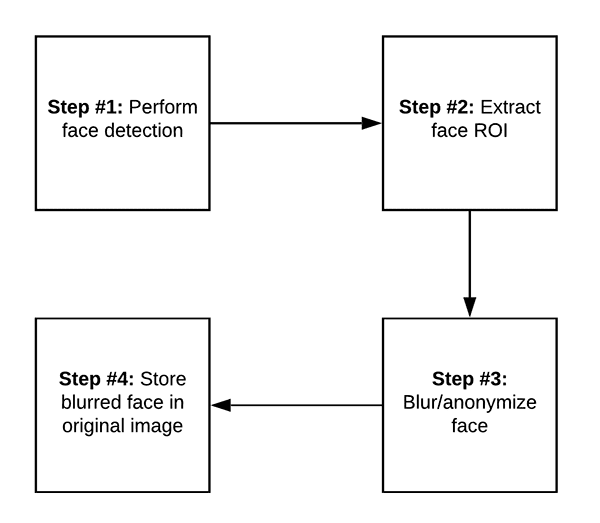
Applying face blurring with OpenCV and computer vision is a four-step process.
Step #1 is to perform face detection.
Any face detector can be used here, provided that it can produce the bounding box coordinates of a face in an image or video stream.
Typical face detectors that you may use include
- Haar cascades
- HOG + Linear SVM
- Deep learning-based face detectors.
You can refer to this face detection guide for more information on how to detect faces in an image.
Once you have detected a face, Step #2 is to extract the Region of Interest (ROI):

Your face detector will give you the bounding box (x, y)-coordinates of a face in an image.
These coordinates typically represent:
- The starting x-coordinate of the face bounding box
- The ending x-coordinate of the face
- The starting y-coordinate of the face location
- The ending y-coordinate of the face
You can then use this information to extract the face ROI itself, as shown in Figure 4 above.
Given the face ROI, Step #3 is to actually blur/anonymize the face:
Typically, you’ll apply a Gaussian blur to anonymize the face. You may also apply methods to pixelate the face if you find the end result more aesthetically pleasing.
Exactly how you “blur” the image is up to you — the important part is that the face is anonymized.
With the face blurred and anonymized, Step #4 is to store the blurred face back in the original image:

Using the original (x, y)-coordinates from the face detection (i.e., Step #2), we can take the blurred/anonymized face and then store it back in the original image (if you’re utilizing OpenCV and Python, this step is performed using NumPy array slicing).
The face in the original image has been blurred and anonymized — at this point the face anonymization pipeline is complete.
Let’s see how we can implement face blurring and anonymization with OpenCV in the remainder of this tutorial.
How to install OpenCV for face blurring
To follow my face blurring tutorial, you will need OpenCV installed on your system. I recommend installing OpenCV 4 using one of my tutorials:
- pip install opencv — the easiest and fastest method
- How to install OpenCV 4 on Ubuntu
- Install OpenCV 4 on macOS
I recommend the pip installation method for 99% of readers — it’s also how I typically install OpenCV for quick projects like face blurring.
If you think you might need the full install of OpenCV with patented algorithms, you should consider either the second or third bullet depending on your operating system. Both of these guides require compiling from source, which takes considerably longer as well, but can (1) give you the full OpenCV install and (2) allow you to optimize OpenCV for your operating system and system architecture.
Once you have OpenCV installed, you can move on with the rest of the tutorial.
Note: I don’t support the Windows OS here at PyImageSearch. See my FAQ page.
Project structure
Go ahead and use the “Downloads” section of this tutorial to download the source code, example images, and pre-trained face detector model. From there, let’s inspect the contents:
$ tree --dirsfirst
.
├── examples
│   ├── adrian.jpg
│   ├── chris_evans.png
│   ├── robert_downey_jr.png
│   ├── scarlett_johansson.png
│   └── tom_king.jpg
├── face_detector
│   ├── deploy.prototxt
│   └── res10_300x300_ssd_iter_140000.caffemodel
├── pyimagesearch
│   ├── __init__.py
│   └── face_blurring.py
├── blur_face.py
└── blur_face_video.py

3 directories, 11 files
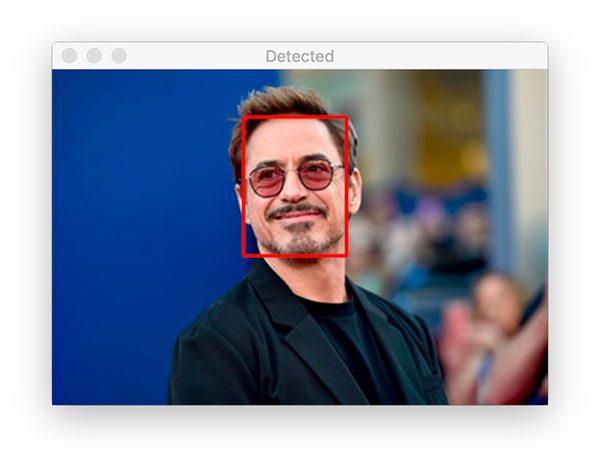
The first step of face blurring is perform face detection to localize faces in a image/frame. We’ll use a deep learning-based Caffe model as shown in the face_detector/ directory.
Our two Python driver scripts, blur_face.py and blur_face_video.py, first detect faces and then perform face blurring in images and video streams. We will step through both scripts so that you can adapt them for your own projects.
First, we’ll review face blurring helper functions inside the face_blurring.py file.
Blurring faces with a Gaussian blur and OpenCV

We’ll be implementing two helper functions to aid us in face blurring and anonymity:
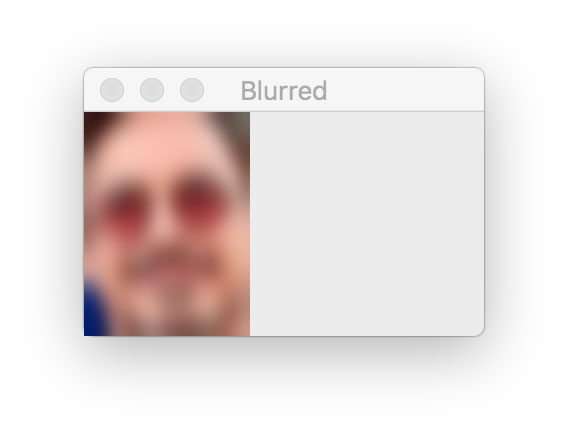
anonymize_face_simple: Performs a simple Gaussian blur on the face ROI (such as in Figure 7 above)anonymize_face_pixelate: Creates a pixelated blur-like effect (which we’ll cover in the next section)
Let’s take a look at the implementation of anonymize_face_simple — open up the face_blurring.py file in the pyimagesearch module, and insert the following code:
# import the necessary packages
import numpy as np
import cv2

def anonymize_face_simple(image, factor=3.0):
	# automatically determine the size of the blurring kernel based
	# on the spatial dimensions of the input image
	(h, w) = image.shape[:2]
	kW = int(w / factor)
	kH = int(h / factor)

	# ensure the width of the kernel is odd
	if kW % 2 == 0:
		kW -= 1

	# ensure the height of the kernel is odd
	if kH % 2 == 0:
		kH -= 1

	# apply a Gaussian blur to the input image using our computed
	# kernel size
	return cv2.GaussianBlur(image, (kW, kH), 0)
Our face blurring utilities require NumPy and OpenCV imports as shown on Lines 2 and 3.
Beginning on Line 5, we define our anonymize_face_simple function, which accepts an input face image and blurring kernel scale factor.
Lines 8-18 derive the blurring kernel’s width and height as a function of the input image dimensions:
- The larger the kernel size, the more blurred the output face will be
- The smaller the kernel size, the less blurred the output face will be
Increasing the factor will therefore increase the amount of blur applied to the face.
When applying a blur, our kernel dimensions must be odd integers such that the kernel can be placed at a central (x, y)-coordinate of the input image (see my tutorial on convolutions with OpenCV for more information on why kernels must be odd integers).
Once we have our kernel dimensions, kW and kH, Line 22 applies a Gaussian blur kernel to the face image and returns the blurred face to the calling function.
In the next section, we’ll cover an alternative anonymity method: pixelated blurring.
Creating a pixelated face blur with OpenCV
The second method we’ll be implementing for face blurring and anonymization creates a pixelated blur-like effect — an example of such a method can be seen in Figure 8.
Notice how we have pixelated the image and made the identity of the person indiscernible.
This pixelated type of face blurring is typically what most people think of when they hear “face blurring” — it’s the same type of face blurring you’ll see on the evening news, mainly because it’s a bit more “aesthetically pleasing” to the eye than a Gaussian blur (which is indeed a bit “jarring”).
Let’s learn how to implement this pixelated face blurring method with OpenCV — open up the face_blurring.py file (the same file we used in the previous section), and append the following code:
def anonymize_face_pixelate(image, blocks=3):
	# divide the input image into NxN blocks
	(h, w) = image.shape[:2]
	xSteps = np.linspace(0, w, blocks + 1, dtype="int")
	ySteps = np.linspace(0, h, blocks + 1, dtype="int")

	# loop over the blocks in both the x and y direction
	for i in range(1, len(ySteps)):
		for j in range(1, len(xSteps)):
			# compute the starting and ending (x, y)-coordinates
			# for the current block
			startX = xSteps[j - 1]
			startY = ySteps[i - 1]
			endX = xSteps[j]
			endY = ySteps[i]

			# extract the ROI using NumPy array slicing, compute the
			# mean of the ROI, and then draw a rectangle with the
			# mean RGB values over the ROI in the original image
			roi = image[startY:endY, startX:endX]
			(B, G, R) = [int(x) for x in cv2.mean(roi)[:3]]
			cv2.rectangle(image, (startX, startY), (endX, endY),
				(B, G, R), -1)

	# return the pixelated blurred image
	return image
Beginning on Line 24, we define our anonymize_face_pixilate function and parameters. This function accepts a face image and the number of pixel blocks.
Lines 26-28 grab our face image dimensions and divide it into MxN blocks.
From there, we proceed to loop over the blocks in both the x and y directions (Lines 31 and 32).
In order to compute the starting and ending bounding coordinates for the current block, we use our step indices, i and j (Lines 35-38).
Subsequently, we extract the current block ROI and compute the mean RGB pixel intensities for the ROI (Lines 43 and 44).
We then annotate a rectangle on the block using the computed mean RGB values, thereby creating the “pixelated”-like effect (Lines 45 and 46).
Note: To learn more about OpenCV drawing functions, be sure to spend some time on my OpenCV Tutorial.
Finally, Line 49 returns our pixelated face image to the caller.
Implementing face blurring in images with OpenCV
Now that we have our two face blurring methods implemented, let’s learn how we can apply them to blur a face in an image using OpenCV and Python.
Open up the blur_face.py file in your project structure, and insert the following code:
# import the necessary packages
from pyimagesearch.face_blurring import anonymize_face_pixelate
from pyimagesearch.face_blurring import anonymize_face_simple
import numpy as np
import argparse
import cv2
import os

# construct the argument parse and parse the arguments
ap = argparse.ArgumentParser()
ap.add_argument("-i", "--image", required=True,
	help="path to input image")
ap.add_argument("-f", "--face", required=True,
	help="path to face detector model directory")
ap.add_argument("-m", "--method", type=str, default="simple",
	choices=["simple", "pixelated"],
	help="face blurring/anonymizing method")
ap.add_argument("-b", "--blocks", type=int, default=20,
	help="# of blocks for the pixelated blurring method")
ap.add_argument("-c", "--confidence", type=float, default=0.5,
	help="minimum probability to filter weak detections")
args = vars(ap.parse_args())
Our most notable imports are both our face pixelation and face blurring functions from the previous two sections (Lines 2 and 3).
Our script accepts five command line arguments, the first two of which are required:
--image: The path to your input image containing faces--face: The path to your face detector model directory--method: Either thesimpleblurring orpixelatedmethods can be chosen with this flag. The simple method is the default--blocks: For pixelated face anonymity, you must provide the number of blocks you want to use, or you can keep the default of20--confidence: The minimum probability to filter weak face detections is set to 50% by default
Given our command line arguments, we’re now ready to perform face detection:
# load our serialized face detector model from disk
print("[INFO] loading face detector model...")
prototxtPath = os.path.sep.join([args["face"], "deploy.prototxt"])
weightsPath = os.path.sep.join([args["face"],
	"res10_300x300_ssd_iter_140000.caffemodel"])
net = cv2.dnn.readNet(prototxtPath, weightsPath)

# load the input image from disk, clone it, and grab the image spatial
# dimensions
image = cv2.imread(args["image"])
orig = image.copy()
(h, w) = image.shape[:2]

# construct a blob from the image
blob = cv2.dnn.blobFromImage(image, 1.0, (300, 300),
	(104.0, 177.0, 123.0))

# pass the blob through the network and obtain the face detections
print("[INFO] computing face detections...")
net.setInput(blob)
detections = net.forward()
First, we load the Caffe-based face detector model (Lines 26-29).
We then load and preprocess our input --image, generating a blob for inference (Lines 33-39). Read my How OpenCV’s blobFromImage works tutorial to learn the “why” and “how” behind the function call on Lines 38 and 39.
Deep learning face detection inference (Step #1) takes place on Lines 43 and 44.
Next, we’ll begin looping over the detections:
# loop over the detections
for i in range(0, detections.shape[2]):
	# extract the confidence (i.e., probability) associated with the
	# detection
	confidence = detections[0, 0, i, 2]

	# filter out weak detections by ensuring the confidence is greater
	# than the minimum confidence
	if confidence > args["confidence"]:
		# compute the (x, y)-coordinates of the bounding box for the
		# object
		box = detections[0, 0, i, 3:7] * np.array([w, h, w, h])
		(startX, startY, endX, endY) = box.astype("int")

		# extract the face ROI
		face = image[startY:endY, startX:endX]
Here, we loop over detections and check the confidence, ensuring it meets the minimum threshold (Lines 47-54).
Assuming so, we then extract the face ROI (Step #2) via Lines 57-61.
We’ll then anonymize the face (Step #3):
		# check to see if we are applying the "simple" face blurring
		# method
		if args["method"] == "simple":
			face = anonymize_face_simple(face, factor=3.0)

		# otherwise, we must be applying the "pixelated" face
		# anonymization method
		else:
			face = anonymize_face_pixelate(face,
				blocks=args["blocks"])

		# store the blurred face in the output image
		image[startY:endY, startX:endX] = face
Depending on the --method, we’ll perform simple blurring or pixelation to anonymize the face (Lines 65-72).
Step #4 entails overwriting the original face ROI in the image with our anonymized face ROI (Line 75).
Steps #2-#4 are then repeated for all faces in the input --image until we’re ready to display the result:
# display the original image and the output image with the blurred
# face(s) side by side
output = np.hstack([orig, image])
cv2.imshow("Output", output)
cv2.waitKey(0)
To wrap up, the original and altered images are displayed side by side until a key is pressed (Lines 79-81).
Face blurring and anonymizing in images results
Let’s now put our face blurring and anonymization methods to work.
Go ahead and use the “Downloads” section of this tutorial to download the source code, example images, and pre-trained OpenCV face detector.
From there, open up a terminal, and execute the following command:
$ python blur_face.py --image examples/adrian.jpg --face face_detector
[INFO] loading face detector model...
[INFO] computing face detections...
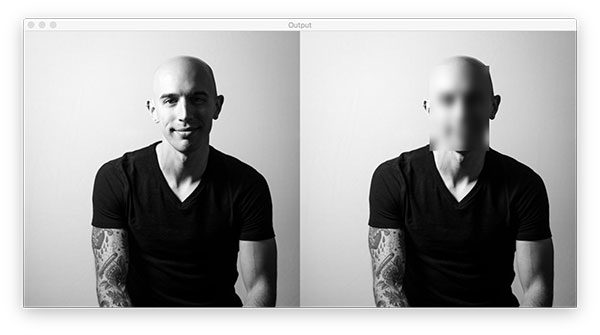
On the left, you can see the original input image (i.e., me), while the right shows that my face has been blurred using the Gaussian blurring method — without seeing the original image, you would have no idea it was me (other than the tattoos, I suppose).
Let’s try another image, this time applying the pixelated blurring technique:
$ python blur_face.py --image examples/tom_king.jpg --face face_detector --method pixelated
[INFO] loading face detector model...
[INFO] computing face detections...

On the left, we have the original input image of Tom King, one of my favorite comic writers.
Then, on the right, we have the output of the pixelated blurring method — without seeing the original image, you would have no idea whose face was in the image.
Implementing face blurring in real-time video with OpenCV
Our previous example only handled blurring and anonymizing faces in images — but what if we wanted to apply face blurring and anonymization to real-time video streams?
Is that possible?
You bet it is!
Open up the blur_face_video.py file in your project structure, and let’s learn how to blur faces in real-time video with OpenCV:
# import the necessary packages
from pyimagesearch.face_blurring import anonymize_face_pixelate
from pyimagesearch.face_blurring import anonymize_face_simple
from imutils.video import VideoStream
import numpy as np
import argparse
import imutils
import time
import cv2
import os

# construct the argument parse and parse the arguments
ap = argparse.ArgumentParser()
ap.add_argument("-f", "--face", required=True,
	help="path to face detector model directory")
ap.add_argument("-m", "--method", type=str, default="simple",
	choices=["simple", "pixelated"],
	help="face blurring/anonymizing method")
ap.add_argument("-b", "--blocks", type=int, default=20,
	help="# of blocks for the pixelated blurring method")
ap.add_argument("-c", "--confidence", type=float, default=0.5,
	help="minimum probability to filter weak detections")
args = vars(ap.parse_args())
We begin with our imports on Lines 2-10. For face recognition in video, we’ll use the VideoStream API in my imutils package (Line 4).
Our command line arguments are the same as previously (Lines 13-23).
We’ll then load our face detector and initialize our video stream:
# load our serialized face detector model from disk
print("[INFO] loading face detector model...")
prototxtPath = os.path.sep.join([args["face"], "deploy.prototxt"])
weightsPath = os.path.sep.join([args["face"],
	"res10_300x300_ssd_iter_140000.caffemodel"])
net = cv2.dnn.readNet(prototxtPath, weightsPath)

# initialize the video stream and allow the camera sensor to warm up
print("[INFO] starting video stream...")
vs = VideoStream(src=0).start()
time.sleep(2.0)
Our video stream accesses our computer’s webcam (Line 34).
We’ll then proceed to loop over frames in the stream and perform Step #1 — face detection:
# loop over the frames from the video stream
while True:
	# grab the frame from the threaded video stream and resize it
	# to have a maximum width of 400 pixels
	frame = vs.read()
	frame = imutils.resize(frame, width=400)

	# grab the dimensions of the frame and then construct a blob
	# from it
	(h, w) = frame.shape[:2]
	blob = cv2.dnn.blobFromImage(frame, 1.0, (300, 300),
		(104.0, 177.0, 123.0))

	# pass the blob through the network and obtain the face detections
	net.setInput(blob)
	detections = net.forward()
Once faces are detected, we’ll ensure they meet the minimum confidence threshold:
	# loop over the detections
	for i in range(0, detections.shape[2]):
		# extract the confidence (i.e., probability) associated with
		# the detection
		confidence = detections[0, 0, i, 2]

		# filter out weak detections by ensuring the confidence is
		# greater than the minimum confidence
		if confidence > args["confidence"]:
			# compute the (x, y)-coordinates of the bounding box for
			# the object
			box = detections[0, 0, i, 3:7] * np.array([w, h, w, h])
			(startX, startY, endX, endY) = box.astype("int")

			# extract the face ROI
			face = frame[startY:endY, startX:endX]

			# check to see if we are applying the "simple" face
			# blurring method
			if args["method"] == "simple":
				face = anonymize_face_simple(face, factor=3.0)

			# otherwise, we must be applying the "pixelated" face
			# anonymization method
			else:
				face = anonymize_face_pixelate(face,
					blocks=args["blocks"])

			# store the blurred face in the output image
			frame[startY:endY, startX:endX] = face
Looping over high confidence detections, we extract the face ROI (Step #2) on Lines 55-69.
To accomplish Step #3, we apply our chosen anonymity --method via Lines 73-80.
And finally, for Step #4, we replace the anonymous face in our camera’s frame (Line 83).
To close out our face blurring loop, we display the frame (with blurred out faces) on the screen:
	# show the output frame
	cv2.imshow("Frame", frame)
	key = cv2.waitKey(1) & 0xFF

	# if the `q` key was pressed, break from the loop
	if key == ord("q"):
		break

# do a bit of cleanup
cv2.destroyAllWindows()
vs.stop()
If the q key is pressed, we break out of the face blurring loop and perform cleanup.
Great job — in the next section, we’ll analyze results!
Real-time face blurring OpenCV results
We are now ready to apply face blurring with OpenCV to real-time video streams.
Start by using the “Downloads” section of this tutorial to download the source code and pre-trained OpenCV face detector.
You can then launch the blur_face_video.py using the following command:
$ python blur_face_video.py --face face_detector --method simple
[INFO] loading face detector model...
[INFO] starting video stream...
Notice how my face is blurred in the video stream using the Gaussian blurring method.
We can apply the pixelated face blurring method by supplying the --method pixelated flag:
$ python blur_face_video.py --face face_detector --method pixelated
[INFO] loading face detector model...
[INFO] starting video stream...
Again, my face is anonymized/blurred using OpenCV, but using the more “aesthetically pleasing” pixelated method.
Handling missed face detections and “detection flickering”
The face blurring method we’re applying here assumes that a face can be detected in each and every frame of our input video stream.
But what happens if our face detector misses a detection, such as in video at the top of this section?
If our face detector misses a face detection, then the face cannot be blurred, thereby defeating the purpose of face blurring and anonymization.
So what do we do in those situations?
Typically, the easiest method is to take the last known location of the face (i.e., the previous detection location) and then blur that region.
Faces don’t tend to move very quickly, so blurring the last known location will help ensure the face is anonymized even when your face detector misses the face.
A more advanced option is to use dedicated object trackers similar to what we do in our people/footfall counter guide.
Using this method you would:
- Detect faces in the video stream
- Create an object tracker for each face
- Use the object tracker and face detector to correlate the position of the face
- If the face detector misses a detection, then fall back on the tracker to provide the location of the face
This method is more computationally complex than the simple “last known location,” but it’s also far more robust.
I’ll leave implementing those methods up to you (although I am tempted to cover them in a future tutorial, as they are pretty fun methods to implement).
Are you interested in learning more about Computer Vision, OpenCV, and Face Applications?

If so, you’ll want to take a look at the PyImageSearch Gurus course.
Inside the course you’ll find:
- An actionable, real-world course on Computer Vision, Deep Learning, and OpenCV. Each lesson in the course is taught in the same hands-on, easy-to-understand PyImageSearch style that you know and love
- The most comprehensive computer vision education online today. The PyImageSearch Gurus course covers 13 modules broken out into 168 lessons, with over 2,161 pages of content. You won’t find a more detailed computer vision course anywhere else online; I guarantee it
- A community of like-minded developers, researchers, and students just like you, who are eager to learn computer vision and level-up their skills
- Access to private course forums that I personally participate in nearly every day. These forums are a great way to get expert advice, both from me as well as the more advanced students
If you’re interested in learning more, I’d love to send you (1) a PDF containing the course syllabus and (2) a set of sample lessons in the course:
Summary
In this tutorial, you learned how to blur and anonymize faces in both images and real-time video streams using OpenCV and Python.
Face blurring and anonymization is a four-step process:
- Step #1: Apply a face detector (i.e., Haar cascades, HOG + Linear SVM, deep learning-based face detectors) to detect the presence of a face in an image
- Step #2: Use the bounding box (x, y)-coordinates to extract the face ROI from the input image
- Step #3: Blur the face in the image, typically with a Gaussian blur or pixelated blur, thereby anonymizing the face and protecting the identity of the person in the image
- Step #4: Store the blurred/anonymized face back in the original image
We then implemented this entire pipeline using only OpenCV and Python.
I hope you’ve found this tutorial helpful!
To download the source code to this post (including the example images and pre-trained face detector), just enter your email address in the form below!

Download the Source Code and FREE 17-page Resource Guide
Enter your email address below to get a .zip of the code and a FREE 17-page Resource Guide on Computer Vision, OpenCV, and Deep Learning. Inside you’ll find my hand-picked tutorials, books, courses, and libraries to help you master CV and DL!
The post Blur and anonymize faces with OpenCV and Python appeared first on PyImageSearch.