In this tutorial, you will learn how to train a COVID-19 face mask detector with OpenCV, Keras/TensorFlow, and Deep Learning.
Last month, I authored a blog post on detecting COVID-19 in X-ray images using deep learning.
Readers really enjoyed learning from the timely, practical application of that tutorial, so today we are going to look at another COVID-related application of computer vision, this one on detecting face masks with OpenCV and Keras/TensorFlow.
I was inspired to author this tutorial after:
- Receiving numerous requests from PyImageSearch readers asking that I write such a blog post
- Seeing others implement their own solutions (my favorite being Prajna Bhandary’s, which we are going to build from today)
If deployed correctly, the COVID-19 mask detector we’re building here today could potentially be used to help ensure your safety and the safety of others (but I’ll leave that to the medical professionals to decide on, implement, and distribute in the wild).
To learn how to create a COVID-19 face mask detector with OpenCV, Keras/TensorFlow, and Deep Learning, just keep reading!
COVID-19: Face Mask Detector with OpenCV, Keras/TensorFlow, and Deep Learning
In this tutorial, we’ll discuss our two-phase COVID-19 face mask detector, detailing how our computer vision/deep learning pipeline will be implemented.
From there, we’ll review the dataset we’ll be using to train our custom face mask detector.
I’ll then show you how to implement a Python script to train a face mask detector on our dataset using Keras and TensorFlow.
We’ll use this Python script to train a face mask detector and review the results.
Given the trained COVID-19 face mask detector, we’ll proceed to implement two more additional Python scripts used to:
- Detect COVID-19 face masks in images
- Detect face masks in real-time video streams
We’ll wrap up the post by looking at the results of applying our face mask detector.
I’ll also provide some additional suggestions for further improvement.
Two-phase COVID-19 face mask detector
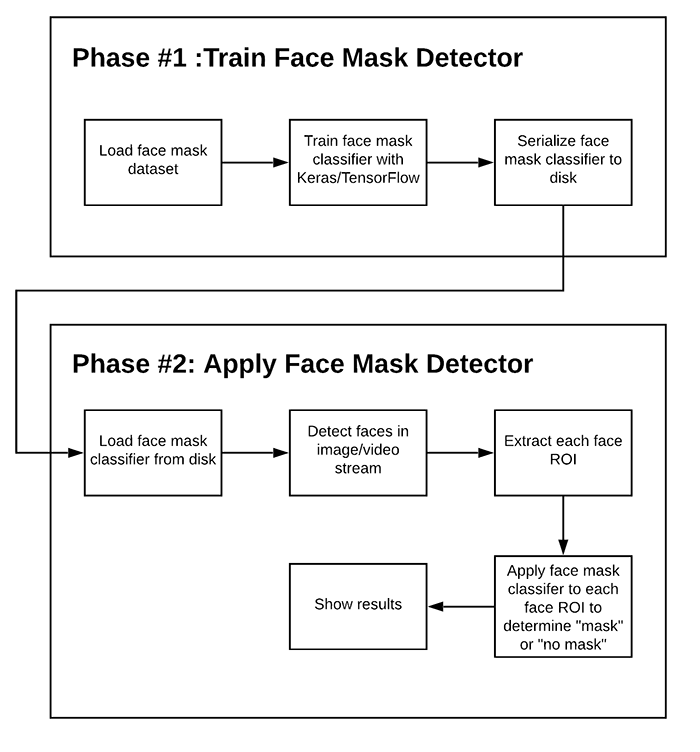
In order to train a custom face mask detector, we need to break our project into two distinct phases, each with its own respective sub-steps (as shown by Figure 1 above):
- Training: Here we’ll focus on loading our face mask detection dataset from disk, training a model (using Keras/TensorFlow) on this dataset, and then serializing the face mask detector to disk
- Deployment: Once the face mask detector is trained, we can then move on to loading the mask detector, performing face detection, and then classifying each face as
with_maskorwithout_mask
We’ll review each of these phases and associated subsets in detail in the remainder of this tutorial, but in the meantime, let’s take a look at the dataset we’ll be using to train our COVID-19 face mask detector.
Our COVID-19 face mask detection dataset
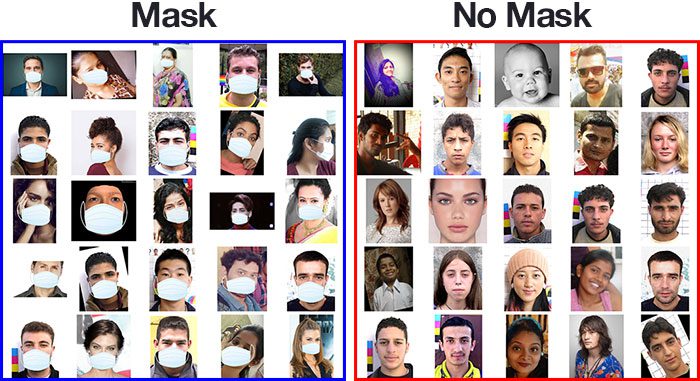
The dataset we’ll be using here today was created by PyImageSearch reader Prajna Bhandary.
This dataset consists of 1,376 images belonging to two classes:
with_mask: 690 imageswithout_mask
Our goal is to train a custom deep learning model to detect whether a person is or is not wearing a mask.
Note: For convenience, I have included the dataset created by Prajna in the “Downloads” section of this tutorial.
How was our face mask dataset created?
Prajna, like me, has been feeling down and depressed about the state of the world — thousands of people are dying each day, and for many of us, there is very little (if anything) we can do.
To help keep her spirts up, Prajna decided to distract herself by applying computer vision and deep learning to solve a real-world problem:
- Best case scenario — she could use her project to help others
- Worst case scenario — it gave her a much needed mental escape
Either way, it’s win-win!
As programmers, developers, and computer vision/deep learning practitioners, we can all take a page from Prajna’s book — let your skills become your distraction and your haven.
To create this dataset, Prajna had the ingenious solution of:
- Taking normal images of faces
- Then creating a custom computer vision Python script to add face masks to them, thereby creating an artificial (but still real-world applicable) dataset
This method is actually a lot easier than it sounds once you apply facial landmarks to the problem.
Facial landmarks allow us to automatically infer the location of facial structures, including:
- Eyes
- Eyebrows
- Nose
- Mouth
- Jawline
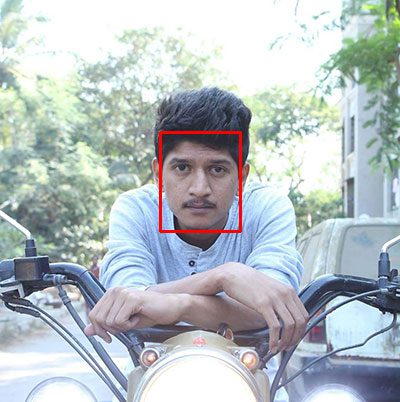
To use facial landmarks to build a dataset of faces wearing face masks, we need to first start with an image of a person not wearing a face mask:

From there, we apply face detection to compute the bounding box location of the face in the image:
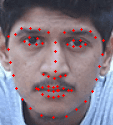
Once we know where in the image the face is, we can extract the face Region of Interest (ROI):

And from there, we apply facial landmarks, allowing us to localize the eyes, nose, mouth, etc.:
Next, we need an image of a mask (with a transparent background) such as the one below:

This mask will be automatically applied to the face by using the facial landmarks (namely the points along the chin and nose) to compute where the mask will be placed.
The mask is then resized and rotated, placing it on the face:
We can then repeat this process for all of our input images, thereby creating our artificial face mask dataset:

However, there is a caveat you should be aware of when using this method to artificially create a dataset!
If you use a set of images to create an artificial dataset of people wearing masks, you cannot “re-use” the images without masks in your training set — you still need to gather non-face mask images that were not used in the artificial generation process!
If you include the original images used to generate face mask samples as non-face mask samples, your model will become heavily biased and fail to generalize well. Avoid that at all costs by taking the time to gather new examples of faces without masks.
Covering how to use facial landmarks to apply a mask to a face is outside the scope of this tutorial, but if you want to learn more about it, I would suggest:
- Referring to Prajna’s GitHub repository
- Reading this tutorial on the PyImageSearch blog where I discuss how to use facial landmarks to automatically apply sunglasses to a face
The same principle from my sunglasses post applies to building an artificial face mask dataset — use the facial landmarks to infer the facial structures, rotate and resize the mask, and then apply it to the image.
Project structure
Once you grab the files from the “Downloads” section of this article, you’ll be presented with the following directory structure:
$ tree --dirsfirst --filelimit 10
.
├── dataset
│   ├── with_mask [690 entries]
│   └── without_mask [686 entries]
├── examples
│   ├── example_01.png
│   ├── example_02.png
│   └── example_03.png
├── face_detector
│   ├── deploy.prototxt
│   └── res10_300x300_ssd_iter_140000.caffemodel
├── detect_mask_image.py
├── detect_mask_video.py
├── mask_detector.model
├── plot.png
└── train_mask_detector.py

5 directories, 10 files
The dataset/ directory contains the data described in the “Our COVID-19 face mask detection dataset” section.
Three image examples/ are provided so that you can test the static image face mask detector.
We’ll be reviewing three Python scripts in this tutorial:
train_mask_detector.pymask_detector.model. A training historyplot.pngcontaining accuracy/loss curves is also produceddetect_mask_image.py: Performs face mask detection in static imagesdetect_mask_video.py: Using your webcam, this script applies face mask detection to every frame in the stream
In the next two sections, we will train our face mask detector.
Implementing our COVID-19 face mask detector training script with Keras and TensorFlow
Now that we’ve reviewed our face mask dataset, let’s learn how we can use Keras and TensorFlow to train a classifier to automatically detect whether a person is wearing a mask or not.
To accomplish this task, we’ll be fine-tuning the MobileNet V2 architecture, a highly efficient architecture that can be applied to embedded devices with limited computational capacity (ex., Raspberry Pi, Google Coral, NVIDIA Jetson Nano, etc.).
Note: If your interest is embedded computer vision, be sure to check out my Raspberry Pi for Computer Vision book which covers working with computationally limited devices for computer vision and deep learning.
Deploying our face mask detector to embedded devices could reduce the cost of manufacturing such face mask detection systems, hence why we choose to use this architecture.
Let’s get started!
Open up the train_mask_detector.py file in your directory structure, and insert the following code:
# import the necessary packages
from tensorflow.keras.preprocessing.image import ImageDataGenerator
from tensorflow.keras.applications import MobileNetV2
from tensorflow.keras.layers import AveragePooling2D
from tensorflow.keras.layers import Dropout
from tensorflow.keras.layers import Flatten
from tensorflow.keras.layers import Dense
from tensorflow.keras.layers import Input
from tensorflow.keras.models import Model
from tensorflow.keras.optimizers import Adam
from tensorflow.keras.applications.mobilenet_v2 import preprocess_input
from tensorflow.keras.preprocessing.image import img_to_array
from tensorflow.keras.preprocessing.image import load_img
from tensorflow.keras.utils import to_categorical
from sklearn.preprocessing import LabelBinarizer
from sklearn.model_selection import train_test_split
from sklearn.metrics import classification_report
from imutils import paths
import matplotlib.pyplot as plt
import numpy as np
import argparse
import os
The imports for our training script may look intimidating to you either because there are so many or you are new to deep learning. If you are new, I would recommend reading both my Keras tutorial and fine-tuning tutorial before moving forward.
Our set of tensorflow.keras imports allow for:
- Data augmentation
- Loading the MobilNetV2 classifier (we will fine-tune this model with pre-trained ImageNet weights)
- Building a new fully-connected (FC) head
- Pre-processing
- Loading image data
We’ll use scikit-learn (sklearn) for binarizing class labels, segmenting our dataset, and printing a classification report.
My imutils paths implementation will help us to find and list images in our dataset. And we’ll use matplotlib to plot our training curves.
To install the necessary software so that these imports are available to you, be sure to follow either one of my Tensorflow 2.0+ installation guides:
Let’s go ahead and parse a few command line arguments that are required to launch our script from a terminal:
# construct the argument parser and parse the arguments
ap = argparse.ArgumentParser()
ap.add_argument("-d", "--dataset", required=True,
	help="path to input dataset")
ap.add_argument("-p", "--plot", type=str, default="plot.png",
	help="path to output loss/accuracy plot")
ap.add_argument("-m", "--model", type=str,
	default="mask_detector.model",
	help="path to output face mask detector model")
args = vars(ap.parse_args())
Our command line arguments include:
--dataset: The path to the input dataset of faces and and faces with masks--plot: The path to your output training history plot, which will be generated usingmatplotlib--model: The path to the resulting serialized face mask classification model
I like to define my deep learning hyperparameters in one place:
# initialize the initial learning rate, number of epochs to train for,
# and batch size
INIT_LR = 1e-4
EPOCHS = 20
BS = 32
Here, I’ve specified hyperparameter constants including my initial learning rate, number of training epochs, and batch size. Later, we will be applying a learning rate decay schedule, which is why we’ve named the learning rate variable INIT_LR.
At this point, we’re ready to load and pre-process our training data:
# grab the list of images in our dataset directory, then initialize
# the list of data (i.e., images) and class images
print("[INFO] loading images...")
imagePaths = list(paths.list_images(args["dataset"]))
data = []
labels = []

# loop over the image paths
for imagePath in imagePaths:
	# extract the class label from the filename
	label = imagePath.split(os.path.sep)[-2]

	# load the input image (224x224) and preprocess it
	image = load_img(imagePath, target_size=(224, 224))
	image = img_to_array(image)
	image = preprocess_input(image)

	# update the data and labels lists, respectively
	data.append(image)
	labels.append(label)

# convert the data and labels to NumPy arrays
data = np.array(data, dtype="float32")
labels = np.array(labels)
In this block, we are:
- Grabbing all of the
imagePathsin the dataset (Line 44) - Initializing
dataandlabelslists (Lines 45 and 46) - Looping over the
imagePathsand loading + pre-processing images (Lines 49-60). Pre-processing steps include resizing to 224×224 pixels, conversion to array format, and scaling the pixel intensities in the input image to the range [-1, 1] (via thepreprocess_inputconvenience function) - Appending the pre-processed
imageand associatedlabelto thedataandlabelslists, respectively (Lines 59 and 60) - Ensuring our training data is in NumPy array format (Lines 63 and 64)
The above lines of code assume that your entire dataset is small enough to fit into memory. If your dataset is larger than the memory you have available, I suggest using HDF5, a strategy I cover in Deep Learning for Computer Vision with Python (Practitioner Bundle Chapters 9 and 10).
Our data preparation work isn’t done yet. Next, we’ll encode our labels, partition our dataset, and prepare for data augmentation:
# perform one-hot encoding on the labels
lb = LabelBinarizer()
labels = lb.fit_transform(labels)
labels = to_categorical(labels)

# partition the data into training and testing splits using 75% of
# the data for training and the remaining 25% for testing
(trainX, testX, trainY, testY) = train_test_split(data, labels,
	test_size=0.20, stratify=labels, random_state=42)

# construct the training image generator for data augmentation
aug = ImageDataGenerator(
	rotation_range=20,
	zoom_range=0.15,
	width_shift_range=0.2,
	height_shift_range=0.2,
	shear_range=0.15,
	horizontal_flip=True,
	fill_mode="nearest")
Lines 67-69 one-hot encode our class labels, meaning that our data will be in the following format:
$ python  train_mask_detector.py --dataset  dataset
[INFO] loading images...
-> (trainX, testX, trainY, testY) = train_test_split(data, labels,
(Pdb) labels[500:]
array([[1., 0.],
       [1., 0.],
       [1., 0.],
       ...,
       [0., 1.],
       [0., 1.],
       [0., 1.]], dtype=float32)
(Pdb)
As you can see, each element of our labels array consists of an array in which only one index is “hot” (i.e., 1).
Using scikit-learn’s convenience method, Lines 73 and 74 segment our data into 80% training and the remaining 20% for testing.
During training, we’ll be applying on-the-fly mutations to our images in an effort to improve generalization. This is known as data augmentation, where the random rotation, zoom, shear, shift, and flip parameters are established on Lines 77-84. We’ll use the aug object at training time.
But first, we need to prepare MobileNetV2 for fine-tuning:
# load the MobileNetV2 network, ensuring the head FC layer sets are
# left off
baseModel = MobileNetV2(weights="imagenet", include_top=False,
	input_tensor=Input(shape=(224, 224, 3)))

# construct the head of the model that will be placed on top of the
# the base model
headModel = baseModel.output
headModel = AveragePooling2D(pool_size=(7, 7))(headModel)
headModel = Flatten(name="flatten")(headModel)
headModel = Dense(128, activation="relu")(headModel)
headModel = Dropout(0.5)(headModel)
headModel = Dense(2, activation="softmax")(headModel)

# place the head FC model on top of the base model (this will become
# the actual model we will train)
model = Model(inputs=baseModel.input, outputs=headModel)

# loop over all layers in the base model and freeze them so they will
# *not* be updated during the first training process
for layer in baseModel.layers:
	layer.trainable = False
Fine-tuning setup is a three-step process:
- Load MobileNet with pre-trained ImageNet weights, leaving off head of network (Lines 88 and 89)
- Construct a new FC head, and append it to the base in place of the old head (Lines 93-102)
- Freeze the base layers of the network (Lines 106 and 107). The weights of these base layers will not be updated during the process of backpropagation, whereas the head layer weights will be tuned.
Fine-tuning is a strategy I nearly always recommend to establish a baseline model while saving considerable time. To learn more about the theory, purpose, and strategy, please refer to my fine-tuning blog posts and Deep Learning for Computer Vision with Python (Practitioner Bundle Chapter 5).
With our data prepared and model architecture in place for fine-tuning, we’re now ready to compile and train our face mask detector network:
# compile our model
print("[INFO] compiling model...")
opt = Adam(lr=INIT_LR, decay=INIT_LR / EPOCHS)
model.compile(loss="binary_crossentropy", optimizer=opt,
	metrics=["accuracy"])

# train the head of the network
print("[INFO] training head...")
H = model.fit(
	aug.flow(trainX, trainY, batch_size=BS),
	steps_per_epoch=len(trainX) // BS,
	validation_data=(testX, testY),
	validation_steps=len(testX) // BS,
	epochs=EPOCHS)
Lines 111-113 compile our model with the Adam optimizer, a learning rate decay schedule, and binary cross-entropy. If you’re building from this training script with > 2 classes, be sure to use categorical cross-entropy.
Face mask training is launched via Lines 117-122. Notice how our data augmentation object (aug) will be providing batches of mutated image data.
Once training is complete, we’ll evaluate the resulting model on the test set:
# make predictions on the testing set
print("[INFO] evaluating network...")
predIdxs = model.predict(testX, batch_size=BS)

# for each image in the testing set we need to find the index of the
# label with corresponding largest predicted probability
predIdxs = np.argmax(predIdxs, axis=1)

# show a nicely formatted classification report
print(classification_report(testY.argmax(axis=1), predIdxs,
	target_names=lb.classes_))

# serialize the model to disk
print("[INFO] saving mask detector model...")
model.save(args["model"], save_format="h5")
Here, Lines 126-130 make predictions on the test set, grabbing the highest probability class label indices. Then, we print a classification report in the terminal for inspection.
Line 138 serializes our face mask classification model to disk.
Our last step is to plot our accuracy and loss curves:
# plot the training loss and accuracy
N = EPOCHS
plt.style.use("ggplot")
plt.figure()
plt.plot(np.arange(0, N), H.history["loss"], label="train_loss")
plt.plot(np.arange(0, N), H.history["val_loss"], label="val_loss")
plt.plot(np.arange(0, N), H.history["accuracy"], label="train_acc")
plt.plot(np.arange(0, N), H.history["val_accuracy"], label="val_acc")
plt.title("Training Loss and Accuracy")
plt.xlabel("Epoch #")
plt.ylabel("Loss/Accuracy")
plt.legend(loc="lower left")
plt.savefig(args["plot"])
Once our plot is ready, Line 152 saves the figure to disk using the --plot filepath.
Training the COVID-19 face mask detector with Keras/TensorFlow
We are now ready to train our face mask detector using Keras, TensorFlow, and Deep Learning.
Make sure you have used the “Downloads” section of this tutorial to download the source code and face mask dataset.
From there, open up a terminal, and execute the following command:
$ python train_mask_detector.py --dataset dataset
[INFO] loading images...
[INFO] compiling model...
[INFO] training head...
Train for 34 steps, validate on 276 samples
Epoch 1/20
34/34 [==============================] - 30s 885ms/step - loss: 0.6431 - accuracy: 0.6676 - val_loss: 0.3696 - val_accuracy: 0.8242
Epoch 2/20
34/34 [==============================] - 29s 853ms/step - loss: 0.3507 - accuracy: 0.8567 - val_loss: 0.1964 - val_accuracy: 0.9375
Epoch 3/20
34/34 [==============================] - 27s 800ms/step - loss: 0.2792 - accuracy: 0.8820 - val_loss: 0.1383 - val_accuracy: 0.9531
Epoch 4/20
34/34 [==============================] - 28s 814ms/step - loss: 0.2196 - accuracy: 0.9148 - val_loss: 0.1306 - val_accuracy: 0.9492
Epoch 5/20
34/34 [==============================] - 27s 792ms/step - loss: 0.2006 - accuracy: 0.9213 - val_loss: 0.0863 - val_accuracy: 0.9688
...
Epoch 16/20
34/34 [==============================] - 27s 801ms/step - loss: 0.0767 - accuracy: 0.9766 - val_loss: 0.0291 - val_accuracy: 0.9922
Epoch 17/20
34/34 [==============================] - 27s 795ms/step - loss: 0.1042 - accuracy: 0.9616 - val_loss: 0.0243 - val_accuracy: 1.0000
Epoch 18/20
34/34 [==============================] - 27s 796ms/step - loss: 0.0804 - accuracy: 0.9672 - val_loss: 0.0244 - val_accuracy: 0.9961
Epoch 19/20
34/34 [==============================] - 27s 793ms/step - loss: 0.0836 - accuracy: 0.9710 - val_loss: 0.0440 - val_accuracy: 0.9883
Epoch 20/20
34/34 [==============================] - 28s 838ms/step - loss: 0.0717 - accuracy: 0.9710 - val_loss: 0.0270 - val_accuracy: 0.9922
[INFO] evaluating network...
              precision    recall  f1-score   support

   with_mask       0.99      1.00      0.99       138
without_mask       1.00      0.99      0.99       138

    accuracy                           0.99       276
   macro avg       0.99      0.99      0.99       276
weighted avg       0.99      0.99      0.99       276
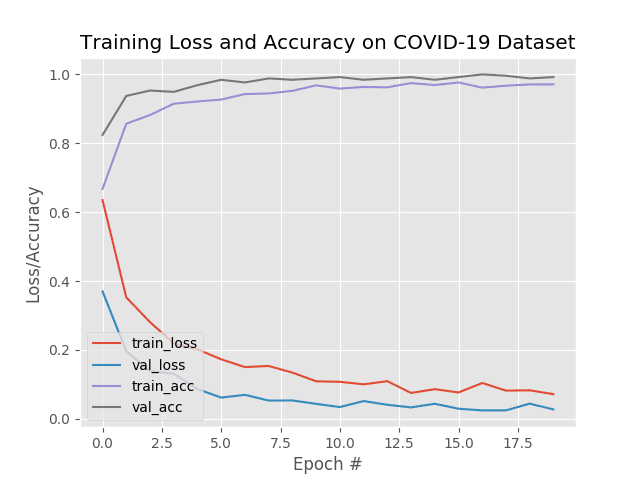
As you can see, we are obtaining ~99% accuracy on our test set.
Looking at Figure 10, we can see there are little signs of overfitting, with the validation loss lower than the training loss (a phenomenon I discuss in this blog post).
Given these results, we are hopeful that our model will generalize well to images outside our training and testing set.
Implementing our COVID-19 face mask detector for images with OpenCV
Now that our face mask detector is trained, let’s learn how we can:
- Load an input image from disk
- Detect faces in the image
- Apply our face mask detector to classify the face as either
with_maskorwithout_mask
Open up the detect_mask_image.py file in your directory structure, and let’s get started:
# import the necessary packages
from tensorflow.keras.applications.mobilenet_v2 import preprocess_input
from tensorflow.keras.preprocessing.image import img_to_array
from tensorflow.keras.models import load_model
import numpy as np
import argparse
import cv2
import os
Our driver script requires three TensorFlow/Keras imports to (1) load our MaskNet model and (2) pre-process the input image.
OpenCV is required for display and image manipulations.
The next step is to parse command line arguments:
# construct the argument parser and parse the arguments
ap = argparse.ArgumentParser()
ap.add_argument("-i", "--image", required=True,
	help="path to input image")
ap.add_argument("-f", "--face", type=str,
	default="face_detector",
	help="path to face detector model directory")
ap.add_argument("-m", "--model", type=str,
	default="mask_detector.model",
	help="path to trained face mask detector model")
ap.add_argument("-c", "--confidence", type=float, default=0.5,
	help="minimum probability to filter weak detections")
args = vars(ap.parse_args())
Our four command line arguments include:
--image: The path to the input image containing faces for inference--face: The path to the face detector model directory (we need to localize faces prior to classifying them)--model--confidence: An optional probability threshold can be set to override 50% to filter weak face detections
Next, we’ll load both our face detector and face mask classifier models:
# load our serialized face detector model from disk
print("[INFO] loading face detector model...")
prototxtPath = os.path.sep.join([args["face"], "deploy.prototxt"])
weightsPath = os.path.sep.join([args["face"],
	"res10_300x300_ssd_iter_140000.caffemodel"])
net = cv2.dnn.readNet(prototxtPath, weightsPath)

# load the face mask detector model from disk
print("[INFO] loading face mask detector model...")
model = load_model(args["model"])
With our deep learning models now in memory, our next step is to load and pre-process an input image:
# load the input image from disk, clone it, and grab the image spatial
# dimensions
image = cv2.imread(args["image"])
orig = image.copy()
(h, w) = image.shape[:2]

# construct a blob from the image
blob = cv2.dnn.blobFromImage(image, 1.0, (300, 300),
	(104.0, 177.0, 123.0))

# pass the blob through the network and obtain the face detections
print("[INFO] computing face detections...")
net.setInput(blob)
detections = net.forward()
Upon loading our --image from disk (Line 37), we make a copy and grab frame dimensions for future scaling and display purposes (Lines 38 and 39).
Pre-processing is handled by OpenCV’s blobFromImage function (Lines 42 and 43). As shown in the parameters, we resize to 300×300 pixels and perform mean subtraction.
Lines 47 and 48 then perform face detection to localize where in the image all faces are.
Once we know where each face is predicted to be, we’ll ensure they meet the --confidence threshold before we extract the faceROIs:
# loop over the detections
for i in range(0, detections.shape[2]):
	# extract the confidence (i.e., probability) associated with
	# the detection
	confidence = detections[0, 0, i, 2]

	# filter out weak detections by ensuring the confidence is
	# greater than the minimum confidence
	if confidence > args["confidence"]:
		# compute the (x, y)-coordinates of the bounding box for
		# the object
		box = detections[0, 0, i, 3:7] * np.array([w, h, w, h])
		(startX, startY, endX, endY) = box.astype("int")

		# ensure the bounding boxes fall within the dimensions of
		# the frame
		(startX, startY) = (max(0, startX), max(0, startY))
		(endX, endY) = (min(w - 1, endX), min(h - 1, endY))
Here, we loop over our detections and extract the confidence to measure against the --confidence threshold (Lines 51-58).
We then compute bounding box value for a particular face and ensure that the box falls within the boundaries of the image (Lines 61-67).
Next, we’ll run the face ROI through our MaskNet model:
		# extract the face ROI, convert it from BGR to RGB channel
		# ordering, resize it to 224x224, and preprocess it
		face = image[startY:endY, startX:endX]
		face = cv2.cvtColor(face, cv2.COLOR_BGR2RGB)
		face = cv2.resize(face, (224, 224))
		face = img_to_array(face)
		face = preprocess_input(face)
		face = np.expand_dims(face, axis=0)

		# pass the face through the model to determine if the face
		# has a mask or not
		(mask, withoutMask) = model.predict(face)[0]
In this block, we:
- Extract the
faceROI via NumPy slicing (Line 71) - Pre-process the ROI the same way we did during training (Lines 72-76)
- Perform mask detection to predict
with_maskorwithout_mask(Line 80)
From here, we will annotate and display the result!
		# determine the class label and color we'll use to draw
		# the bounding box and text
		label = "Mask" if mask > withoutMask else "No Mask"
		color = (0, 255, 0) if label == "Mask" else (0, 0, 255)

		# include the probability in the label
		label = "{}: {:.2f}%".format(label, max(mask, withoutMask) * 100)

		# display the label and bounding box rectangle on the output
		# frame
		cv2.putText(image, label, (startX, startY - 10),
			cv2.FONT_HERSHEY_SIMPLEX, 0.45, color, 2)
		cv2.rectangle(image, (startX, startY), (endX, endY), color, 2)

# show the output image
cv2.imshow("Output", image)
cv2.waitKey(0)
First, we determine the class label based on probabilities returned by the mask detector model (Line 84) and assign an associated color for the annotation (Line 85). The color will be “green” for with_mask and “red” for without_mask.
We then draw the label text (including class and probability), as well as a bounding box rectangle for the face, using OpenCV drawing functions (Lines 92-94).
Once all detections have been processed, Lines 97 and 98 display the output image.
COVID-19 face mask detection in images with OpenCV
Let’s put our COVID-19 face mask detector to work!
Make sure you have used the “Downloads” section of this tutorial to download the source code, example images, and pre-trained face mask detector.
From there, open up a terminal, and execute the following command:
$ python detect_mask_image.py --image examples/example_01.png
[INFO] loading face detector model...
[INFO] loading face mask detector model...
[INFO] computing face detections...
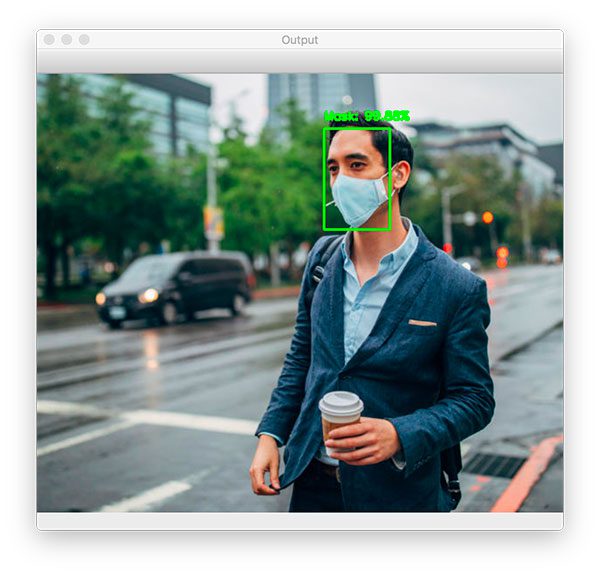
As you can see, our face mask detector correctly labeled this image as Mask.
Let’s try another image, this one of a person not wearing a face mask:
$ python detect_mask_image.py --image examples/example_02.png
[INFO] loading face detector model...
[INFO] loading face mask detector model...
[INFO] computing face detections...

Our face mask detector has correctly predicted No Mask.
Let’s try one final image:
$ python detect_mask_image.py --image examples/example_03.png
[INFO] loading face detector model...
[INFO] loading face mask detector model...
[INFO] computing face detections...
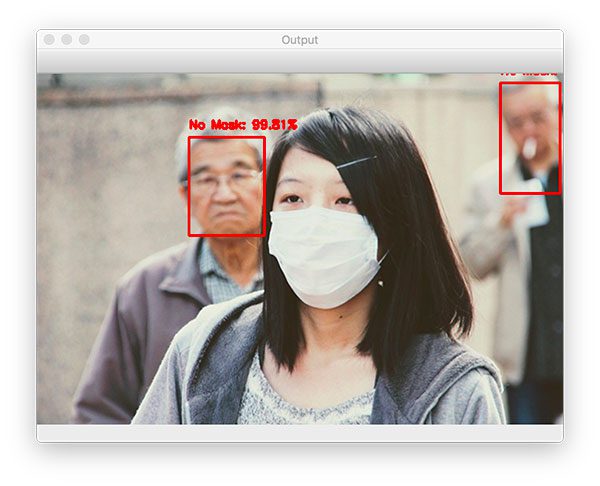
What happened here?
Why is it that we were able to detect the faces of the two gentlemen in the background and correctly classify mask/no mask for them, but we could not detect the woman in the foreground?
I discuss the reason for this issue in the “Suggestions for further improvement” section later in this tutorial, but the gist is that we’re too reliant on our two-stage process.
Keep in mind that in order to classify whether or not a person is wearing in mask, we first need to perform face detection — if a face is not found (which is what happened in this image), then the mask detector cannot be applied!
The reason we cannot detect the face in the foreground is because:
- It’s too obscured by the mask
- The dataset used to train the face detector did not contain example images of people wearing face masks
Therefore, if a large portion of the face is occluded, our face detector will likely fail to detect the face.
Again, I discuss this problem in more detail, including how to improve the accuracy of our mask detector, in the “Suggestions for further improvement” section of this tutorial.
Implementing our COVID-19 face mask detector in real-time video streams with OpenCV
At this point, we know we can apply face mask detection to static images — but what about real-time video streams?
Is our COVID-19 face mask detector capable of running in real-time?
Let’s find out.
Open up the detect_mask_video.py file in your directory structure, and insert the following code:
# import the necessary packages
from tensorflow.keras.applications.mobilenet_v2 import preprocess_input
from tensorflow.keras.preprocessing.image import img_to_array
from tensorflow.keras.models import load_model
from imutils.video import VideoStream
import numpy as np
import argparse
import imutils
import time
import cv2
import os
The algorithm for this script is the same, but it is pieced together in such a way to allow for processing every frame of your webcam stream.
Thus, the only difference when it comes to imports is that we need a VideoStream class and time. Both of these will help us to work with the stream. We’ll also take advantage of imutils for its aspect-aware resizing method.
Our face detection/mask prediction logic for this script is in the detect_and_predict_mask function:
def detect_and_predict_mask(frame, faceNet, maskNet):
	# grab the dimensions of the frame and then construct a blob
	# from it
	(h, w) = frame.shape[:2]
	blob = cv2.dnn.blobFromImage(frame, 1.0, (300, 300),
		(104.0, 177.0, 123.0))

	# pass the blob through the network and obtain the face detections
	faceNet.setInput(blob)
	detections = faceNet.forward()

	# initialize our list of faces, their corresponding locations,
	# and the list of predictions from our face mask network
	faces = []
	locs = []
	preds = []
By defining this convenience function here, our frame processing loop will be a little easier to read later.
This function detects faces and then applies our face mask classifier to each face ROI. Such a function consolidates our code — it could even be moved to a separate Python file if you so choose.
Our detect_and_predict_mask function accepts three parameters:
framefaceNet: The model used to detect where in the image faces aremaskNet: Our COVID-19 face mask classifier model
Inside, we construct a blob, detect faces, and initialize lists, two of which the function is set to return. These lists include our faces (i.e., ROIs), locs (the face locations), and preds (the list of mask/no mask predictions).
From here, we’ll loop over the face detections:
	# loop over the detections
	for i in range(0, detections.shape[2]):
		# extract the confidence (i.e., probability) associated with
		# the detection
		confidence = detections[0, 0, i, 2]

		# filter out weak detections by ensuring the confidence is
		# greater than the minimum confidence
		if confidence > args["confidence"]:
			# compute the (x, y)-coordinates of the bounding box for
			# the object
			box = detections[0, 0, i, 3:7] * np.array([w, h, w, h])
			(startX, startY, endX, endY) = box.astype("int")

			# ensure the bounding boxes fall within the dimensions of
			# the frame
			(startX, startY) = (max(0, startX), max(0, startY))
			(endX, endY) = (min(w - 1, endX), min(h - 1, endY))
Inside the loop, we filter out weak detections (Lines 34-38) and extract bounding boxes while ensuring bounding box coordinates do not fall outside the bounds of the image (Lines 41-47).
Next, we’ll add face ROIs to two of our corresponding lists:
			# extract the face ROI, convert it from BGR to RGB channel
			# ordering, resize it to 224x224, and preprocess it
			face = frame[startY:endY, startX:endX]
			face = cv2.cvtColor(face, cv2.COLOR_BGR2RGB)
			face = cv2.resize(face, (224, 224))
			face = img_to_array(face)
			face = preprocess_input(face)
			face = np.expand_dims(face, axis=0)

			# add the face and bounding boxes to their respective
			# lists
			faces.append(face)
			locs.append((startX, startY, endX, endY))
After extracting face ROIs and pre-processing (Lines 51-56), we append the the face ROIs and bounding boxes to their respective lists.
We’re now ready to run our faces through our mask predictor:
	# only make a predictions if at least one face was detected
	if len(faces) > 0:
		# for faster inference we'll make batch predictions on *all*
		# faces at the same time rather than one-by-one predictions
		# in the above `for` loop
		preds = maskNet.predict(faces)

	# return a 2-tuple of the face locations and their corresponding
	# locations
	return (locs, preds)
The logic here is built for speed. First we ensure at least one face was detected (Line 64) — if not, we’ll return empty preds.
Secondly, we are performing inference on our entire batch of faces in the frame so that our pipeline is faster (Line 68). It wouldn’t make sense to write another loop to make predictions on each face individually due to the overhead (especially if you are using a GPU that requires a lot of overhead communication on your system bus). It is more efficient to perform predictions in batch.
Line 72 returns our face bounding box locations and corresponding mask/not mask predictions to the caller.
Next, we’ll define our command line arguments:
# construct the argument parser and parse the arguments
ap = argparse.ArgumentParser()
ap.add_argument("-f", "--face", type=str,
	default="face_detector",
	help="path to face detector model directory")
ap.add_argument("-m", "--model", type=str,
	default="mask_detector.model",
	help="path to trained face mask detector model")
ap.add_argument("-c", "--confidence", type=float, default=0.5,
	help="minimum probability to filter weak detections")
args = vars(ap.parse_args())
Our command line arguments include:
--face: The path to the face detector directory--model--confidence: The minimum probability threshold to filter weak face detections
With our imports, convenience function, and command line args ready to go, we just have a few initializations to handle before we loop over frames:
# load our serialized face detector model from disk
print("[INFO] loading face detector model...")
prototxtPath = os.path.sep.join([args["face"], "deploy.prototxt"])
weightsPath = os.path.sep.join([args["face"],
	"res10_300x300_ssd_iter_140000.caffemodel"])
faceNet = cv2.dnn.readNet(prototxtPath, weightsPath)

# load the face mask detector model from disk
print("[INFO] loading face mask detector model...")
maskNet = load_model(args["model"])

# initialize the video stream and allow the camera sensor to warm up
print("[INFO] starting video stream...")
vs = VideoStream(src=0).start()
time.sleep(2.0)
Here we have initialized our:
- Face detector
- COVID-19 face mask detector
- Webcam video stream
Let’s proceed to loop over frames in the stream:
# loop over the frames from the video stream
while True:
	# grab the frame from the threaded video stream and resize it
	# to have a maximum width of 400 pixels
	frame = vs.read()
	frame = imutils.resize(frame, width=400)

	# detect faces in the frame and determine if they are wearing a
	# face mask or not
	(locs, preds) = detect_and_predict_mask(frame, faceNet, maskNet)
We begin looping over frames on Line 103. Inside, we grab a frame from the stream and resize it (Lines 106 and 107).
From there, we put our convenience utility to use; Line 111 detects and predicts whether people are wearing their masks or not.
Let’s post-process (i.e., annotate) the COVID-19 face mask detection results:
	# loop over the detected face locations and their corresponding
	# locations
	for (box, pred) in zip(locs, preds):
		# unpack the bounding box and predictions
		(startX, startY, endX, endY) = box
		(mask, withoutMask) = pred

		# determine the class label and color we'll use to draw
		# the bounding box and text
		label = "Mask" if mask > withoutMask else "No Mask"
		color = (0, 255, 0) if label == "Mask" else (0, 0, 255)

		# include the probability in the label
		label = "{}: {:.2f}%".format(label, max(mask, withoutMask) * 100)

		# display the label and bounding box rectangle on the output
		# frame
		cv2.putText(frame, label, (startX, startY - 10),
			cv2.FONT_HERSHEY_SIMPLEX, 0.45, color, 2)
		cv2.rectangle(frame, (startX, startY), (endX, endY), color, 2)
Inside our loop over the prediction results (beginning on Line 115), we:
- Unpack a face bounding box and mask/not mask prediction (Lines 117 and 118)
- Determine the
labelandcolor(Lines 122-126) - Annotate the
labeland face bounding box (Lines 130-132)
Finally, we display the results and perform cleanup:
	# show the output frame
	cv2.imshow("Frame", frame)
	key = cv2.waitKey(1) & 0xFF

	# if the `q` key was pressed, break from the loop
	if key == ord("q"):
		break

# do a bit of cleanup
cv2.destroyAllWindows()
vs.stop()
After the frame is displayed, we capture key presses. If the user presses q (quit), we break out of the loop and perform housekeeping.
Great job implementing your real-time face mask detector with Python, OpenCV, and deep learning with TensorFlow/Keras!
Detecting COVID-19 face masks with OpenCV in real-time
To see our real-time COVID-19 face mask detector in action, make sure you use the “Downloads” section of this tutorial to download the source code and pre-trained face mask detector model.
You can then launch the mask detector in real-time video streams using the following command:
$ python detect_mask_video.py
[INFO] loading face detector model...
[INFO] loading face mask detector model...
[INFO] starting video stream...
Here, you can see that our face mask detector is capable of running in real-time (and is correct in its predictions as well).
Suggestions for improvement
As you can see from the results sections above, our face mask detector is working quite well despite:
- Having limited training data
- The
with_maskclass being artificially generated (see the “How was our face mask dataset created?” section above).
To improve our face mask detection model further, you should gather actual images (rather than artificially generated images) of people wearing masks.
While our artificial dataset worked well in this case, there’s no substitute for the real thing.
Secondly, you should also gather images of faces that may “confuse” our classifier into thinking the person is wearing a mask when in fact they are not — potential examples include shirts wrapped around faces, bandana over the mouth, etc.
All of these are examples of something that could be confused as a face mask by our face mask detector.
Finally, you should consider training a dedicated two-class object detector rather than a simple image classifier.
Our current method of detecting whether a person is wearing a mask or not is a two-step process:
- Step #1: Perform face detection
- Step #2: Apply our face mask detector to each face
The problem with this approach is that a face mask, by definition, obscures part of the face. If enough of the face is obscured, the face cannot be detected, and therefore, the face mask detector will not be applied.
To circumvent that issue, you should train a two-class object detector that consists of a with_mask class and without_mask class.
Combining an object detector with a dedicated with_mask class will allow improvement of the model in two respects.
First, the object detector will be able to naturally detect people wearing masks that otherwise would have been impossible for the face detector to detect due to too much of the face being obscured.
Secondly, this approach reduces our computer vision pipeline to a single step — rather than applying face detection and then our face mask detector model, all we need to do is apply the object detector to give us bounding boxes for people both with_mask and without_mask in a single forward pass of the network.
Not only is such a method more computationally efficient, it’s also more “elegant” and end-to-end.
What’s next?
Inside today’s tutorial, we covered training a face mask detector. If you’re inspired to create your own deep learning projects, I would recommend reading my book, Deep Learning for Computer Vision with Python.
I crafted my book so that it perfectly balances theory with implementation, ensuring you properly master:
- Deep learning fundamentals and theory without unnecessary mathematical fluff. I present the basic equations and back them up with code walkthroughs that you can implement and easily understand. You don’t need a degree in advanced mathematics to understand this book
- How to implement your own custom neural network architectures. Not only will you learn how to implement state-of-the-art architectures, including ResNet, SqueezeNet, etc., but you’ll also learn how to create your own custom CNNs
- How to train CNNs on your own datasets. Most deep learning tutorials don’t teach you how to work with your own custom datasets. Mine do. You’ll be training CNNs on your own datasets in no time
- Object detection (Faster R-CNNs, Single Shot Detectors, and RetinaNet) and instance segmentation (Mask R-CNN). Use these chapters to create your own custom object detectors and segmentation networks
You’ll also find answers and proven code recipes to:
- Create and prepare your own custom image datasets for image classification, object detection, and segmentation
- Hands-on tutorials (with lots of code) that not only show you the algorithms behind deep learning for computer vision but their implementations as well
- Put my tips, suggestions, and best practices into action, ensuring you maximize the accuracy of your models
My readers enjoy my no-nonsense teaching style that is guaranteed to help you master deep learning for image understanding and visual recognition.
If you’re ready to dive in, just click here. And if you aren’t convinced yet, just grab my free PDF of sample chapters and the entire table of contents by filling the form in the lower right of this page.
Summary
In this tutorial, you learned how to create a COVID-19 face mask detector using OpenCV, Keras/TensorFlow, and Deep Learning.
To create our face mask detector, we trained a two-class model of people wearing masks and people not wearing masks.
We fine-tuned MobileNetV2 on our mask/no mask dataset and obtained a classifier that is ~99% accurate.
We then took this face mask classifier and applied it to both images and real-time video streams by:
- Detecting faces in images/video
- Extracting each individual face
- Applying our face mask classifier
Our face mask detector is accurate, and since we used the MobileNetV2 architecture, it’s also computationally efficient, making it easier to deploy the model to embedded systems (Raspberry Pi, Google Coral, Jetosn, Nano, etc.).
I hope you enjoyed this tutorial!
To download the source code to this post (including the pre-trained COVID-19 face mask detector model), just enter your email address in the form below!

Download the Source Code and FREE 17-page Resource Guide
Enter your email address below to get a .zip of the code and a FREE 17-page Resource Guide on Computer Vision, OpenCV, and Deep Learning. Inside you’ll find my hand-picked tutorials, books, courses, and libraries to help you master CV and DL!
The post COVID-19: Face Mask Detector with OpenCV, Keras/TensorFlow, and Deep Learning appeared first on PyImageSearch.