
In this tutorial, you will learn how to use OpenCV and the Fast Fourier Transform (FFT) to perform blur detection in images and real-time video streams.
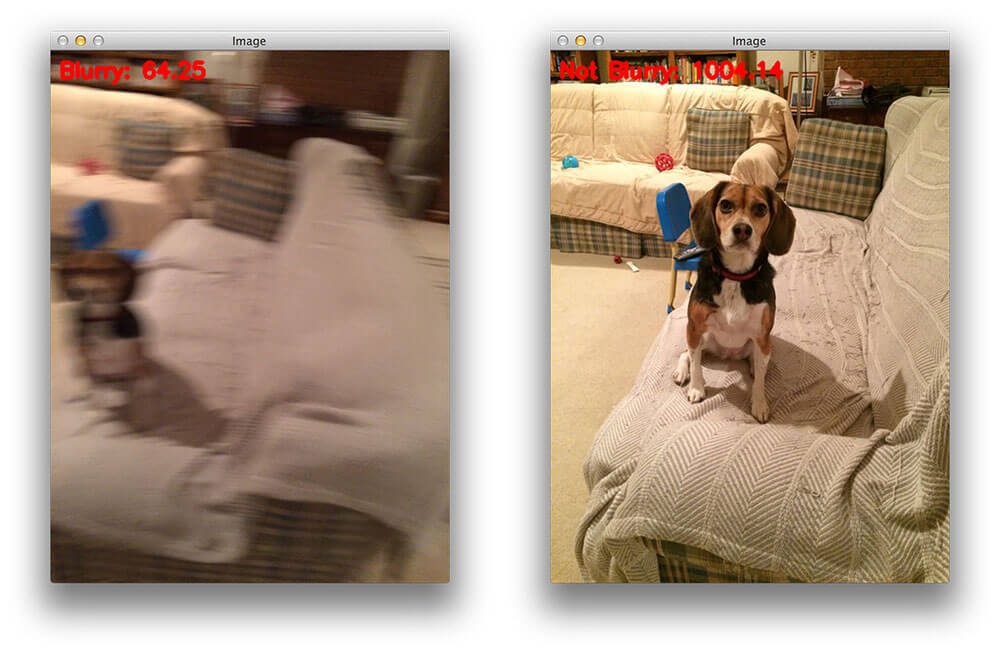
Today’s tutorial is an extension of my previous blog post on Blur Detection with OpenCV. The original blur detection method:
- Relied on computing the variance of the Laplacian operator
- Could be implemented in only a single line of code
- Was dead simple to use
The downside is that the Laplacian method required significant manual tuning to define the “threshold” at which an image was considered blurry or not. If you could control your lighting conditions, environment, and image capturing process, it worked quite well — but if not, you would obtain mixed results, to say the least.
The method we’ll be covering here today relies on computing the Fast Fourier Transform of the image. It still requires some manual tuning, but as we’ll find out, the FFT blur detector we’ll be covering is far more robust and reliable than the variance of the Laplacian method.
By the end of this tutorial, you’ll have a fully functioning FFT blur detector that you can apply to both images and video streams.
To learn how to use OpenCV and the Fast Fourier Transform (FFT) to perform blur detection, just keep reading.
OpenCV Fast Fourier Transform (FFT) for Blur Detection
In the first part of this tutorial, we’ll briefly discuss:
- What blur detection is
- Why we may want to detect blur in an image/video stream
- And how the Fast Fourier Transform can enable us to detect blur.
From there, we’ll implement our FFT blur detector for both images and real-time video.
We’ll wrap up the tutorial by reviewing the results of our FFT blur detector.
What is blur detection and when would we want to detect blur?
Blur detection, as the name suggests, is the process of detecting whether an image is blurry or not.
Possible applications of blur detection include:
- Automatic image quality grading
- Helping professional photographers sort through 100s to 1000s of photos during a photo shoot by automatically discarding the blurry/low quality ones
- Applying OCR to real-time video streams, but only applying the expensive OCR computation to non-blurry frames
The key takeaway here is that it’s always easier to write computer vision code for images captured under ideal conditions.
Instead of trying to handle edge cases where image quality is extremely poor, simply detect and discard the poor quality images (such as ones with significant blur).
Such a blur detection procedure could either automatically discard the poor quality images or simply tell the end user “Hey bud, try again. Let’s capture a better image here.”
Keep in mind that computer vision applications are meant to be intelligent, hence the term, artificial intelligence — and sometimes, that “intelligence” can simply be detecting when input data is of poor quality or not rather than trying to make sense of it.
What is the Fast Fourier Transform (FFT)?
The Fast Fourier Transform is a convenient mathematical algorithm for computing the Discrete Fourier Transform. It is used for converting a signal from one domain into another.
The FFT is useful in many disciplines, ranging from music, mathematics, science, and engineering. For example, electrical engineers, particularly those working with wireless, power, and audio signals, need the FFT calculation to convert time-series signals into the frequency domain because some calculations are more easily made in the frequency domain. Conversely, a frequency domain signal could be converted back into the time domain using the FFT.
In terms of computer vision, we often think of the FFT as an image processing tool that represents an image in two domains:
- Fourier (i.e., frequency) domain
- Spatial domain
Therefore, the FFT represents the image in both real and imaginary components.
By analyzing these values, we can perform image processing routines such as blurring, edge detection, thresholding, texture analysis, and yes, even blur detection.
Reviewing the mathematical details of the Fast Fourier Transform is outside the scope of this blog post, so if you’re interested in learning more about it, I suggest you read this article on the FFT and its relation to image processing.
For readers who are academically inclined, take a look at Aaron Bobick’s fantastic slides from Georgia Tech’s computer vision course.
Finally, the Wikipedia page on the Fourier Transform goes into more detail on the mathematics including its applications to non-image processing tasks.
Project structure
Start by using the “Downloads” section of this tutorial to download the source code and example images. Once you extract the files, you’ll have a directory organized as follows:
$ tree --dirsfirst
.
├── images
│   ├── adrian_01.png
│   ├── adrian_02.png
│   ├── jemma.png
│   └── resume.png
├── pyimagesearch
│   ├── __init__.py
│   └── blur_detector.py
├── blur_detector_image.py
└── blur_detector_video.py

2 directories, 8 files
Our FFT-based blur detector algorithm is housed inside the pyimagesearch module in the blur_detector.py file. Inside, a single function, detect_blur_fft is implemented.
We use our detect_blur_fft method inside of two Python driver scripts:
blur_detector_image: Performs blur detection on static images. I’ve provided a selection of testing images for us inside theimages/directory, and you should also try the algorithm on your own images (both blurry and not blurry).blur_detector_video.py
In the next section, we’ll implement our FFT-based blur detection algorithm.
Implementing our FFT blur detector with OpenCV
We are now ready to implement our Fast Fourier Transform blur detector with OpenCV.
The method we’ll be covering is based on the following implementation from Liu et al.’s 2008 CVPR publication, Image Partial Blur Detection and Classification.
Open up the blur_detector.py file in our directory structure, and insert the following code:
# import the necessary packages
import matplotlib.pyplot as plt
import numpy as np

def detect_blur_fft(image, size=60, thresh=10, vis=False):
	# grab the dimensions of the image and use the dimensions to
	# derive the center (x, y)-coordinates
	(h, w) = image.shape
	(cX, cY) = (int(w / 2.0), int(h / 2.0))
Our blur detector implementation requires both matplotlib and NumPy. We’ll use a Fast Fourier Transform algorithm built-in to NumPy as the basis for our methodology; we accompany the FFT calculation with additional math as well.
Line 5 defines the detect_blur_fft function, accepting four parameters:
imagesizethreshvis
Given our input image, first we grab its dimensions (Line 8) and compute the center (x, y)-coordinates (Line 9).
Next, we’ll calculate the Discrete Fourier Transform (DFT) using NumPy’s implementation of the Fast Fourier Transform (FFT) algorithm:
	# compute the FFT to find the frequency transform, then shift
	# the zero frequency component (i.e., DC component located at
	# the top-left corner) to the center where it will be more
	# easy to analyze
	fft = np.fft.fft2(image)
	fftShift = np.fft.fftshift(fft)
Here, using NumPy’s built-in algorithm, we compute the FFT (Line 15).
We then shift the zero frequency component (DC component) of the result to the center for easier analysis (Line 16).
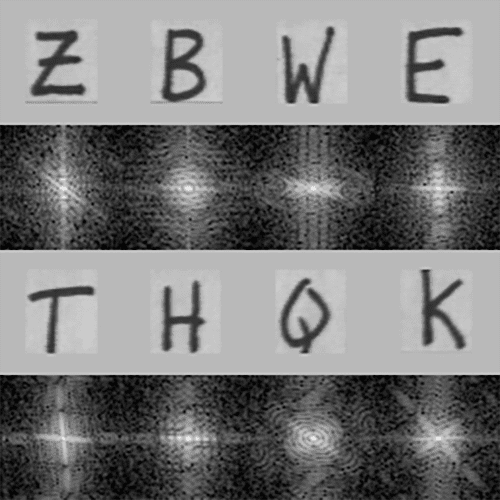
Now that we have the FFT of our image in hand, let’s visualize the result if the vis flag has been set:
	# check to see if we are visualizing our output
	if vis:
		# compute the magnitude spectrum of the transform
		magnitude = 20 * np.log(np.abs(fftShift))

		# display the original input image
		(fig, ax) = plt.subplots(1, 2, )
		ax[0].imshow(image, cmap="gray")
		ax[0].set_title("Input")
		ax[0].set_xticks([])
		ax[0].set_yticks([])

		# display the magnitude image
		ax[1].imshow(magnitude, cmap="gray")
		ax[1].set_title("Magnitude Spectrum")
		ax[1].set_xticks([])
		ax[1].set_yticks([])

		# show our plots
		plt.show()
For debugging and curiosity purposes, you may wish to plot the magnitude spectrum of the FFT of the input image by setting vis=True.
If you choose to do that, first we compute the magnitude spectrum of the transform (Line 21).
We then plot the original input image next to the magnitude spectrum image (Lines 24-34) and display the result (Line 37).
Now that we have the means to visualize the magnitude spectrum, let’s get back to determining whether our input image is blurry or not:
	# zero-out the center of the FFT shift (i.e., remove low
	# frequencies), apply the inverse shift such that the DC
	# component once again becomes the top-left, and then apply
	# the inverse FFT
	fftShift[cY - size:cY + size, cX - size:cX + size] = 0
	fftShift = np.fft.ifftshift(fftShift)
	recon = np.fft.ifft2(fftShift)
Here, we:
- Zero-out the center of our FFT shift (i.e., to remove low frequencies) via Line 43
- Apply the inverse shift to put the DC component back in the top-left (Line 44)
- Apply the inverse FFT (Line 45)
And from here, we have three more steps to determine if our image is blurry:
	# compute the magnitude spectrum of the reconstructed image,
	# then compute the mean of the magnitude values
	magnitude = 20 * np.log(np.abs(recon))
	mean = np.mean(magnitude)

	# the image will be considered "blurry" if the mean value of the
	# magnitudes is less than the threshold value
	return (mean, mean <= thresh)
The remaining steps include:
- Computing the
magnitudespectrum, once again, of the reconstructed image after we have already zeroed out the center DC values (Line 49). - Calculating the mean of the magnitude representation (Line 50).
- Returning a 2-tuple of the
meanvalue as well as a boolean indicating whether the input image is blurry or not (Line 54). Looking at the code, we can observe that we’ve determined the blurry boolean (whether or not theimageis blurry) by comparing themeanto thethresh(threshold).
Great job implementing an FFT-based blurriness detector algorithm. We aren’t done yet though. In the next section, we’ll apply our algorithm to static images to ensure it is performing to our expectations.
Detecting blur in images with FFT
Now that our detect_blur_fft helper function is implemented, let’s put it to use by creating a Python driver script that loads an input image from disk and then applies FFT blur detection to it.
Open up a new file, name it detect_blur_image.py, and insert the following code:
# import the necessary packages
from pyimagesearch.blur_detector import detect_blur_fft
import numpy as np
import argparse
import imutils
import cv2

# construct the argument parser and parse the arguments
ap = argparse.ArgumentParser()
ap.add_argument("-i", "--image", type=str, required=True,
	help="path input image that we'll detect blur in")
ap.add_argument("-t", "--thresh", type=int, default=20,
	help="threshold for our blur detector to fire")
ap.add_argument("-v", "--vis", type=int, default=-1,
	help="whether or not we are visualizing intermediary steps")
ap.add_argument("-d", "--test", type=int, default=-1,
	help="whether or not we should progressively blur the image")
args = vars(ap.parse_args())
Lines 2-6 begin with handling our imports; in particular, we need our detect_blur_fft function that we implemented in the previous section.
From there, we parse four command line arguments:
--image: The path to the input image for blur detection.--thresh: The threshold for our blur detector calculation.--vis: Our flag indicating whether to visualize the input image and the magnitude spectrum image.--test
Each of the --image, --thresh, and --vis arguments correspond to the image, thresh, and vis parameters of our detect_blur_fft function implemented in the previous section, respectively.
Let’s go ahead and load our input --image and perform Fast Fourier Transform blur detection:
# load the input image from disk, resize it, and convert it to
# grayscale
orig = cv2.imread(args["image"])
orig = imutils.resize(orig, width=500)
gray = cv2.cvtColor(orig, cv2.COLOR_BGR2GRAY)

# apply our blur detector using the FFT
(mean, blurry) = detect_blur_fft(gray, size=60,
	thresh=args["thresh"], vis=args["vis"] > 0)
To conduct FFT blur detection, we:
- Load the input
--image, and convert it to grayscale (Lines 22-24) - Apply our FFT blur detector using our
detect_blur_fftfunction (Lines 27 and 28)
Next, we’ll annotate and display our image:
# draw on the image, indicating whether or not it is blurry
image = np.dstack([gray] * 3)
color = (0, 0, 255) if blurry else (0, 255, 0)
text = "Blurry ({:.4f})" if blurry else "Not Blurry ({:.4f})"
text = text.format(mean)
cv2.putText(image, text, (10, 25), cv2.FONT_HERSHEY_SIMPLEX, 0.7,
	color, 2)
print("[INFO] {}".format(text))

# show the output image
cv2.imshow("Output", image)
cv2.waitKey(0)
Here, we:
- Add two more channels to our single-channel
grayimage, storing the result inimage(Line 31) - Set the
coloras red (if blurry) and green (if not blurry) via Line 32 - Draw our blurry
textindication andmeanvalue in the top-left corner of ourimage(Lines 33-36) andprintout the same information in our terminal (Line 37) - Show the output
imageuntil a key is pressed (Lines 40 and 41)
At this point, we’ve accomplished our goal of determining whether the input --image was blurry or not.
We might just stop here, and we definitely could do just that. But in order to --test our algorithm more rigorously, let’s implement a robust means of testing our image at different levels of intentional blurring:
# check to see if are going to test our FFT blurriness detector using
# various sizes of a Gaussian kernel
if args["test"] > 0:
	# loop over various blur radii
	for radius in range(1, 30, 2):
		# clone the original grayscale image
		image = gray.copy()

		# check to see if the kernel radius is greater than zero
		if radius > 0:
			# blur the input image by the supplied radius using a
			# Gaussian kernel
			image = cv2.GaussianBlur(image, (radius, radius), 0)

			# apply our blur detector using the FFT
			(mean, blurry) = detect_blur_fft(image, size=60,
				thresh=args["thresh"], vis=args["vis"] > 0)

			# draw on the image, indicating whether or not it is
			# blurry
			image = np.dstack([image] * 3)
			color = (0, 0, 255) if blurry else (0, 255, 0)
			text = "Blurry ({:.4f})" if blurry else "Not Blurry ({:.4f})"
			text = text.format(mean)
			cv2.putText(image, text, (10, 25), cv2.FONT_HERSHEY_SIMPLEX,
				0.7, color, 2)
			print("[INFO] Kernel: {}, Result: {}".format(radius, text))

		# show the image
		cv2.imshow("Test Image", image)
		cv2.waitKey(0)
When the --test flag is set, we’ll fall into the conditional block beginning on Line 45. The code on Lines 45-73 accomplishes the following:
- Applies a Gaussian Blur to our grayscale image over a range of progressively increasing radii
- Performs Fast Fourier Transform-based blur detection on each intentionally blurred image
- Annotates and displays the result
In order to accomplish our testing feature, Line 47 begins a loop over all odd radii in the range [0, 30]. From there, Line 55 applies OpenCV’s GaussianBlur method to intentionally introduce blurring in our image.
Everything else is the same, including the blurriness detection algorithm and annotation steps. You can cycle through the testing result images on your screen by pressing a key until all of the blur radii are exhausted in the range.
Of course, the purpose of our testing routine is to enable us to get a feel for and tune our blur threshold parameter (--thresh / thresh) effectively.
FFT blur detection in images results
We are now ready to use OpenCV and the Fast Fourier Transform to detect blur in images.
Start by making sure you use the “Downloads” section of this tutorial to download the source code and example images.
From there, open up a terminal, and execute the following command:
$ python blur_detector_image.py --image images/adrian_01.png
[INFO] Not Blurry (42.4630)
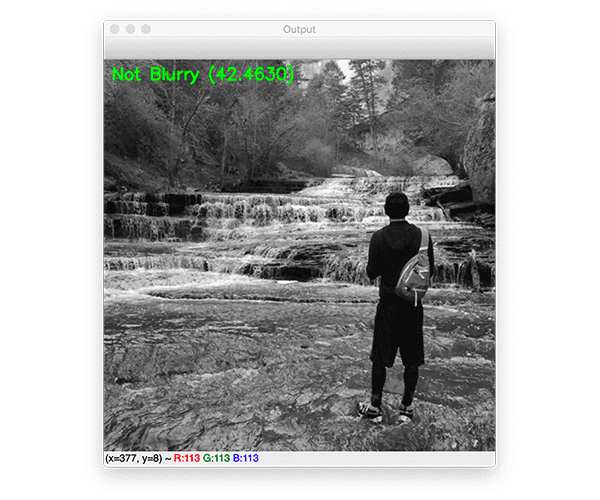
Here you can see an input image of me hiking The Subway in Zion National Park — the image is correctly marked as not blurry.
Let’s try another image, this one of my family’s dog, Jemma:
$ python blur_detector_image.py --image images/jemma.png
[INFO] Blurry (12.4738)
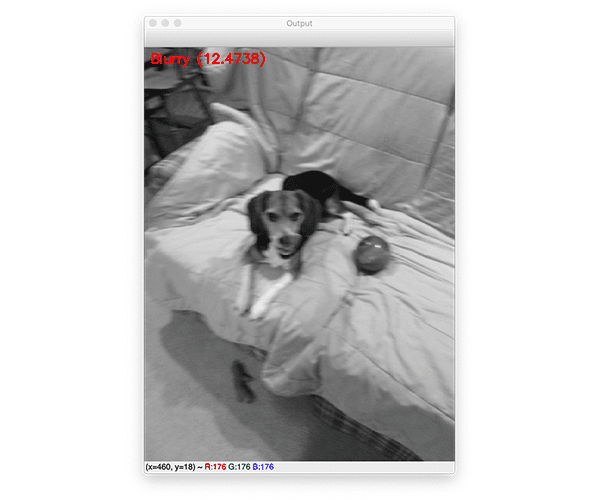
This image has significant blur and is marked as such.
To see how the mean FFT magnitude values change as an image becomes progressively more blurry, let’s supply the --test command line argument:
$ python blur_detector_image.py --image images/adrian_02.png --test 1
[INFO] Not Blurry (32.0934)
[INFO] Kernel: 1, Result: Not Blurry (32.0934)
[INFO] Kernel: 3, Result: Not Blurry (25.1770)
[INFO] Kernel: 5, Result: Not Blurry (20.5668)
[INFO] Kernel: 7, Result: Blurry (13.4830)
[INFO] Kernel: 9, Result: Blurry (7.8893)
[INFO] Kernel: 11, Result: Blurry (0.6506)
[INFO] Kernel: 13, Result: Blurry (-5.3609)
[INFO] Kernel: 15, Result: Blurry (-11.4612)
[INFO] Kernel: 17, Result: Blurry (-17.0109)
[INFO] Kernel: 19, Result: Blurry (-19.6464)
[INFO] Kernel: 21, Result: Blurry (-20.4758)
[INFO] Kernel: 23, Result: Blurry (-20.7365)
[INFO] Kernel: 25, Result: Blurry (-20.9362)
[INFO] Kernel: 27, Result: Blurry (-21.1911)
[INFO] Kernel: 29, Result: Blurry (-21.3853)
--test routine of our Python blurriness detector script, we’ve applied a series of intentional blurs as well as used our Fast Fourier Transform (FFT) method to determine if the image is blurry. This test routine is useful in that it allows you to tune your blurriness threshold parameter. Here, you can see that as our image becomes more and more blurry, the mean FFT magnitude values decrease.
Our FFT blur detection method can be applied to non-natural scene images as well.
For example, let’s suppose we want to build an automatic document scanner application — such a computer vision project should automatically reject blurry images.
However, document images are very different from natural scene images and by their nature will be much more sensitive to blur.
Any type of blur will impact OCR accuracy significantly.
Therefore, we should increase our --thresh value (and I’ll also include the --vis argument so we can visualize how the FFT magnitude values change):
$ python blur_detector_image.py --image images/resume.png --thresh 27 --test 1 --vis 1
[INFO] Not Blurry (34.6735)
[INFO] Kernel: 1, Result: Not Blurry (34.6735)
[INFO] Kernel: 3, Result: Not Blurry (29.2539)
[INFO] Kernel: 5, Result: Blurry (26.2893)
[INFO] Kernel: 7, Result: Blurry (21.7390)
[INFO] Kernel: 9, Result: Blurry (18.3632)
[INFO] Kernel: 11, Result: Blurry (12.7235)
[INFO] Kernel: 13, Result: Blurry (9.1489)
[INFO] Kernel: 15, Result: Blurry (2.3377)
[INFO] Kernel: 17, Result: Blurry (-2.6372)
[INFO] Kernel: 19, Result: Blurry (-9.1908)
[INFO] Kernel: 21, Result: Blurry (-15.9808)
[INFO] Kernel: 23, Result: Blurry (-20.6240)
[INFO] Kernel: 25, Result: Blurry (-29.7478)
[INFO] Kernel: 27, Result: Blurry (-29.0728)
[INFO] Kernel: 29, Result: Blurry (-37.7561)

Here, you can see that our image quickly becomes blurry and unreadable, and as the output shows, our OpenCV FFT blur detector correctly marks these images as blurry.
Below is a visualization of the Fast Fourier Transform magnitude values as the image becomes progressively blurrier and blurrier:

Detecting blur in video with OpenCV and the FFT
So far, we’ve applied our Fast Fourier Transform blur detector to images.
But is it possible to apply FFT blur detection to video streams as well?
And can the entire process be accomplished in real-time as well?
Let’s find out — open up a new file, name it blur_detector_video.py, and insert the following code:
# import the necessary packages
from imutils.video import VideoStream
from pyimagesearch.blur_detector import detect_blur_fft
import argparse
import imutils
import time
import cv2

# construct the argument parser and parse the arguments
ap = argparse.ArgumentParser()
ap.add_argument("-t", "--thresh", type=int, default=10,
	help="threshold for our blur detector to fire")
args = vars(ap.parse_args())
We begin with our imports, in particular both our VideoStream class and detect_blur_fft function.
We only have a single command line argument for this Python script — the threshold for FFT blur detection (--thresh).
From here, we’re ready to initialize our video stream and begin looping over incoming frames from our webcam:
# initialize the video stream and allow the camera sensor to warm up
print("[INFO] starting video stream...")
vs = VideoStream(src=0).start()
time.sleep(2.0)

# loop over the frames from the video stream
while True:
	# grab the frame from the threaded video stream and resize it
	# to have a maximum width of 400 pixels
	frame = vs.read()
	frame = imutils.resize(frame, width=500)

	# convert the frame to grayscale and detect blur in it
	gray = cv2.cvtColor(frame, cv2.COLOR_BGR2GRAY)
	(mean, blurry) = detect_blur_fft(gray, size=60,
		thresh=args["thresh"], vis=False)
Lines 17 and 18 initialize our webcam stream and allow time for the camera to warm up.
From there, we begin a frame processing loop on Line 21. Inside, we grab a frame and convert it to grayscale (Lines 24-28) just as in our single image blur detection script.
Then, Lines 29 and 30 apply our Fast Fourier Transform blur detection algorithm while passing our gray frame and --thresh command line argument. We won’t be visualizing the magnitude spectrum representation, so vis=False.
Next, we’ll process the results for this particular frame:
	# draw on the frame, indicating whether or not it is blurry
	color = (0, 0, 255) if blurry else (0, 255, 0)
	text = "Blurry ({:.4f})" if blurry else "Not Blurry ({:.4f})"
	text = text.format(mean)
	cv2.putText(frame, text, (10, 25), cv2.FONT_HERSHEY_SIMPLEX,
		0.7, color, 2)

	# show the output frame
	cv2.imshow("Frame", frame)
	key = cv2.waitKey(1) & 0xFF

	# if the `q` key was pressed, break from the loop
	if key == ord("q"):
		break

# do a bit of cleanup
cv2.destroyAllWindows()
vs.stop()
Our last code block should look very familiar at this point because this is the third time we’ve seen these lines of code. Here we:
- Annotate either blurry (red colored
text) or not blurry (green coloredtext) as well as themeanvalue (Lines 33-37) - Display the result (Line 40)
- Quit if the
qkey is pressed (Lines 41-45), and perform housekeeping cleanup (Lines 48 and 49)
Fast Fourier Transform video blur detection results
We’re now ready to find out if our OpenCV FFT blur detector can be applied to real-time video streams.
Make sure you use the “Downloads” section of this tutorial to download the source code.
From there, open up a terminal, and execute the following command:
$ python blur_detector_video.py
[INFO] starting video stream...
As I move my laptop, motion blur is introduced into the frame.
If we were implementing a computer vision system to automatically extract key, important frames, or creating an automatic video OCR system, we would want to discard these blurry frames — using our OpenCV FFT blur detector, we can do exactly that!
What’s next?

Are you interested in learning more about image processing, computer vision, and machine/deep learning?
If so, you’ll want to take a look at the PyImageSearch Gurus course.
I didn’t have the luxury of such a course in college.
I learned computer vision the hard way — a tale much like the one your grandparents tell, in which they walked uphill both ways in 4 feet of snow each day on their way to school.
Back then, there weren’t great image processing blogs like PyImageSearch online to learn from. Of course, there were theory and math intensive textbooks, complex research papers, and the occasional sit-down in my adviser’s office. But none of these resources taught computer vision systematically via practical use cases and Python code examples.
So what did I do?
I took what I learned and came up with my own examples and projects to learn from. It wasn’t easy, but by the end of it, I was confident that I knew computer vision well enough to consult for the National Institutes of Health (NIH) and build/deploy a couple of iPhone apps to the App Store.
Now what does that mean for you?
You have the golden opportunity to learn from me in a central place with other motivated students. I’ve developed a course using my personal arsenal of code and my years of knowledge. You will learn concepts and code the way I wish I had earlier in my career.
Inside PyImageSearch Gurus, you’ll find:
- An actionable, real-world course on Computer Vision, Deep Learning, and OpenCV. Each lesson in PyImageSearch Gurus is taught in the same hands-on, easy-to-understand PyImageSearch style that you know and love.
- The most comprehensive computer vision education online today. The PyImageSearch Gurus course covers 13 modules broken out into 168 lessons, with over 2,161 pages of content. You won’t find a more detailed computer vision course anywhere else online; I guarantee it.
- A community of like-minded developers, researchers, and students just like you, who are eager to learn computer vision, level-up their skills, and collaborate on projects. I participate in the forums nearly every day. These forums are a great way to get expert advice, both from me as well as the more advanced students.
Take a look at these previous students’ success stories — each of these students invested in themselves and achieved success. You can too in a short time after you take the plunge by enrolling today.
If you’re on the fence, grab the course syllabus and 10 free sample lessons. If that sounds interesting to you, simply click this link:
Summary
In today’s tutorial, you learned how to use OpenCV’s Fast Fourier Transform (FFT) implementation to perform blur detection in images and real-time video streams.
While not as simple as our variance of the Laplacian blur detector, the FFT blur detector is more robust and tends to provide better blur detection accuracy in real-life applications.
The problem is that the FFT method still requires us to set a manual threshold, specifically on the mean value of the FFT magnitudes.
An ideal blur detector would be able to detect blur in images and video streams without such a threshold.
To accomplish this task we’ll need a bit of machine learning — I’ll cover an automatic blur detector in a future tutorial.
To download the source code to this post (and be notified when future tutorials are published here on PyImageSearch), simply enter your email address in the form below!

Download the Source Code and FREE 17-page Resource Guide
Enter your email address below to get a .zip of the code and a FREE 17-page Resource Guide on Computer Vision, OpenCV, and Deep Learning. Inside you’ll find my hand-picked tutorials, books, courses, and libraries to help you master CV and DL!
The post OpenCV Fast Fourier Transform (FFT) for blur detection in images and video streams appeared first on PyImageSearch.