In this tutorial, you will learn how to use OpenCV and GrabCut to perform foreground segmentation and extraction.
Prior to deep learning and instance/semantic segmentation networks such as Mask R-CNN, U-Net, etc., GrabCut was the method to accurately segment the foreground of an image from the background.
The GrabCut algorithm works by:
- Accepting an input image with either (1) a bounding box that specified the location of the object in the image we wanted to segment or (2) a mask that approximated the segmentation
- Iteratively performing the following steps:
- Step #1: Estimating the color distribution of the foreground and background via a Gaussian Mixture Model (GMM)
- Step #2: Constructing a Markov random field over the pixels labels (i.e., foreground vs. background)
- Step #3: Applying a graph cut optimization to arrive at the final segmentation
Sounds complicated, doesn’t it?
Luckily, OpenCV has an implementation of GrabCut via the cv2.grabCut function that makes applying GrabCut a breeze (once you know the parameters to the function and how to tweak them, of course).
But before you go saying:
Hey Adrian, isn’t the GrabCut algorithm old news?
Shouldn’t we just be applying Mask R-CNN, U-Net, or other image segmentation networks to segment background and foreground instead?
The above is the perfect example of how deep learning and traditional computer vision are being blended together.
If you’ve ever used Mask R-CNN or U-Net before, you know these deep neural networks are super powerful, but the masks are not always perfect. In practice, you can actually use GrabCut to clean up these segmentation masks (and I’ll be showing you how to do that in a future post).
But in the meantime, let’s learn about the fundamentals of GrabCut.
To learn how to use OpenCV and GrabCut for foreground segmentation, just keep reading.
OpenCV GrabCut: Foreground Segmentation and Extraction
In the first part of this tutorial, we’ll discuss GrabCut, its implementation in OpenCV via the cv2.grabCut function, and its associated parameters.
From there, we’ll learn how to implement GrabCut with OpenCV via both:
- GrabCut initialization with bounding boxes
- GrabCut initialization with mask approximations
Afterward, we’ll apply GrabCut and review our results.
GrabCut in OpenCV
The cv2.grabCut function has the following signature:
grabCut(img, mask, rect, bgdModel, fgdModel, iterCount[, mode]) ->
	mask, bgdModel, fgdModel
To obtain a complete understanding of the implementation, let’s review each of these parameters:
imgmaskcv2.GC_INIT_WITH_RECT); otherwise, GrabCut assumes you are performing mask initialization (cv2.GC_INIT_WITH_MASK).rectmodetocv2.GC_INIT_WITH_MASK).bgModel: Temporary array used by GrabCut internally when modeling the background.fgModeliterCountmodecv2.GC_INIT_WITH_RECTorcv2.GC_INIT_WITH_MASK, depending on whether you are initializing GrabCut with a bounding box or a mask, respectively.
OpenCV’s GrabCut implementation returns a 3-tuple of:
maskbgModel: The temporary array used to model the background (you can ignore this value)fgModel
Now that we have an understanding of the cv2.grabCut function including its parameters and the values that it returns, let’s move on to applying GrabCut to an example computer vision project.
Configuring your development environment
You can set up your system today with a Python virtual environment containing OpenCV by following my pip install opencv tutorial (instructions included for Ubuntu, macOS, and Raspbian).
Please note that PyImageSearch does not recommend or support Windows for computer vision and deep learning development.
Project structure
Before we move on, use the “Downloads” section of today’s tutorial to grab the .zip associated with this blog post. From there, let’s inspect the layout of the files and folders directly in our terminal with the tree command:
$ tree --dirsfirst
.
├── images
│   ├── adrian.jpg
│   ├── lighthouse.png
│   └── lighthouse_mask.png
├── grabcut_bbox.py
└── grabcut_mask.py

1 directory, 5 files
Our project today consists of one folder of images/ and two Python scripts:
images/grabcut_bbox.pygrabcut_mask.py: Performs GrabCut via mask initialization
Using both of the Python scripts, we are going to learn how to perform GrabCut using two methods (bounding box initialization vs. mask initialization). We’ll begin with the bounding box approach in the next section.
GrabCut with OpenCV: Initialization with bounding boxes
Let’s get started implementing GrabCut with OpenCV — we’ll start by reviewing the bounding box implementation method.
Here, we’ll specify the bounding box of the object we want to segment in the image. The bounding box could be generated by:
- Manually examining the image and labeling the (x, y)-coordinates of the bounding box
- Applying a Haar cascade
- Using HOG + Linear SVM to detect the object
- Utilizing deep learning-based object detectors such as Faster R-CNN, SSDs, YOLO, etc.
As long as the algorithm generates a bounding box, you can use it in conjunction with GrabCut.
For the purposes of our demo script today, we will manually define the bounding box (x, y)-coordinates (i.e., rather than applying an automated object detector).
Let’s take a look at the bounding box initialization method of GrabCut now.
Open up a new file, name it grabcut_bbox.py, and insert the following code:
# import the necessary packages
import numpy as np
import argparse
import time
import cv2
import os

# construct the argument parser and parse the arguments
ap = argparse.ArgumentParser()
ap.add_argument("-i", "--image", type=str,
	default=os.path.sep.join(["images", "adrian.jpg"]),
	help="path to input image that we'll apply GrabCut to")
ap.add_argument("-c", "--iter", type=int, default=10,
	help="# of GrabCut iterations (larger value => slower runtime)")
args = vars(ap.parse_args())
We begin this script with a selection of imports, namely OpenCV and NumPy (the rest are built into Python). Please refer to the “Configuring your development environment” section above to install Python, OpenCV, and associated software on your system.
Our script handles two command line arguments:
--imagedefault, we’ll use theadrian.jpgimage in theimages/directory.--iter: The number of GrabCut iterations to perform, where smaller values lead to faster overall time and larger values result in a slower runtime (but ideally better segmentation results)
Let’s go ahead and load our input --image and allocate space for an equivalently sized mask:
# load the input image from disk and then allocate memory for the
# output mask generated by GrabCut -- this mask should hae the same
# spatial dimensions as the input image
image = cv2.imread(args["image"])
mask = np.zeros(image.shape[:2], dtype="uint8")
Here, Line 20 loads your input --image from disk and Line 21 creates a mask (i.e., empty image) with the same dimensions. The mask will soon be populated with the results of the GrabCut algorithm.
Next, we will manually define the coordinates of the face in the adrian.jpg image:
# define the bounding box coordinates that approximately define my
# face and neck region (i.e., all visible skin)
rect = (151, 43, 236, 368)
Line 25 defines the bounding box coordinates of the face in the image. These (x, y)-coordinates were determined manually by means of a mouse hovering over pixels in the image and me jotting them down. You can accomplish this with most photo editing software including Photoshop or free alternatives such as GIMP and other apps you find online.
It is important to note here that while these face rect coordinates were determined manually, any object detector could do the job. Given that our first example is a face, you could have chosen a Haar, HOG, or DL-based face detector to find the bounding box coordinates of the face (substitute a different object detector for different types of objects).
In this next code block, we’ll will execute the GrabCut algorithm with bounding box initialization on our input:
# allocate memory for two arrays that the GrabCut algorithm internally
# uses when segmenting the foreground from the background
fgModel = np.zeros((1, 65), dtype="float")
bgModel = np.zeros((1, 65), dtype="float")

# apply GrabCut using the the bounding box segmentation method
start = time.time()
(mask, bgModel, fgModel) = cv2.grabCut(image, mask, rect, bgModel,
	fgModel, iterCount=args["iter"], mode=cv2.GC_INIT_WITH_RECT)
end = time.time()
print("[INFO] applying GrabCut took {:.2f} seconds".format(end - start))
Before we perform the GrabCut computation, we need two empty arrays for GrabCut to use internally when segmenting the foreground from the background (fgModel and bgModel). Lines 29 and 30 generate both arrays with NumPy’s zeros method.
From there, Lines 34 and 35 apply GrabCut (timestamps are collected before/after the operation), and the elapsed time is printed via Line 37.
GrabCut returns our populated mask as well as two arrays that we can ignore. If you need a review of the GrabCut method signature including the input parameters and return values, please refer to the “GrabCut in OpenCV” section above.
Let’s go ahead and post-process our mask:
# the output mask has for possible output values, marking each pixel
# in the mask as (1) definite background, (2) definite foreground,
# (3) probable background, and (4) probable foreground
values = (
	("Definite Background", cv2.GC_BGD),
	("Probable Background", cv2.GC_PR_BGD),
	("Definite Foreground", cv2.GC_FGD),
	("Probable Foreground", cv2.GC_PR_FGD),
)

# loop over the possible GrabCut mask values
for (name, value) in values:
	# construct a mask that for the current value
	print("[INFO] showing mask for '{}'".format(name))
	valueMask = (mask == value).astype("uint8") * 255

	# display the mask so we can visualize it
	cv2.imshow(name, valueMask)
	cv2.waitKey(0)
Lines 42-47 define possible values in the output GrabCut mask including our definite/probable backgrounds and foregrounds.
We then proceed to loop over these values so that we can visualize each. Inside the loop (Lines 50-57), we (1) construct a mask for the current value and (2) display it until any key is pressed.
After each of our definite/probable backgrounds and foregrounds have been displayed, our code will begin generating an outputMask and an output image:
# we'll set all definite background and probable background pixels
# to 0 while definite foreground and probable foreground pixels are
# set to 1
outputMask = np.where((mask == cv2.GC_BGD) | (mask == cv2.GC_PR_BGD),
	0, 1)

# scale the mask from the range [0, 1] to [0, 255]
outputMask = (outputMask * 255).astype("uint8")

# apply a bitwise AND to the image using our mask generated by
# GrabCut to generate our final output image
output = cv2.bitwise_and(image, image, mask=outputMask)
Here we produce two visualizations:
- GrabCut output mask
- Output image (with the background masked out)
To produce our GrabCut outputMask, Lines 62 and 63 find all pixels that are either definite background or probable background and set them to 0 — all other pixels should be marked as 1 (i.e., foreground). Notice how we take advantage of NumPy’s where function while OR-ing each mask and setting the values to 0 and 1 accordingly. Then, Line 66 scales the outputMask from the range [0, 1] to [0, 255].
We then generate our output image with the background masked out by means of a bitwise_and operation and pass the outputMask as the mask parameter (Line 70).
At this point, we have:
- Prepared inputs to the
grabCutfunction including our inputimage,mask,rectcoordinates, andfgModelandbgModelzero arrays. Note that therectcoordinates were determined manually. - Executed the GrabCut algorithm.
- Generated and visualized our definite/probable background and foreground masks.
- Generated our (1) GrabCut output mask (
outputMask) and our (2) output image with the background masked out (output).
Let’s go ahead and display our final results:
# show the input image followed by the mask and output generated by
# GrabCut and bitwise masking
cv2.imshow("Input", image)
cv2.imshow("GrabCut Mask", outputMask)
cv2.imshow("GrabCut Output", output)
cv2.waitKey(0)
To wrap up, we show each of the following in separate windows:
image--imageoutputMaskoutput
Now that GrabCut with bounding box initialization has been implemented, let’s move on to applying it to our input images.
Bounding box GrabCut results
Start by using the “Downloads” section of this blog post to download the source code and example image.
From there, open up a terminal, and execute the following command:
$ python grabcut_bbox.py
[INFO] applying GrabCut took 1.08 seconds
[INFO] showing mask for 'Definite Background'
[INFO] showing mask for 'Probable Background'
[INFO] showing mask for 'Definite Foreground'
[INFO] showing mask for 'Probable Foreground'

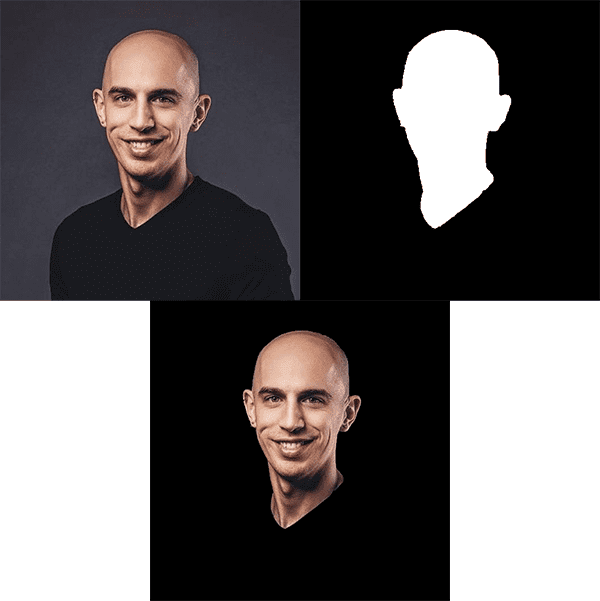
On the left, you can see the original input image, while on the right, you can see the same face with a bounding box drawn around the face/neck region (this bounding box corresponds to the rect variable in the grabcut_bbox.py script).
Our goal here is to automatically segment the face and neck region from the above image using GrabCut and OpenCV.
Next, you can see our output from Lines 45-60 where we visualize the definite and probable background and foreground segmentations:
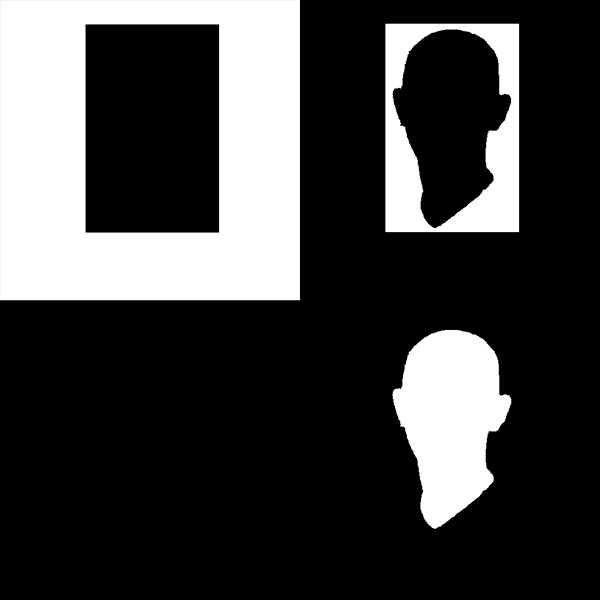
These values map to:
- Definite background (top-left):
cv2.GC_BGD - Probable background (top-right):
cv2.GC_PR_BGD - Definite foreground (bottom-left):
cv2.GC_FGD - Probable foreground (bottom-right):
cv2.GC_PR_FGD
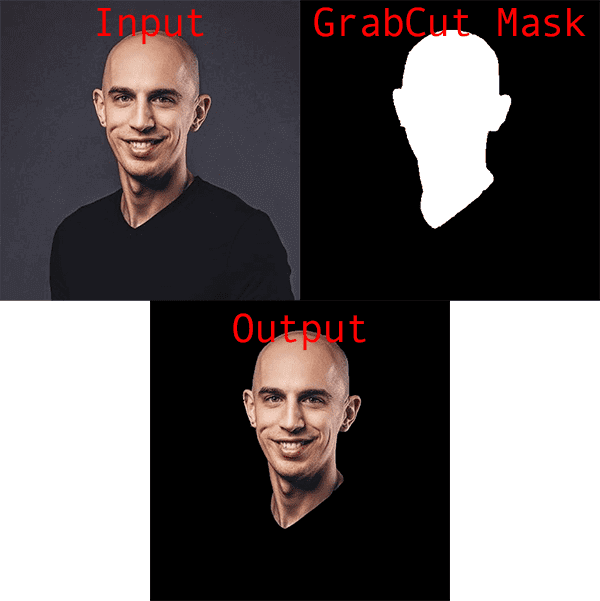
Finally, we have the output of GrabCut itself:
On the left, we have our original input image.
The right shows the output mask generated by GrabCut, while the bottom shows the output of applying the mask to the input image — notice how my face and neck region is cleanly segmented and extracted via GrabCut.
GrabCut with OpenCV: Initialization with masks
Previously, we learned how to initialize OpenCV’s GrabCut using bounding boxes — but there’s actually a second method to initialize GrabCut.
Using masks, we can supply the approximate segmentation of the object in the image. GrabCut can then iteratively apply graph cuts to improve the segmentation and extract the foreground from the image.
These masks could be generated by:
- Manually creating them in photo editing software such as Photoshop, GIMP, etc.
- Applying basic image processing operations such as thresholding, edge detection, contour filtering, etc.
- Utilizing deep learning-based segmentation networks (ex., Mask R-CNN and U-Net)
How the mask is generated is irrelevant to GrabCut. As long as you have a mask that approximates the segmentation of the object in an image, you can use GrabCut to further improve the segmentation.
Let’s see how GrabCut with mask initialization works.
Open up the grabcut_mask.py file in your project directory structure, and insert the following code:
# import the necessary packages
import numpy as np
import argparse
import time
import cv2
import os

# construct the argument parser and parse the arguments
ap = argparse.ArgumentParser()
ap.add_argument("-i", "--image", type=str,
	default=os.path.sep.join(["images", "lighthouse.png"]),
	help="path to input image that we'll apply GrabCut to")
ap.add_argument("-mask", "--mask", type=str,
	default=os.path.sep.join(["images", "lighthouse_mask.png"]),
	help="path to input mask")
ap.add_argument("-c", "--iter", type=int, default=10,
	help="# of GrabCut iterations (larger value => slower runtime)")
args = vars(ap.parse_args())
Again, our most notable imports are OpenCV and NumPy. Please follow the “Configuring your development environment” section instructions if you need to set up your system to perform GrabCut with mask initialization.
Our script handles three command line arguments:
--image: The path to your input image. This time, bydefault, we’ll use thelighthouse.pngphoto available in theimages/directory.--mask--iter: The number of GrabCut iterations to perform, where smaller values lead to faster overall time and larger values result in a slower runtime (but ideally better segmentation results)
Now that our imports and command line arguments are taken care of, let’s go ahead and load our input --image and input --mask:
# load the input image and associated mask from disk
image = cv2.imread(args["image"])
mask = cv2.imread(args["mask"], cv2.IMREAD_GRAYSCALE)

# apply a bitwise mask to show what the rough, approximate mask would
# give us
roughOutput = cv2.bitwise_and(image, image, mask=mask)

# show the rough, approximated output
cv2.imshow("Rough Output", roughOutput)
cv2.waitKey(0)
Before we get into the weeds of this second GrabCut method, we need to load our input --image and --mask from disk (Lines 21 and 22).
Please note that our rough mask was manually generated for the sake of this example (using Photoshop/GIMP); however, in a future post we’ll be showing you how to automatically generate the mask via a deep learning Mask R-CNN.
Line 26 applies a bitwise AND to the image using the mask, resulting in our rough approximation of our foreground segmentation. Subsequently Lines 29 and 30 display the approximation until any key is pressed.
From here, we’ll set our probable/definite foreground values into the mask array:
# any mask values greater than zero should be set to probable
# foreground
mask[mask > 0] = cv2.GC_PR_FGD
mask[mask == 0] = cv2.GC_BGD
Any pixel values in the mask greater than zero are set to probable foreground (Line 34); all other pixel values are set to definite background (Line 35).
We’re now ready to apply GrabCut with mask initialization:
# allocate memory for two arrays that the GrabCut algorithm internally
# uses when segmenting the foreground from the background
fgModel = np.zeros((1, 65), dtype="float")
bgModel = np.zeros((1, 65), dtype="float")

# apply GrabCut using the the mask segmentation method
start = time.time()
(mask, bgModel, fgModel) = cv2.grabCut(image, mask, None, bgModel,
	fgModel, iterCount=args["iter"], mode=cv2.GC_INIT_WITH_MASK)
end = time.time()
print("[INFO] applying GrabCut took {:.2f} seconds".format(end - start))
Again, we allocate memory for the foreground and background models of GrabCut (Lines 39 and 40).
And then we execute GrabCut on the image using the approximate mask segmentation (Lines 44 and 45). Note how the rect parameter is set to None (we don’t need it for this method), unlike the first bounding box-based method described in this blog post.
Moving on, we’ll post-process the results:
# the output mask has for possible output values, marking each pixel
# in the mask as (1) definite background, (2) definite foreground,
# (3) probable background, and (4) probable foreground
values = (
	("Definite Background", cv2.GC_BGD),
	("Probable Background", cv2.GC_PR_BGD),
	("Definite Foreground", cv2.GC_FGD),
	("Probable Foreground", cv2.GC_PR_FGD),
)

# loop over the possible GrabCut mask values
for (name, value) in values:
	# construct a mask that for the current value
	print("[INFO] showing mask for '{}'".format(name))
	valueMask = (mask == value).astype("uint8") * 255

	# display the mask so we can visualize it
	cv2.imshow(name, valueMask)
	cv2.waitKey(0)
This block should look especially familiar. In fact, it is identical to a block in our first GrabCut method code walkthrough.
Again, we define definite/probable foreground and background values (Lines 52-57) and display each of the resulting valueMask images (Lines 60-67).
Next, we’ll prepare our GrabCut mask and output image with the background removed:
# set all definite background and probable background pixels to 0
# while definite foreground and probable foreground pixels are set
# to 1, then scale teh mask from the range [0, 1] to [0, 255]
outputMask = np.where((mask == cv2.GC_BGD) | (mask == cv2.GC_PR_BGD),
	0, 1)
outputMask = (outputMask * 255).astype("uint8")

# apply a bitwise AND to the image using our mask generated by
# GrabCut to generate our final output image
output = cv2.bitwise_and(image, image, mask=outputMask)
Again, this code on Lines 72-78 should be familiar at this point (they are identical to the previous script).
Here, we find all pixels that are either definite background or probable background and set them to 0; all other pixels are marked as 1 (i.e., foreground). We then scale the mask to the range [0, 255].
We then apply a bitwise AND operation to the input image using the outputMask, resulting in the background being removed (masked out).
And finally we display the results on screen:
# show the input image followed by the mask and output generated by
# GrabCut and bitwise masking
cv2.imshow("Input", image)
cv2.imshow("GrabCut Mask", outputMask)
cv2.imshow("GrabCut Output", output)
cv2.waitKey(0)
Again, to conclude our script, we show the input image, GrabCut outputMask, and output of GrabCut after applying the mask.
With GrabCut mask initialization now implemented, let’s move on to testing it with our own example images.
Mask GrabCut results
We are now ready to use OpenCV and GrabCut to segment an image via mask initialization.
Start by using the “Downloads” section of this tutorial to download the source code and example images.
From there, open up a terminal, and execute the following command:
$ python grabcut_mask.py
[INFO] applying GrabCut took 0.56 seconds
[INFO] showing mask for 'Definite Background'
[INFO] showing mask for 'Probable Background'
[INFO] showing mask for 'Definite Foreground'
[INFO] showing mask for 'Probable Foreground'
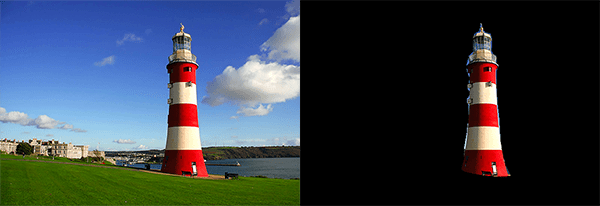
On the left, you can see our original input image. On the right you can see the output of applying GrabCut via mask initialization.
The image on the right shows the mask associated with the lighthouse. For the sake of this blog post/example I manually created this mask in Photoshop; however any algorithm capable of producing a mask could be used here (ex., basic image processing via thresholding, edge detection, contours; deep learning-based segmentation; etc.) Notice how the mask/segmentation isn’t very “clean” — we can easily see the blue sky of the background “leaking” into our mask.
From there, we can visualize our definite and probable masks for the background and foreground, respectively:
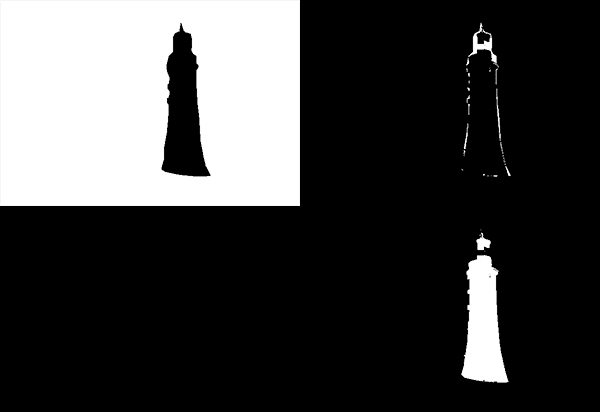
These values map to:
- Definite background (top-left):
cv2.GC_BGD - Probable background (top-right):
cv2.GC_PR_BGD - Definite foreground (bottom-left):
cv2.GC_FGD - Probable foreground (bottom-right):
cv2.GC_PR_FGD
And finally, we have the output of OpenCV’s GrabCut with mask initialization:
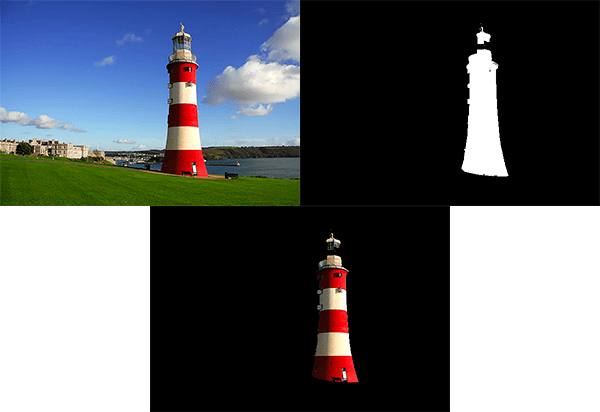
For reference, the left displays our input image.
The right shows our output mask generated by GrabCut, while the bottom displays the output of applying the mask created by GrabCut to the original input image.
Notice that we have cleaned up our segmentation — the blue background from the sky has been removed, while the lighthouse is left as the foreground.
The only problem is that the area where the actual spotlight sits in the lighthouse has been marked as background:
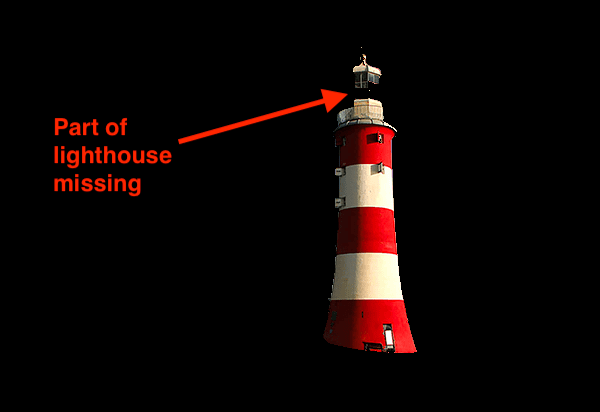
ctrl + "+"). As you can observe, the results of GrabCut with mask initialization aren’t perfect. I suggest you use the definite background mask value result rather than both the definite/probable foreground masks in this specific case. You will need to invert the definite background mask image using your OpenCV/NumPy knowledge. From there, your GrabCut mask initialization method will produce a better foreground segmentation. The problem here is that the area where the light sits in the lighthouse is more-or-less transparent, causing the blue sky background to shine through, thereby causing GrabCut to mark this area as background.
You could fix this problem by updating your mask to use the definite background (i.e., cv.GC_BGD) when loading your mask from disk. I will leave this as an exercise to you, the reader, to implement.
Why GrabCut is good, but not perfect
GrabCut is one of my favorite computer vision algorithms ever invented, but it’s not perfect.
Furthermore, deep learning-based segmentation networks such as Faster R-CNN and U-Net can automatically generate masks that can segment objects (foreground) from their backgrounds — does that mean that GrabCut is irrelevant in the age of deep learning?
Actually, far from it.
While Faster R-CNN and U-Net are super powerful methods, they can result in masks that are a bit messy. We can use GrabCut to help clean up these masks. I’ll be showing you how to do exactly that in a future blog post.
What’s next?
Today, we tossed around the concept of a “mask” like it was going out of style.
And no, today’s “masks” aren’t COVID-19 Face Masks which I’ve previously written about.
Image masks are a fundamental concept of image processing. You need to understand them (as well as many other key concepts) if you truly seek to become a well-rounded computer vision hacker and expert.
Are you interested in learning more about image processing, computer vision, and machine/deep learning?
If so, you’ll want to take a look at the PyImageSearch Gurus course.
I didn’t have the luxury of such a course in college.
I learned computer vision the hard way — a tale much like the one your grandparents tell in which they walked uphill to school, both ways, in 4 feet of snow each day.
Back then, there weren’t great image processing blogs like PyImageSearch online to learn from. Of course there were theory and math-intensive text books, complex research papers, and the occasional sit-down in my computer science adviser’s office. But none of these resources taught computer vision systematically via practical use cases and Python code examples.
So what did I do?
I took what I learned and came up with my own examples and projects to learn from. It wasn’t easy, but by the end of it, I was confident that I knew computer vision well enough to consult for the NIH and build/deploy a couple of iPhone apps to the App Store. My learning endeavor continues to this day with my passion for sharing what I learn in books and courses and here on the blog.
Now what does that mean for you?
You have the golden opportunity to learn from me in a central place with other motivated students. I’ve developed a course using my personal arsenal of code and my years of knowledge. You will learn concepts and code the way I wish I had earlier in my career.
Inside PyImageSearch Gurus, you’ll find:
- An actionable, real-world course on Computer Vision, Deep Learning, and OpenCV. Each lesson in PyImageSearch Gurus is taught in the same hands-on, easy-to-understand PyImageSearch style that you know and love
- The most comprehensive computer vision education online today. The PyImageSearch Gurus course covers 13 modules broken out into 168 lessons, with over 2,161 pages of content. You won’t find a more detailed computer vision course anywhere else online; I guarantee it
- A community of like-minded developers, researchers, and students just like you, who are eager to learn computer vision, level-up their skills, and collaborate on projects. I participate in the forums nearly every day. These forums are a great way to get expert advice, both from me as well as the more advanced students
Take a look at these previous students’ success stories — each of these students invested in themselves and has achieved success. You can too in a short time after you take the plunge by enrolling today.
If you’re on the fence, simply grab the course syllabus and 10 free sample lessons. If that sounds interesting to you, follow this link:
Summary
In this tutorial, you learned how to use OpenCV and the GrabCut algorithm to perform foreground segmentation and extraction.
The GrabCut algorithm is implemented in OpenCV via the cv2.grabCut function and can be initialized via either:
- A bounding box that specifies the location of the object you want to segment in the input image
- A mask that approximates the pixel-wise location of the object in the image
The GrabCut algorithm takes the bounding box/mask and then iteratively approximates the foreground and background.
While deep learning-based image segmentation networks (ex., Mask R-CNN and U-Net) tend to be more powerful in actually detecting and approximating the mask of objects in an image, we know that these masks can be less than perfect — we can actually use GrabCut to clean up “messy” masks returned by these segmentation networks!
In a future tutorial, I’ll show you how to do exactly that.
To download the source code to this post (and be notified when future tutorials are published here on PyImageSearch), simply enter your email address in the form below!

Download the Source Code and FREE 17-page Resource Guide
Enter your email address below to get a .zip of the code and a FREE 17-page Resource Guide on Computer Vision, OpenCV, and Deep Learning. Inside you’ll find my hand-picked tutorials, books, courses, and libraries to help you master CV and DL!
The post OpenCV GrabCut: Foreground Segmentation and Extraction appeared first on PyImageSearch.