
In this tutorial, you will create an automatic sudoku puzzle solver using OpenCV, Deep Learning, and Optical Character Recognition (OCR).
My wife is a huge sudoku nerd. Every time we travel, whether it be a 45-minute flight from Philadelphia to Albany or a 6-hour transcontinental flight to California, she always has a sudoku puzzle with her.
The funny thing is, she prefers the printed Sudoku puzzle books. She hates the digital/smartphone app versions and refuses to play them.
I’m not a big puzzle person myself, but one time, we were sitting on a flight, and I asked:
How do you know if you solved the puzzle correctly? Is there a solution sheet in the back of the book? Or do you just do it and hope it’s correct?
Apparently, that was a stupid question to ask, for two reasons:
- Yes, there is a solution key in the back. All you need to do is flip to the back of the book, locate the puzzle number, and see the solution.
- And most importantly, she doesn’t solve a puzzle incorrectly. My wife doesn’t get mad easily, but let me tell you, I touched a nerve when I innocently and unknowingly insulted her sudoku puzzle solving skills.
She then lectured me for 20 minutes on how she only solves “level 4 and 5 puzzles,” followed by a lesson on the “X-wing” and “Y-wing” techniques to sudoku puzzle solving. I have a Ph.D in computer science, but all of that went over my head.
But for those of you who aren’t married to a sudoku grand master like I am, it does raise the question:
Can OpenCV and OCR be used to solve and check sudoku puzzles?
If the sudoku puzzle manufacturers didn’t have to print the answer key in the back of the book and instead provided an app for users to check their puzzles, the printers could either pocket the savings or print additional puzzles at no cost.
The sudoku puzzle company makes more money, and the end users are happy. Seems like a win/win.
And from my perspective, perhaps if I publish a tutorial on sudoku, maybe I can get back in my wife’s good graces.
To learn how to build an automatic sudoku puzzle solver with OpenCV, Deep Learning, and OCR, just keep reading.
OpenCV Sudoku Solver and OCR
In the first part of this tutorial, we’ll discuss the steps required to build a sudoku puzzle solver using OpenCV, deep learning, and Optical Character Recognition (OCR) techniques.
From there, you’ll configure your development environment and ensure the proper libraries and packages are installed.
Before we write any code, we’ll first review our project directory structure, ensuring you know what files will be created, modified, and utilized throughout the course of this tutorial.
I’ll then show you how to implement SudokuNet, a basic Convolutional Neural Network (CNN) that will be used to OCR the digits on the sudoku puzzle board.
We’ll then train that network to recognize digits using Keras and TensorFlow.
But before we can actually check and solve a sudoku puzzle, we first need to locate where in the image the sudoku board is — we’ll implement helper functions and utilities to help with that task.
Finally, we’ll put all the pieces together and implement our full OpenCV sudoku puzzle solver.
How to solve sudoku puzzles with OpenCV and OCR
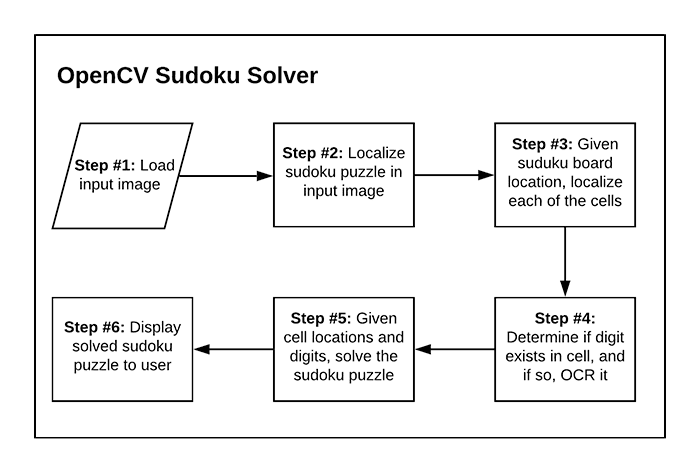
Creating an automatic sudoku puzzle solver with OpenCV is a 6-step process:
- Step #1: Provide input image containing sudoku puzzle to our system.
- Step #2: Locate where in the input image the puzzle is and extract the board.
- Step #3: Given the board, locate each of the individual cells of the sudoku board (most standard sudoku puzzles are a 9×9 grid, so we’ll need to localize each of these cells).
- Step #4: Determine if a digit exists in the cell, and if so, OCR it.
- Step #5: Apply a sudoku puzzle solver/checker algorithm to validate the puzzle.
- Step #6: Display the output result to the user.
The majority of these steps can be accomplished using OpenCV along with basic computer vision and image processing operations.
The biggest exception is Step #4, where we need to apply OCR.
OCR can be a bit tricky to apply, but we have a number of options:
- Use the Tesseract OCR engine, the de facto standard for open source OCR
- Utilize cloud-based OCR APIs, such as Microsoft Cognitive Services, Amazon Rekognition, or the Google Vision API
- Train our own custom OCR model
All of these are perfectly valid options; however, in order to make a complete end-to-end tutorial, I’ve decided that we’ll train our own custom sudoku OCR model using deep learning.
Be sure to strap yourself in — this is going to be a wild ride.
Configuring your development environment to solve sudoku puzzles with OpenCV and OCR

To configure your system for this tutorial, I recommend following either of these tutorials to establish your baseline system and create a virtual environment:
Please note that PyImageSearch does not recommend or support Windows for CV/DL projects.
Once your environment is up and running, you’ll need another package for this tutorial. You need to install py-sudoku, the library we’ll be using to help us solve sudoku puzzles:
$ pip install py-sudoku
Project structure
Take a moment to grab today’s files from the “Downloads” section of this tutorial. From there, extract the archive, and inspect the contents:
$ tree --dirsfirst
.
├── output
│   └── digit_classifier.h5
├── pyimagesearch
│   ├── models
│   │   ├── __init__.py
│   │   └── sudokunet.py
│   ├── sudoku
│   │   ├── __init__.py
│   │   └── puzzle.py
│   └── __init__.py
├── solve_sudoku_puzzle.py
├── sudoku_puzzle.jpg
└── train_digit_classifier.py

4 directories, 9 files
Inside, you’ll find a pyimagesearch module containing the following:
sudokunet.pypuzzle.py
As with all CNNs, SudokuNet needs to be trained with data. Our train_digit_classifier.py script will train a digit OCR model on the MNIST dataset.
Once SudokuNet is successfully trained, we’ll deploy it with our solve_sudoku_puzzle.py script to solve a sudoku puzzle.
When your system is working, you can impress your friends with the app. Or better yet, fool them on the airplane as you solve puzzles faster than they possibly can in the seat right behind you! Don’t worry, I won’t tell!
SudokuNet: A digit OCR model implemented in Keras and TensorFlow
Every sudoku puzzle starts with an NxN grid (typically 9×9) where some cells are blank and other cells already contain a digit.
The goal is to use the knowledge about the existing digits to correctly infer the other digits.
But before we can solve sudoku puzzles with OpenCV, we first need to implement a neural network architecture that will handle OCR’ing the digits on the sudoku puzzle board — given that information, it will become trivial to solve the actual puzzle.
Fittingly, we’ll name our sudoku puzzle architecture SudokuNet.
Open up the sudokunet.py file in your pyimagesearch module, and insert the following code:
# import the necessary packages
from tensorflow.keras.models import Sequential
from tensorflow.keras.layers import Conv2D
from tensorflow.keras.layers import MaxPooling2D
from tensorflow.keras.layers import Activation
from tensorflow.keras.layers import Flatten
from tensorflow.keras.layers import Dense
from tensorflow.keras.layers import Dropout
All of SudokuNet‘s imports are from tf.keras. As you can see, we’ll be using Keras’ Sequential API as well as the layers shown.
Now that our imports are taken care of, let’s dive right into the implementation of our CNN:
class SudokuNet:
	@staticmethod
	def build(width, height, depth, classes):
		# initialize the model
		model = Sequential()
		inputShape = (height, width, depth)
Our SudokuNet class is defined with a single static method (no constructor) on Lines 10-12. The build method accepts the following parameters:
width28pixels)height28pixels)depth: Channels of MNIST digit images (1grayscale channel)classes10digits)
Lines 14 and 15 initialize our model to be built with the Sequential API as well as establish the inputShape, which we’ll need for our first CNN layer.
Now that our model is initialized, let’s go ahead and build out our CNN:
		# first set of CONV => RELU => POOL layers
		model.add(Conv2D(32, (5, 5), padding="same",
			input_shape=inputShape))
		model.add(Activation("relu"))
		model.add(MaxPooling2D(pool_size=(2, 2)))

		# second set of CONV => RELU => POOL layers
		model.add(Conv2D(32, (3, 3), padding="same"))
		model.add(Activation("relu"))
		model.add(MaxPooling2D(pool_size=(2, 2)))

		# first set of FC => RELU layers
		model.add(Flatten())
		model.add(Dense(64))
		model.add(Activation("relu"))
		model.add(Dropout(0.5))

		# second set of FC => RELU layers
		model.add(Dense(64))
		model.add(Activation("relu"))
		model.add(Dropout(0.5))

		# softmax classifier
		model.add(Dense(classes))
		model.add(Activation("softmax"))

		# return the constructed network architecture
		return model
The body of our network is composed of:
CONV => RELU => POOLCONV => RELU => POOLFC => RELU
The head of the network consists of a softmax classifier with the number of outputs being equal to the number of our classes (in our case: 10 digits).
Great job implementing SudokuNet!
If the CNN layers and working with the Sequential API was unfamiliar to you, I recommend checking out either of the following resources:
- Keras Tutorial: How to get started with Keras, Deep Learning, and Python
- Deep Learning for Computer Vision with Python (Starter Bundle)
Note: As an aside, I’d like to take a moment to point out here that if you were, for example, building a CNN to classify 26 uppercase English letters plus the 10 digits (a total of 36 characters), you most certainly would need a deeper CNN (outside the scope of this tutorial, which focuses on digits as they apply to sudoku). I cover how to train networks on both digits and alphabet characters inside my book, OCR with OpenCV, Tesseract and Python.
Implementing our sudoku digit training script with Keras and TensorFlow
With the SudokuNet model architecture implemented, we can move on to creating a Python script that will train the model to recognize digits.
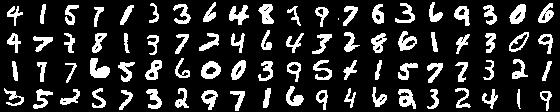
Perhaps unsurprisingly, we’ll be using the MNIST dataset to train our digit recognizer, as it fits quite nicely in this use case.
Open up the train_digit_classifier.py to get started:
# import the necessary packages
from pyimagesearch.models import SudokuNet
from tensorflow.keras.optimizers import Adam
from tensorflow.keras.datasets import mnist
from sklearn.preprocessing import LabelBinarizer
from sklearn.metrics import classification_report
import argparse

# construct the argument parser and parse the arguments
ap = argparse.ArgumentParser()
ap.add_argument("-m", "--model", required=True,
	help="path to output model after training")
args = vars(ap.parse_args())
We begin our training script with a small handful of imports. Most notably, we’re importing SudokuNet (discussed in the previous section) and the mnist dataset. The MNIST dataset of handwritten digits is built right into TensorFlow/Keras’ datasets module and will be cached to your machine on demand.
Our script requires a single command line argument: --model. When you execute the training script from the command line, simply pass a filename for your output model file (I recommend using the .h5 file extension).
Next, we’ll (1) set hyperparameters and (2) load and pre-process MNIST:
# initialize the initial learning rate, number of epochs to train
# for, and batch size
INIT_LR = 1e-3
EPOCHS = 10
BS = 128

# grab the MNIST dataset
print("[INFO] accessing MNIST...")
((trainData, trainLabels), (testData, testLabels)) = mnist.load_data()

# add a channel (i.e., grayscale) dimension to the digits
trainData = trainData.reshape((trainData.shape[0], 28, 28, 1))
testData = testData.reshape((testData.shape[0], 28, 28, 1))

# scale data to the range of [0, 1]
trainData = trainData.astype("float32") / 255.0
testData = testData.astype("float32") / 255.0

# convert the labels from integers to vectors
le = LabelBinarizer()
trainLabels = le.fit_transform(trainLabels)
testLabels = le.transform(testLabels)
You can configure training hyperparameters on Lines 17-19. Through experimentation, I’ve determined appropriate settings for the learning rate, number of training epochs, and batch size.
Note: Advanced users might wish to check out my Keras Learning Rate Finder tutorial to aid in automatically finding optimal learning rates.
To work with the MNIST digit dataset, we perform the following steps:
- Load the dataset into memory (Line 23). This dataset is already split into training and testing data
- Add a channel dimension to the digits to indicate that they are grayscale (Lines 30 and 31)
- Scale data to the range of [0, 1] (Lines 30 and 31)
- One-hot encode labels (Lines 34-36)
The process of one-hot encoding means that an integer such as 3 would be represented as follows:
[0, 0, 0, 1, 0, 0, 0, 0, 0, 0]
Or the integer 9 would be encoded like so:
[0, 0, 0, 0, 0, 0, 0, 0, 0, 1]
From here, we’ll go ahead and initialize and train SudokuNet on our digits data:
# initialize the optimizer and model
print("[INFO] compiling model...")
opt = Adam(lr=INIT_LR)
model = SudokuNet.build(width=28, height=28, depth=1, classes=10)
model.compile(loss="categorical_crossentropy", optimizer=opt,
	metrics=["accuracy"])

# train the network
print("[INFO] training network...")
H = model.fit(
	trainData, trainLabels,
	validation_data=(testData, testLabels),
	batch_size=BS,
	epochs=EPOCHS,
	verbose=1)
Lines 40-43 build and compile our model with the Adam optimizer and categorical cross-entropy loss.
Note: We’re focused on 10 digits. However, if you were only focused on recognizing binary numbers 0 and 1, then you would use loss="binary_crossentropy". Keep this in mind when working with two-class datasets or data subsets.
Training is launched via a call to the fit method (Lines 47-52).
Once training is complete, we’ll evaluate and export our model:
# evaluate the network
print("[INFO] evaluating network...")
predictions = model.predict(testData)
print(classification_report(
	testLabels.argmax(axis=1),
	predictions.argmax(axis=1),
	target_names=[str(x) for x in le.classes_]))

# serialize the model to disk
print("[INFO] serializing digit model...")
model.save(args["model"], save_format="h5")
Using our newly trained model, we make predictions on our testData (Line 56). From there we print a classification report to our terminal (Lines 57-60).
Finally, we save our model to disk (Line 64). Note that for TensorFlow 2.0+, we recommend explicitly setting the save_format="h5" (HDF5 format).
Training our sudoku digit recognizer with Keras and TensorFlow
We’re now ready to train our SudokuNet model to recognize digits.
Start by using the “Downloads” section of this tutorial to download the source code and example images.
From there, open up a terminal, and execute the following command:
$ python train_digit_classifier.py --model output/digit_classifier.h5
[INFO] accessing MNIST...
[INFO] compiling model...
[INFO] training network...
[INFO] training network...
Epoch 1/10
469/469 [==============================] - 22s 47ms/step - loss: 0.7311 - accuracy: 0.7530 - val_loss: 0.0989 - val_accuracy: 0.9706
Epoch 2/10
469/469 [==============================] - 22s 47ms/step - loss: 0.2742 - accuracy: 0.9168 - val_loss: 0.0595 - val_accuracy: 0.9815
Epoch 3/10
469/469 [==============================] - 21s 44ms/step - loss: 0.2083 - accuracy: 0.9372 - val_loss: 0.0452 - val_accuracy: 0.9854
...
Epoch 8/10
469/469 [==============================] - 22s 48ms/step - loss: 0.1178 - accuracy: 0.9668 - val_loss: 0.0312 - val_accuracy: 0.9893
Epoch 9/10
469/469 [==============================] - 22s 47ms/step - loss: 0.1100 - accuracy: 0.9675 - val_loss: 0.0347 - val_accuracy: 0.9889
Epoch 10/10
469/469 [==============================] - 22s 47ms/step - loss: 0.1005 - accuracy: 0.9700 - val_loss: 0.0392 - val_accuracy: 0.9889
[INFO] evaluating network...
              precision    recall  f1-score   support

           0       0.98      1.00      0.99       980
           1       0.99      1.00      0.99      1135
           2       0.99      0.98      0.99      1032
           3       0.99      0.99      0.99      1010
           4       0.99      0.99      0.99       982
           5       0.98      0.99      0.98       892
           6       0.99      0.98      0.99       958
           7       0.98      1.00      0.99      1028
           8       1.00      0.98      0.99       974
           9       0.99      0.98      0.99      1009

    accuracy                           0.99     10000
   macro avg       0.99      0.99      0.99     10000
weighted avg       0.99      0.99      0.99     10000

[INFO] serializing digit model...
Here, you can see that our SudokuNet model has obtained 99% accuracy on our testing set.
You can verify that the model is serialized to disk by inspecting your output directory:
$ ls -lh output
total 2824
-rw-r--r--@ 1 adrian  staff   1.4M Jun  7 07:38 digit_classifier.h5
This digit_classifier.h5 file contains our Keras/TensorFlow model, which we’ll use to recognize the digits on a sudoku board later in this tutorial.
This model is quite small and could be deployed to a Raspberry Pi or even a mobile device such as an iPhone running the CoreML framework.
Finding the sudoku puzzle board in an image with OpenCV
At this point, we have a model that can recognize digits in an image; however, that digit recognizer doesn’t do us much good if it can’t locate the sudoku puzzle board in an image.
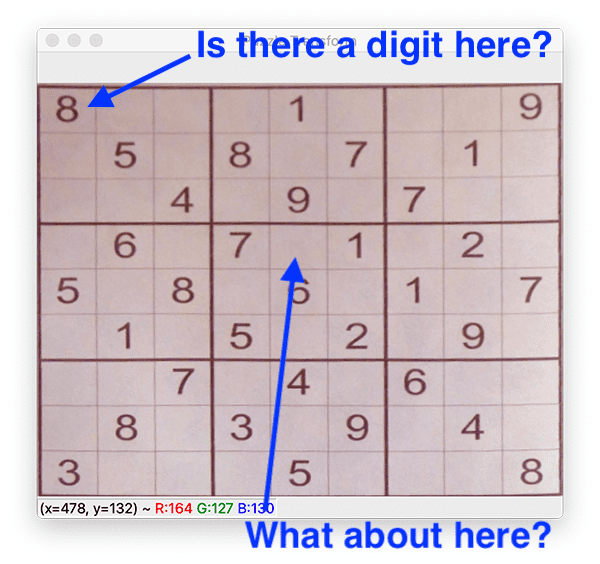
For example, let’s say we presented the following sudoku puzzle board to our system:
How are we going to locate the actual sudoku puzzle board in the image?
And once we’ve located the puzzle, how do we identify each of the individual cells?
To make our lives a bit easier, we’ll be implementing two helper utilities:
find_puzzleextract_digit
This section will show you how to implement the find_puzzle method, while the next section will show the extract_digit implementation.
Open up the puzzle.py file in the pyimagesearch module, and we’ll get started:
# import the necessary packages
from imutils.perspective import four_point_transform
from skimage.segmentation import clear_border
import numpy as np
import imutils
import cv2

def find_puzzle(image, debug=False):
	# convert the image to grayscale and blur it slightly
	gray = cv2.cvtColor(image, cv2.COLOR_BGR2GRAY)
	blurred = cv2.GaussianBlur(gray, (7, 7), 3)
Our two helper functions require my imutils implementation of a four_point_transform for deskewing an image to obtain a bird’s eye view.
Additionally, we’ll use the clear_border routine in our extract_digit function to clean up the edges of a sudoku cell. Most operations will be driven with OpenCV with a little bit of help from NumPy and imutils.
Our find_puzzle function comes first and accepts two parameters:
imagedebugdebug=Trueand using your computer vision knowledge to iron out any bugs.
Our first step is to convert our image to grayscale and apply a Gaussian blur operation with a 7×7 kernel (Lines 10 and 11).
And next, we’ll apply adaptive thresholding:
	# apply adaptive thresholding and then invert the threshold map
	thresh = cv2.adaptiveThreshold(blurred, 255,
		cv2.ADAPTIVE_THRESH_GAUSSIAN_C, cv2.THRESH_BINARY, 11, 2)
	thresh = cv2.bitwise_not(thresh)

	# check to see if we are visualizing each step of the image
	# processing pipeline (in this case, thresholding)
	if debug:
		cv2.imshow("Puzzle Thresh", thresh)
		cv2.waitKey(0)
Binary adaptive thresholding operations allow us to peg grayscale pixels toward each end of the [0, 255] pixel range. In this case, we’ve both applied a binary threshold and then inverted the result as shown in Figure 5 below:
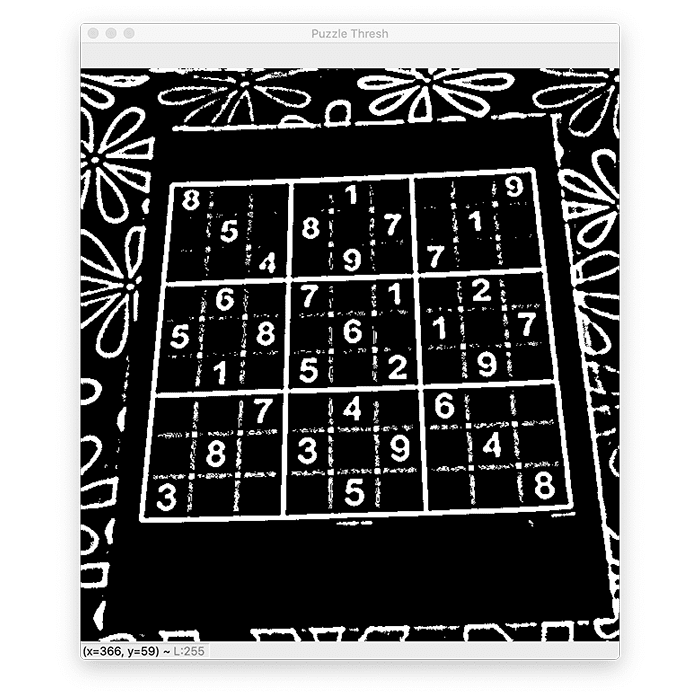
Just remember, you’ll only see something similar to the inverted thresholded image if you have your debug option set to True.
Now that our image is thresholded, let’s find and sort contours:
	# find contours in the thresholded image and sort them by size in
	# descending order
	cnts = cv2.findContours(thresh.copy(), cv2.RETR_EXTERNAL,
		cv2.CHAIN_APPROX_SIMPLE)
	cnts = imutils.grab_contours(cnts)
	cnts = sorted(cnts, key=cv2.contourArea, reverse=True)

	# initialize a contour that corresponds to the puzzle outline
	puzzleCnt = None

	# loop over the contours
	for c in cnts:
		# approximate the contour
		peri = cv2.arcLength(c, True)
		approx = cv2.approxPolyDP(c, 0.02 * peri, True)

		# if our approximated contour has four points, then we can
		# assume we have found the outline of the puzzle
		if len(approx) == 4:
			puzzleCnt = approx
			break
Here, we find contours and sort by area in reverse order (Lines 26-29).
One of our contours will correspond to the outline of the sudoku grid — puzzleCnt is initialized to None on Line 32. Let’s determine which of our cnts is our puzzleCnt using the following approach:
- Loop over all contours beginning on Line 35
- Determine the perimeter of the contour (Line 37)
- Approximate the contour (Line 38)
- Check if contour has four vertices, and if so, mark it as the
puzzleCnt, andbreakout of the loop (Lines 42-44)
It is possible that the outline of the sudoku grid isn’t found. In that case, let’s raise an Exception:
# if the puzzle contour is empty then our script could not find
# the outline of the sudoku puzzle so raise an error
if puzzleCnt is None:
raise Exception(("Could not find sudoku puzzle outline. "
"Try debugging your thresholding and contour steps."))
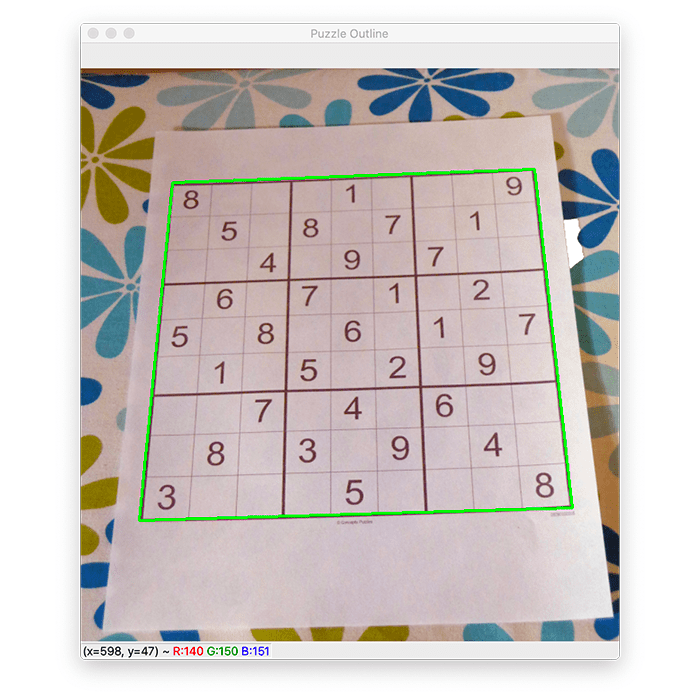
# check to see if we are visualizing the outline of the detected
# sudoku puzzle
if debug:
# draw the contour of the puzzle on the image and then display
# it to our screen for visualization/debugging purposes
output = image.copy()
cv2.drawContours(output, [puzzleCnt], -1, (0, 255, 0), 2)
cv2.imshow("Puzzle Outline", output)
cv2.waitKey(0)
If the sudoku puzzle is not found, we raise an Exception to tell the user/developer what happened (Lines 48-50).
And again, if we are debugging, we’ll visualize what is going on under the hood by drawing the puzzle contour outline on the image, as shown in Figure 6:
With the contour of the puzzle in hand (fingers crossed), we’re then able to deskew the image to obtain a top-down bird’s eye view of the puzzle:
	# apply a four point perspective transform to both the original
	# image and grayscale image to obtain a top-down bird's eye view
	# of the puzzle
	puzzle = four_point_transform(image, puzzleCnt.reshape(4, 2))
	warped = four_point_transform(gray, puzzleCnt.reshape(4, 2))

	# check to see if we are visualizing the perspective transform
	if debug:
		# show the output warped image (again, for debugging purposes)
		cv2.imshow("Puzzle Transform", puzzle)
		cv2.waitKey(0)

	# return a 2-tuple of puzzle in both RGB and grayscale
	return (puzzle, warped)
Applying a four-point perspective transform effectively deskews our sudoku puzzle grid, making it much easier for us to determine rows, columns, and cells as we move forward (Lines 65 and 66). This operation is performed on the original RGB image and gray image.
The final result of our find_puzzle function is shown in Figure 7:
Our find_puzzle return signature consists of a 2-tuple of the original RGB image and grayscale image after all operations, including the final four-point perspective transform.
Great job so far!
Let’s continue our forward march toward solving sudoku puzzles. Now we need a means to extract digits from sudoku puzzle cells, and we’ll do just that in the next section.
Extracting digits from a sudoku puzzle with OpenCV
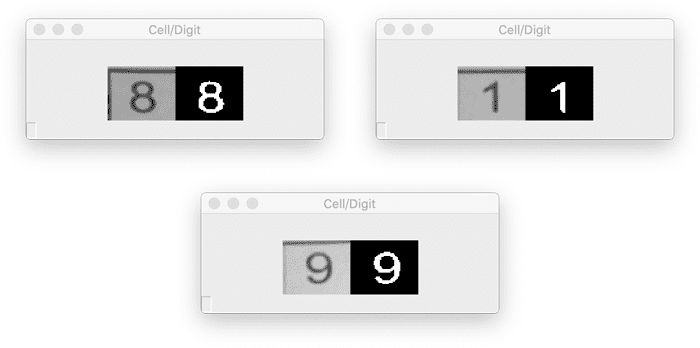
extract_digit helper function will help us find and extract digits or determine that a cell is empty and no digit is present. Each of these two cases is equally important for solving a sudoku puzzle. In the case where a digit is present, we need to OCR it. In our previous section, you learned how to detect and extract the sudoku puzzle board from an image with OpenCV.
This section will show you how to examine each of the individual cells in a sudoku board, detect if there is a digit in the cell, and if so, extract the digit.
Continuing where we left off in the previous section, let’s open the puzzle.py file once again and get to work:
def extract_digit(cell, debug=False):
	# apply automatic thresholding to the cell and then clear any
	# connected borders that touch the border of the cell
	thresh = cv2.threshold(cell, 0, 255,
		cv2.THRESH_BINARY_INV | cv2.THRESH_OTSU)[1]
	thresh = clear_border(thresh)

	# check to see if we are visualizing the cell thresholding step
	if debug:
		cv2.imshow("Cell Thresh", thresh)
		cv2.waitKey(0)
Here, you can see we’ve defined our extract_digit function to accept two parameters:
celldebug
Our first step, on Lines 80-82, is to threshold and clear any foreground pixels that are touching the borders of the cell (such as any line markings from the cell dividers). The result of this operation can be shown via Lines 85-87.
Let’s see if we can find the digit contour:
	# find contours in the thresholded cell
	cnts = cv2.findContours(thresh.copy(), cv2.RETR_EXTERNAL,
		cv2.CHAIN_APPROX_SIMPLE)
	cnts = imutils.grab_contours(cnts)

	# if no contours were found than this is an empty cell
	if len(cnts) == 0:
		return None

	# otherwise, find the largest contour in the cell and create a
	# mask for the contour
	c = max(cnts, key=cv2.contourArea)
	mask = np.zeros(thresh.shape, dtype="uint8")
	cv2.drawContours(mask, [c], -1, 255, -1)
Lines 90-92 find the contours in the thresholded cell. If no contours are found, we return None (Lines 95 and 96).
Given our contours, cnts, we then find the largest contour by pixel area and construct an associated mask (Lines 100-102).
From here, we’ll continue working on trying to isolate the digit in the cell:
	# compute the percentage of masked pixels relative to the total
	# area of the image
	(h, w) = thresh.shape
	percentFilled = cv2.countNonZero(mask) / float(w * h)

	# if less than 3% of the mask is filled then we are looking at
	# noise and can safely ignore the contour
	if percentFilled < 0.03:
		return None

	# apply the mask to the thresholded cell
	digit = cv2.bitwise_and(thresh, thresh, mask=mask)

	# check to see if we should visualize the masking step
	if debug:
		cv2.imshow("Digit", digit)
		cv2.waitKey(0)

	# return the digit to the calling function
	return digit
Dividing the pixel area of our mask by the area of the cell itself (Lines 106 and 107) gives us the percentFilled value (i.e., how much our cell is “filled up” with white pixels). Given this percentage, we ensure the contour is not simply “noise” (i.e., a very small contour).
Assuming we don’t have a noisy cell, Line 115 applies the mask to the thresholded cell. This mask is optionally shown on screen (Lines 118-120) and is finally returned to the caller. Three example results are shown in Figure 9:
Great job implementing the digit extraction pipeline!
Implementing our OpenCV sudoku puzzle solver
At this point, we’re armed with the following components:
- Our custom SudokuNet model trained on the MNIST dataset of digits and residing on disk ready for use
- A means to extract the sudoku puzzle board and apply a perspective transform
- A pipeline to extract digits within individual cells of the sudoku puzzle or ignore ones that we consider to be noise
- The py-sudoku puzzle solver installed in our Python virtual environment, which saves us from having to engineer an algorithm from hand and lets us focus solely on the computer vision challenge
We are now ready to put each of the pieces together to build a working OpenCV sudoku solver!
Open up the solve_sudoku_puzzle.py file, and let’s complete our sudoku solver project:
# import the necessary packages
from pyimagesearch.sudoku import extract_digit
from pyimagesearch.sudoku import find_puzzle
from tensorflow.keras.preprocessing.image import img_to_array
from tensorflow.keras.models import load_model
from sudoku import Sudoku
import numpy as np
import argparse
import imutils
import cv2

# construct the argument parser and parse the arguments
ap = argparse.ArgumentParser()
ap.add_argument("-m", "--model", required=True,
	help="path to trained digit classifier")
ap.add_argument("-i", "--image", required=True,
	help="path to input sudoku puzzle image")
ap.add_argument("-d", "--debug", type=int, default=-1,
	help="whether or not we are visualizing each step of the pipeline")
args = vars(ap.parse_args())
As with nearly all Python scripts, we have a selection of imports to get the party started.
These include our custom computer vision helper functions: extract_digit and find_puzzle. We’ll be using TensorFlow/Keras’ load_model method to grab our trained SudokuNet model from disk and load it into memory.
The sudoku import is made possible by py-sudoku, which we’ve previously installed; at this stage, this is the most foreign import for us computer vision and deep learning nerds.
Let’s define three command line arguments:
--model--image--debug
As we’re now equipped with imports and our args dictionary, let’s load both our (1) digit classifier model and (2) input --image from disk:
# load the digit classifier from disk
print("[INFO] loading digit classifier...")
model = load_model(args["model"])

# load the input image from disk and resize it
print("[INFO] processing image...")
image = cv2.imread(args["image"])
image = imutils.resize(image, width=600)
From there, we’ll find our puzzle and prepare to isolate the cells therein:
# find the puzzle in the image and then
(puzzleImage, warped) = find_puzzle(image, debug=args["debug"] > 0)

# initialize our 9x9 sudoku board
board = np.zeros((9, 9), dtype="int")

# a sudoku puzzle is a 9x9 grid (81 individual cells), so we can
# infer the location of each cell by dividing the warped image
# into a 9x9 grid
stepX = warped.shape[1] // 9
stepY = warped.shape[0] // 9

# initialize a list to store the (x, y)-coordinates of each cell
# location
cellLocs = []
Here, we:
- Find the sudoku puzzle in the input
--imagevia ourfind_puzzlehelper (Line 32) - Initialize our sudoku board — a 9×9 array (Line 35)
- Infer the step size for each of the cells by simple division (Lines 40 and 41)
- Initialize a list to hold the (x, y)-coordinates of cell locations (Line 45)
And now, let’s begin a nested loop over rows and columns of the sudoku board:
# loop over the grid locations
for y in range(0, 9):
	# initialize the current list of cell locations
	row = []

	for x in range(0, 9):
		# compute the starting and ending (x, y)-coordinates of the
		# current cell
		startX = x * stepX
		startY = y * stepY
		endX = (x + 1) * stepX
		endY = (y + 1) * stepY

		# add the (x, y)-coordinates to our cell locations list
		row.append((startX, startY, endX, endY))
Accounting for every cell in the sudoku puzzle, we loop over rows (Line 48) and columns (Line 52) in a nested fashion.
Inside, we use our step values to determine the starting and ending (x, y)-coordinates of the current cell (Lines 55-58).
Line 61 appends the coordinates as a tuple to this particular row. Each row will have nine entries (9x 4-tuples).
Now we’re ready to crop out the cell and recognize the digit therein (if one is present):
		# crop the cell from the warped transform image and then
		# extract the digit from the cell
		cell = warped[startY:endY, startX:endX]
		digit = extract_digit(cell, debug=args["debug"] > 0)

		# verify that the digit is not empty
		if digit is not None:
			# resize the cell to 28x28 pixels and then prepare the
			# cell for classification
			roi = cv2.resize(digit, (28, 28))
			roi = roi.astype("float") / 255.0
			roi = img_to_array(roi)
			roi = np.expand_dims(roi, axis=0)

			# classify the digit and update the sudoku board with the
			# prediction
			pred = model.predict(roi).argmax(axis=1)[0]
			board[y, x] = pred

	# add the row to our cell locations
	cellLocs.append(row)
Step by step, we proceed to:
-
Crop the
cellfrom transformed image and then extract thedigit(Lines 65 and 66) -
If the digit is
not None, then we know there is an actualdigitin thecell(rather than an empty space), at which point we:- Pre-process the digit
roiin the same manner that we did for training (Lines 72-75) - Classify the digit
roiwith SudokuNet (Line 79) - Update the sudoku puzzle
boardarray with the predicted value of the cell (Line 80)
- Pre-process the digit
-
Add the
row‘s (x, y)-coordinates to thecellLocslist (Line 83) — the last line of our nested loop over rows and columns
And now, let’s solve the sudoku puzzle with py-sudoku:
# construct a sudoku puzzle from the board
print("[INFO] OCR'd sudoku board:")
puzzle = Sudoku(3, 3, board=board.tolist())
puzzle.show()

# solve the sudoku puzzle
print("[INFO] solving sudoku puzzle...")
solution = puzzle.solve()
solution.show_full()
As you can see, first, we display the sudoku puzzle board as it was interpreted via OCR (Lines 87 and 88).
Then, we make a call to puzzle.solve to solve the sudoku puzzle (Line 92). And again, this is where the py-sudoku package does the mathematical algorithm to solve our puzzle.
We go ahead and print out the solved puzzle in our terminal (Line 93)
And of course, what fun would this project be if we didn’t visualize the solution on the puzzle image itself? Let’s do that now:
# loop over the cell locations and board
for (cellRow, boardRow) in zip(cellLocs, solution.board):
	# loop over individual cell in the row
	for (box, digit) in zip(cellRow, boardRow):
		# unpack the cell coordinates
		startX, startY, endX, endY = box

		# compute the coordinates of where the digit will be drawn
		# on the output puzzle image
		textX = int((endX - startX) * 0.33)
		textY = int((endY - startY) * -0.2)
		textX += startX
		textY += endY

		# draw the result digit on the sudoku puzzle image
		cv2.putText(puzzleImage, str(digit), (textX, textY),
			cv2.FONT_HERSHEY_SIMPLEX, 0.9, (0, 255, 255), 2)

# show the output image
cv2.imshow("Sudoku Result", puzzleImage)
cv2.waitKey(0)
To annotate our image with the solution numbers, we simply:
- Loop over cell locations and the board (Lines 96-98)
- Unpack cell coordinates (Line 100)
- Compute coordinates of where text annotation will be drawn (Lines 104-107)
- Draw each output digit on our puzzle board photo (Lines 110 and 111)
- Display our solved sudoku puzzle image (Line 114) until any key is pressed (Line 115)
Nice job!
Let’s kick our project into gear in the next section. You’ll be very impressed with your hard work!
OpenCV sudoku puzzle solver OCR results
We are now ready to put our OpenV sudoku puzzle solver to the test!
Make sure you use the “Downloads” section of this tutorial to download the source code, trained digit classifier, and example sudoku puzzle image.
From there, open up a terminal, and execute the following command:
$ python solve_sudoku_puzzle.py --model output/digit_classifier.h5 \
	--image sudoku_puzzle.jpg
[INFO] loading digit classifier...
[INFO] processing image...
[INFO] OCR'd sudoku board:
+-------+-------+-------+
| 8     |   1   |     9 |
|   5   | 8   7 |   1   |
|     4 |   9   | 7     |
+-------+-------+-------+
|   6   | 7   1 |   2   |
| 5   8 |   6   | 1   7 |
|   1   | 5   2 |   9   |
+-------+-------+-------+
|     7 |   4   | 6     |
|   8   | 3   9 |   4   |
| 3     |   5   |     8 |
+-------+-------+-------+

[INFO] solving sudoku puzzle...

---------------------------
9x9 (3x3) SUDOKU PUZZLE
Difficulty: SOLVED
---------------------------
+-------+-------+-------+
| 8 7 2 | 4 1 3 | 5 6 9 |
| 9 5 6 | 8 2 7 | 3 1 4 |
| 1 3 4 | 6 9 5 | 7 8 2 |
+-------+-------+-------+
| 4 6 9 | 7 3 1 | 8 2 5 |
| 5 2 8 | 9 6 4 | 1 3 7 |
| 7 1 3 | 5 8 2 | 4 9 6 |
+-------+-------+-------+
| 2 9 7 | 1 4 8 | 6 5 3 |
| 6 8 5 | 3 7 9 | 2 4 1 |
| 3 4 1 | 2 5 6 | 9 7 8 |
+-------+-------+-------+

As you can see, we have successfully solved the sudoku puzzle using OpenCV, OCR, and deep learning!
And now, if you’re the betting type, you could challenge a friend or significant other to see who can solve 10 sudoku puzzles the fastest on your next transcontinental airplane ride! Just don’t get caught snapping a few photos!
Credits
This tutorial was inspired by Aakash Jhawar and by Part 1 and Part 2 of his sudoku puzzle solver.
Additionally, you’ll note that I used the same example sudoku puzzle board that Aakash did, not out of laziness, but to demonstrate how the same puzzle can be solved with different computer vision and image processing techniques.
I really enjoyed Aakash’s articles and recommend PyImageSearch readers check them out as well (especially if you want to implement a sudoku solver from scratch rather than using the py-sudoku library).
What’s next?
Today, we learned how to solve a fun sudoku puzzle using OCR techniques spanning from training a deep learning model to creating a couple of image processing pipelines.
When you go to tackle any computer vision project, you need to know what’s possible and how to break a project down into achievable milestones.
But for a lot of readers of my blog that e-mail me daily, a single project is very daunting.
You wonder:
- Where on Earth do I begin?
- How do I get from point A to point B? Or what is point A in the first place?
- What’s possible, and what isn’t?
- Which tools do I need, and how can I use them effectively?
- How can I get from my “BIG idea” to my “working solution” faster?
You’re not alone!
Your coach, mentor, or teacher has probably told you that “practice makes perfect” or “study harder.” And they are not wrong.
I’ll add that “studying smarter” is part of the equation too. I’ve learned not to focus on theory when I’m learning something new (such as OCR). Instead, I like to solve problems and learn by doing. By studying a new topic this way, I’m more successful at producing measurable results than if I were to remember complex equations.
If you want to study Optical Character Recognition (OCR) the smart way, look no further than my upcoming book.
Inside, you’ll find plenty of examples that are directly applicable to your OCR challenge.
Readers of mine tend to resonate with my no-nonsense and no mathematical fluff style of teaching in my books and courses. Grab one today, and get started.
Or hold out for my new OCR-specific book, which is in the planning and early development stages right now. If you want to stay in the loop, simply click here and fill in your information:
Summary
In this tutorial, you learned how to implement a sudoku puzzle solver using OpenCV, deep learning, and OCR.
In order to find and locate the sudoku puzzle board in the image, we utilized OpenCV and basic image processing techniques, including blurring, thresholding, and contour processing, just to name a few.
To actually OCR the digits on the sudoku board, we trained a custom digit recognition model using Keras and TensorFlow.
Combining the sudoku board locator with our digit OCR model allowed us to make quick work of solving the actual sudoku puzzle.
If you’re interested in learning more about OCR, I’m authoring a brand-new book called Optical Character Recognition with OpenCV, Tesseract, and Python.
Otherwise, to download the source code to this post (and be notified when future tutorials are published here on PyImageSearch), simply enter your email address in the form below!

Download the Source Code and FREE 17-page Resource Guide
Enter your email address below to get a .zip of the code and a FREE 17-page Resource Guide on Computer Vision, OpenCV, and Deep Learning. Inside you’ll find my hand-picked tutorials, books, courses, and libraries to help you master CV and DL!
The post OpenCV Sudoku Solver and OCR appeared first on PyImageSearch.