
In this tutorial, you will learn how to perform image alignment and image registration using OpenCV.
Image alignment and registration have a number of practical, real-world use cases, including:
- Medical: MRI scans, SPECT scans, and other medical scans produce multiple images. To help doctors and physicians better interpret these scans, image registration can be used to align multiple images together and overlay them on top of each other. From there the doctor can read the results and provide a more accurate diagnosis.
- Military: Automatic Target Recognition (ATR) algorithms accept multiple input images of the target, align them, and refine their internal parameters to improve target recognition.
- Optical Character Recognition (OCR): Image alignment (often called document alignment in the context of OCR) can be used to build automatic form, invoice, or receipt scanners. We first align the input image to a template of the document we want to scan. From there OCR algorithms can read the text from each individual field.
In the context of this tutorial, we’ll be looking at image alignment through the perspective of document alignment/registration, which is often used in Optical Character Recognition (OCR) applications.
Today, we’ll be covering the fundamentals of image registration and alignment. Next week, we’ll incorporate image alignment with Optical Character Recognition (OCR), allowing us to create a document, form, and invoice scanner that aligns an input image with a template document and then extracts the text from each field in the document.
Note: Portions of this tutorial appear in my upcoming book OCR with OpenCV, Tesseract, and Python.
To learn how to perform image alignment and registration with OpenCV, just keep reading.
Image alignment and registration with OpenCV
In the first part of this tutorial, we’ll briefly discuss what image alignment and registration is. We’ll learn how OpenCV can help us align and register our images using keypoint detectors, local invariant descriptors, and keypoint matching.
Next, we’ll implement a helper function, align_images, which as the name suggests, will allow us to align two images based on keypoint correspondences.
I’ll then show you how to use the align_document function to align an input image with a template.
Ready to get started?
Then let’s dive in!
What is image alignment and registration?
Image alignment and registration is the process of:
- Accepting two input images that contain the same object but at slightly different viewing angles
- Automatically computing the homography matrix used to align the images (whether that be featured-based keypoint correspondences, similarity measures, or even deep neural networks that automatically learn the transformation)
- Taking that homography matrix and applying a perspective warp to align the images together
For example, let’s consider the following figure:
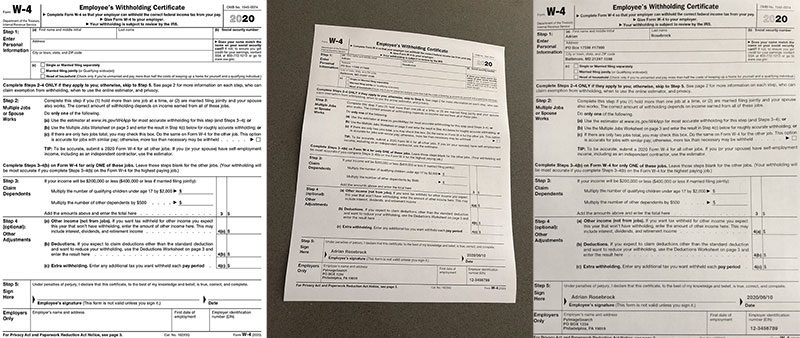
In Figure 1 (left) we have a template of a W-4 form, which is a United States Internal Revenue Service (IRS) tax form that employees fill out so that employers know how much tax to withhold from their paycheck (depending on deductions, filing status, etc.).
I have partially filled out a W-4 form with faux data and then captured a photo of it with my phone (middle).
Finally, you can see the output image alignment and registration on the right — notice how the input image is now aligned with the template.
In next week’s tutorial, you’ll learn how to OCR each of the individual fields from the input document and associate them with the fields in the template. For now though, we’ll only be learning how to align a form with its template as an important pre-processing step before applying OCR.
While we’re examining image alignment and registration from an OCR perspective, be aware the same principles hold for other domains too.
How can OpenCV help with image alignment and registration?
There are a number of image alignment and registration algorithms:
- The most popular image alignment algorithms are feature-based and include keypoint detectors (DoG, Harris, GFFT, etc.), local invariant descriptors (SIFT, SURF, ORB, etc.), and keypoint matching (RANSAC and its variants).
- Medical applications often use similarity measures for image registration, typically cross-correlation, sum of squared intensity differences, and mutual information.
- With the resurgence of neural networks, deep learning can even be used for image alignment by automatically learning the homography transform.
We’ll be implementing image alignment and registration using feature-based methods.
Feature-based methods start with detecting keypoints in our two input images:

Keypoints are meant to identify salient regions of an input image.
For each keypoint, we extract local invariant descriptors, which quantify the region surrounding each keypoint in the input image.
SIFT features, for example, are 128-d, so if we detected 528 keypoints in a given input image, then we’ll have a total of 528 vectors, each of which is 128-d.
Given our features, we apply algorithms such as RANSAC to match our keypoints and determine their correspondences:

Provided we have enough keypoint matches and correspondences, we can then compute a homography matrix, which allows us to apply a perspective warp to align the images:

You’ll be learning how to build an OpenCV project that accomplishes image alignment and registration via a homography matrix in the remainder of this tutorial.
For more details on homography matrix construction and the role it plays in computer vision, be sure to refer to this OpenCV reference.
Configuring your OCR development environment
If you have not already configured TensorFlow and the associated libraries from last week’s tutorial, I first recommend following the relevant tutorial linked below:
The tutorials above will help you configure your system with all the necessary software for this blog post in a convenient Python virtual environment.
Project structure
Take a moment to find the “Downloads” section of this tutorial and grab both the code and example tax forms we’ll use here today. Inside, you’ll find the following:
$ tree --dirsfirst
.
├── pyimagesearch
│   ├── alignment
│   │   ├── __init__.py
│   │   └── align_images.py
│   └── __init__.py
├── scans
│   ├── scan_01.jpg
│   └── scan_02.jpg
├── align_document.py
└── form_w4.png

3 directories, 7 files
We have a simple project structure for this tutorial consisting of the following images:
scans/form_w4.png
Additionally, we’ll be reviewing two Python files:
align_images.py: Holds our helper function which aligns a scan to a template by means of an OpenCV pipelinealign_document.py
In the next section, we’ll work on implementing our helper utility for aligning images.
Aligning images with OpenCV and keypoint matching
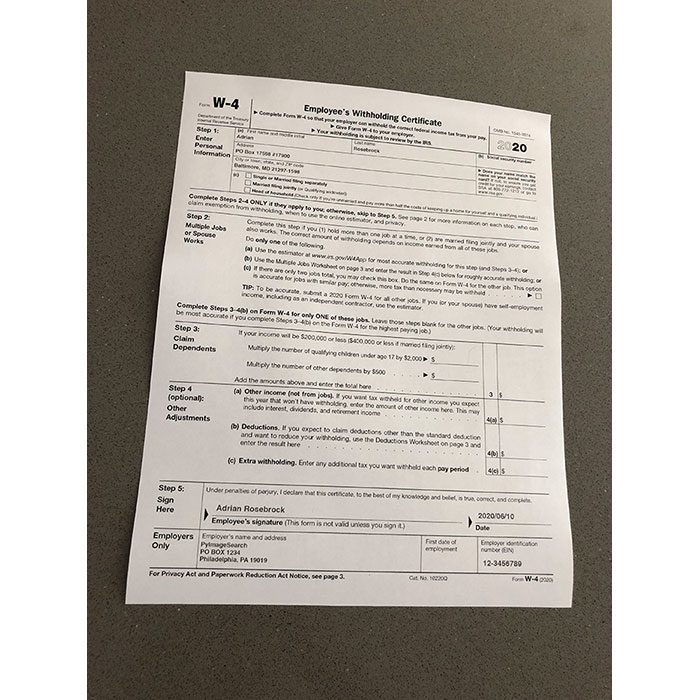
We are now ready to implement image alignment and registration using OpenCV. For the purposes of this section, we’ll be attempting to align the following images:

On the left we have our template W-4 form, while on the right we have a sample W-4 form I have filled out and captured with my phone.
The end goal is to align these images such that their fields match up (allowing us to OCR each field in next week’s tutorial).
Let’s get started!
Open align_images.py, and let’s work on the script together:
# import the necessary packages
import numpy as np
import imutils
import cv2

def align_images(image, template, maxFeatures=500, keepPercent=0.2,
	debug=False):
	# convert both the input image and template to grayscale
	imageGray = cv2.cvtColor(image, cv2.COLOR_BGR2GRAY)
	templateGray = cv2.cvtColor(template, cv2.COLOR_BGR2GRAY)
Our helper script requires OpenCV and imutils; you can follow the “Configuring your OCR development environment” section above to install both of these packages on your system. NumPy is an OpenCV prerequisite and will also be installed.
Our align_images function begins on Line 6 and accepts five parameters:
imagetemplateimage but with form data present.template: The template form image.maxFeatureskeepPercentdebugTruefor debugging purposes.
Given that we have defined our function, let’s implement our image processing pipeline. Diving in, the first action we take is converting both our image and template to grayscale (Lines 9 and 10).
Next, we will detect keypoints, extract local binary features, and correlate these features between our input image and the template:
	# use ORB to detect keypoints and extract (binary) local
	# invariant features
	orb = cv2.ORB_create(maxFeatures)
	(kpsA, descsA) = orb.detectAndCompute(imageGray, None)
	(kpsB, descsB) = orb.detectAndCompute(templateGray, None)

	# match the features
	method = cv2.DESCRIPTOR_MATCHER_BRUTEFORCE_HAMMING
	matcher = cv2.DescriptorMatcher_create(method)
	matches = matcher.match(descsA, descsB, None)
We use the ORB algorithm to detect keypoints and extract binary local invariant features (Lines 14-16). The Hamming method computes the distance between these binary features to find the best matches (Lines 19-21). You can learn more about the keypoint detection and local binary patterns in my Local Binary Patterns with Python & OpenCV tutorial or in my PyImageSearch Gurus Course.
As we now have our keypoint matches, our next steps include sorting, filtering, and displaying:
	# sort the matches by their distance (the smaller the distance,
	# the "more similar" the features are)
	matches = sorted(matches, key=lambda x:x.distance)

	# keep only the top matches
	keep = int(len(matches) * keepPercent)
	matches = matches[:keep]

	# check to see if we should visualize the matched keypoints
	if debug:
		matchedVis = cv2.drawMatches(image, kpsA, template, kpsB,
			matches, None)
		matchedVis = imutils.resize(matchedVis, width=1000)
		cv2.imshow("Matched Keypoints", matchedVis)
		cv2.waitKey(0)
Here, we sort the matches (Line 25) by their distance. The smaller the distance, the more similar the two keypoint regions are.
Lines 28 and 29 keep only the top matches — otherwise we risk introducing noise.
If we are in debug mode, we will use cv2.drawMatches to visualize the matches using OpenCV drawing methods (Lines 32-37), an example of which is shown in Figure 6:
Next, we will conduct a couple of steps prior to computing our homography matrix:
	# allocate memory for the keypoints (x, y)-coordinates from the
	# top matches -- we'll use these coordinates to compute our
	# homography matrix
	ptsA = np.zeros((len(matches), 2), dtype="float")
	ptsB = np.zeros((len(matches), 2), dtype="float")

	# loop over the top matches
	for (i, m) in enumerate(matches):
		# indicate that the two keypoints in the respective images
		# map to each other
		ptsA[i] = kpsA[m.queryIdx].pt
		ptsB[i] = kpsB[m.trainIdx].pt
Here we are:
- Allocating memory to store the keypoints (
ptsAandptsB) for our topmatches - Initiating a loop over our top
matches, and inside indicating that A and B keypoints map to one another
Given our organized pairs of keypoint matches, now we’re ready to align our image:
	# compute the homography matrix between the two sets of matched
	# points
	(H, mask) = cv2.findHomography(ptsA, ptsB, method=cv2.RANSAC)

	# use the homography matrix to align the images
	(h, w) = template.shape[:2]
	aligned = cv2.warpPerspective(image, H, (w, h))

	# return the aligned image
	return aligned
Aligning our image can be boiled down to our final two steps:
- Find our homography matrix using the keypoints and RANSAC algorithm (Line 54).
- Align our image by means of applying a warp perspective (
cv2.warpPerspective) to ourimageand matrix,H(Lines 57 and 58). Thisalignedimage result is returned to the caller via Line 61.
Congratulations! You have completed the most technical part of the tutorial.
Note: A big thanks to Satya over at LearnOpenCV for his concise implementation of keypoint matching, which ours is based on.
Implementing our OpenCV image alignment script
Now that we have the align_images function at our disposal, we need to develop a driver script that:
- Loads an image and template from disk
- Performs image alignment and registration
- Displays the aligned images to our screen to verify that our image registration process is working properly
Open align_document.py, and let’s review it to see how we can accomplish exactly that:
# import the necessary packages
from pyimagesearch.alignment import align_images
import numpy as np
import argparse
import imutils
import cv2

# construct the argument parser and parse the arguments
ap = argparse.ArgumentParser()
ap.add_argument("-i", "--image", required=True,
	help="path to input image that we'll align to template")
ap.add_argument("-t", "--template", required=True,
	help="path to input template image")
args = vars(ap.parse_args())
The key import on Lines 2-6 that should stand out is align_images, a function which we implemented in the previous section.
Our script requires two command line arguments:
--image: The path to the input image scan or photo--template: Our template image path; this could be an official company form or in our case the 2020 IRS W-4 template image
Our next step is to align our two input images:
# load the input image and template from disk
print("[INFO] loading images...")
image = cv2.imread(args["image"])
template = cv2.imread(args["template"])

# align the images
print("[INFO] aligning images...")
aligned = align_images(image, template, debug=True)
After loading both our input --image and input --template (Lines 18 and 19), we take advantage of our helper routine, align_images, passing each as a parameter (Line 23).
Notice how I’ve set the debug flag to True indicating that I’d like the matches to be annotated. When you make the align_images function part of a real OCR pipeline like we’ll do next week, you would turn the debugging option off.
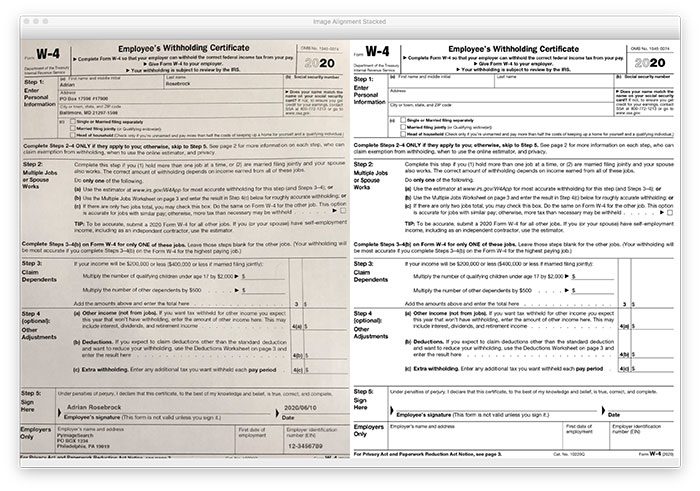
For our purposes this week, we’re going to visualize our results in two ways:
- Stacked side-by-side
- Overlayed on top of one another
These visual representations of our results will allow us to determine if alignment is/was successful.
Let’s prepare our aligned image for a stacked comparison with its template:
# resize both the aligned and template images so we can easily
# visualize them on our screen
aligned = imutils.resize(aligned, width=700)
template = imutils.resize(template, width=700)

# our first output visualization of the image alignment will be a
# side-by-side comparison of the output aligned image and the
# template
stacked = np.hstack([aligned, template])
Lines 27 and 28 resize the two images such that they will fit on our screen. We then use np.hstack to stack our images next to each other so that we can easily inspect the results (Line 33).
And now let’s overlay the template form on top of the aligned image:
# our second image alignment visualization will be *overlaying* the
# aligned image on the template, that way we can obtain an idea of
# how good our image alignment is
overlay = template.copy()
output = aligned.copy()
cv2.addWeighted(overlay, 0.5, output, 0.5, 0, output)

# show the two output image alignment visualizations
cv2.imshow("Image Alignment Stacked", stacked)
cv2.imshow("Image Alignment Overlay", output)
cv2.waitKey(0)
In addition to the side-by-side stacked visualization from above, an alternate visualization is to overlay the input image on the template so we can readily see the amount of misalignment. Lines 38-40 use OpenCV’s cv2.addWeighted to transparently blend the two images into a single output image with the pixels from each image having equal weight.
Finally, we display our two visualizations on screen (Lines 43-45).
Well done! It is now time to inspect our results.
OpenCV image alignment and registration results
We are now ready to apply image alignment and registration using OpenCV!
Use the “Downloads” section of this tutorial to download the source code and example images. From there, open up a terminal, and execute the following command:
$ python align_document.py --template form_w4.png --image scans/scan_01.jpg
[INFO] loading images...
[INFO] aligning images...
The image above shows our input image, scan_01.jpg — notice how this image has been captured with my smartphone at a non-90 degree viewing angle (i.e., not a top-down, bird’s eye view of the input image).
We then apply image alignment and registration, resulting in the following:
On the left you can see the input image (after alignment), while the right shows the original W-4 template image.
Notice how the two images have been automatically aligned using keypoint matching!
An alternate visualization can be seen below:

Here we have overlayed the output aligned image on top of the template.
Our alignment isn’t perfect (obtaining a pixel-perfect alignment is incredibly challenging and in some cases, unrealistic), but the fields of the form are sufficiently aligned such that we’ll be able to OCR the text and associate the fields together (which we’ll cover in next week’s tutorial).
Note: I recommend you take a look at the full resolution output image here so you can see the differences in the alignment overlay.
Let’s try another example image:
$ python align_document.py --template form_w4.png --image scans/scan_02.jpg
[INFO] loading images...
[INFO] aligning images...
The scan_02.jpg image contains the same form but captured at a different viewing angle

By applying image alignment and registration, we are able to align the input image with the form_w4.png template:

And here you can see the overlay visualization:

Next week, you will learn how to apply OCR to our aligned documents, allowing us to OCR each field and then associate fields from the input image to the original template.
It’s going to be a great tutorial, you definitely don’t want to miss it!
What’s next?
In today’s tutorial, we learned how to use OpenCV to align and register forms. This is a basic building block in any pipeline for OCR of forms. And yet the functionality is not included in the most popular open-source OCR engine — Tesseract.
Had we relied solely on Tesseract for OCR of the misaligned W-4 photo taken with my smartphone, we would not have been very successful.
It would be like a modern-day ship captain navigating the seven seas without GPS, updated electronic maps, or radar.
OCR captains like yourself need to be prepared with autopilot and electronics in place to keep track of oncoming storms, vessels, and icebergs (i.e., software implementation challenges).
And just to prove my analogy quite literally, be sure to read my interview with David Austin — Kaggle winner of the $25,000 iceberg challenge — and how David used PyImageSearch educational materials to help identify real icebergs.
My book will serve as your navigation system saving you from the OCR challenges you’d encounter at sea. If you have an OCR project or interest, then this book is for you.
My new IndieGoGo OCR Book campaign backers have the chance to get:
- Discounted pre-launch prices on my new OCR Book – You’ll a better deal if you back the campaign! Yes, prices will go up when the book officially launches.
- Early access to my OCR Book – You’ll receive exclusive early access to each volume and associated files just as soon as we have them ready! Yes, you’ll receive the book before it becomes available to the general public.
- Discounts and deals on existing products – Bundle your OCR book with one of my other books and courses at an additional discount (25%)! Simply add the product you desire to your shopping cart. And yes, you’ll receive the products just as soon as the funding campaign is over! This is a rare deal, so grab your educational materials while you can!
Just click here to learn more:
Summary
In this tutorial, you learned how to perform image alignment and registration using OpenCV.
Image alignment has a number of use cases, including medical scans, military-based automatic target acquisition, and satellite image analysis.
We chose to examine image alignment from one of the most important (and most utilized) purposes — Optical Character Recognition (OCR).
Applying image alignment to an input image allows us to align it with a template document. Once we have the input image aligned with the template, we can apply OCR to recognize the text in each of the individual fields. And since we know the location of each of the fields in the document, it becomes easy to associate the OCR’d text with each field.
Next week, I’ll be showing you how to take our image alignment script and extend it to OCR each field in our input document.
Stay tuned for the next post; you don’t want to miss it!
To download the source code to this post (and be notified when future tutorials are published here on PyImageSearch), simply enter your email address in the form below!

Download the Source Code and FREE 17-page Resource Guide
Enter your email address below to get a .zip of the code and a FREE 17-page Resource Guide on Computer Vision, OpenCV, and Deep Learning. Inside you’ll find my hand-picked tutorials, books, courses, and libraries to help you master CV and DL!
The post Image alignment and registration with OpenCV appeared first on PyImageSearch.