In this tutorial, you will learn how to OCR a document, form, or invoice using Tesseract, OpenCV, and Python.
Last week, we discussed how to accept an input image and align it to a template image, such as the following:
On the left, we have our template image (i.e., a form from the United States Internal Revenue Service). The middle figure is our input image that we wish to align to the template (thereby allowing us to match fields from the two images together). And finally, the right shows the output of aligning the two images together.
At this point, we can associate text fields in the form with each corresponding field in the template, meaning that we know which locations of the input image map to the name, address, EIN, etc. fields of the template:
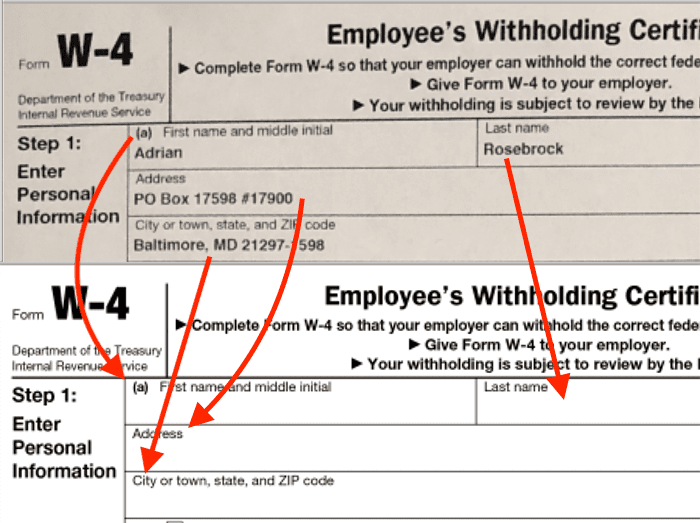
Knowing where and what the fields are allows us to then OCR each individual field and keep track of them for further processing, such as automated database entry.
But that raises the questions:
- How do we go about implementing this document OCR pipeline?
- What OCR algorithms will we need to use?
- And how complicated is this OCR application going to be?
As you’ll see, we’ll be able to implement our entire document OCR pipeline in under 150 lines of code!
Note: This tutorial is part of a chapter from my upcoming book OCR with OpenCV, Tesseract, and Python.
To learn how to OCR a document, form, or invoice with OpenCV, Tesseract, and Python, just keep reading.
OCR a document, form, or invoice with Tesseract, OpenCV, and Python
In the first part of this tutorial, we’ll briefly discuss why we may want to OCR documents, forms, invoices, or any type of physical document.
From there, we’ll review the steps required to implement a document OCR pipeline. We’ll then implement each of the individual steps in a Python script using OpenCV and Tesseract.
Finally, we’ll review the results of applying image alignment and OCR to our example images.
Why use OCR on forms, invoices, and documents?
Despite living in the digital age, we still have a strong reliance on physical paper trails, especially in large organizations such as government, enterprise companies, and universities/colleges.
The need for physical paper trails combined with the fact that nearly every document needs to be organized, categorized, and even shared with multiple people in an organization requires that we also digitize the information on the document and save it in our databases.
These large organizations employ data entry teams whose sole purpose is to take these physical documents, manually re-type the information, and then save it into the system.
Optical Character Recognition algorithms can automatically digitize these documents, extract the information, and pipe them into a database for storage, alleviating the need for large, expensive, and even error-prone manual entry teams.
In the rest of this tutorial, you’ll learn how to implement a basic document OCR pipeline using OpenCV and Tesseract.
Steps to implementing a document OCR pipeline with OpenCV and Tesseract
Implementing a document OCR pipeline with OpenCV and Tesseract is a multistep process. In this section, we’ll discover the five steps required for creating a pipeline to OCR a form.
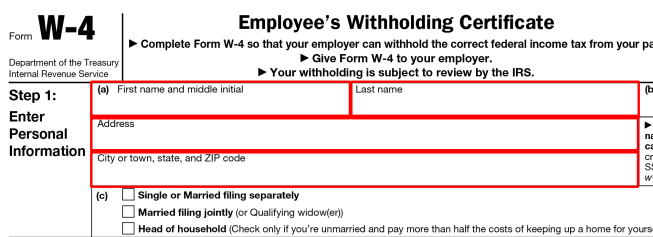
Step #1 involves defining the locations of fields in the input image document. We can do this by opening our template image in our favorite image editing software, such as Photoshop, GIMP, or whatever photo application is built into your operating system. From there, we manually examine the image and determine the bounding box (x, y)-coordinates of each field we want to OCR as shown in Figure 4:
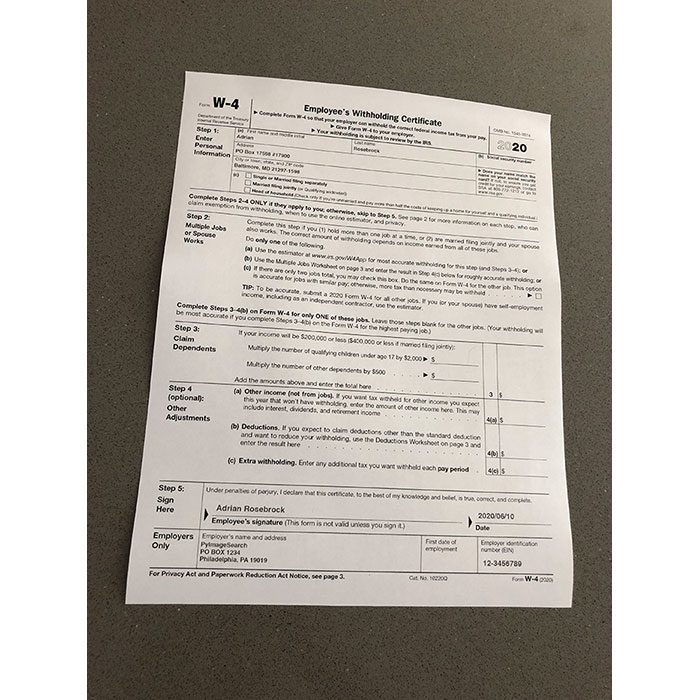
Then we accept an input image containing the document we want to OCR (Step #2) and present it to our OCR pipeline (Figure 5):
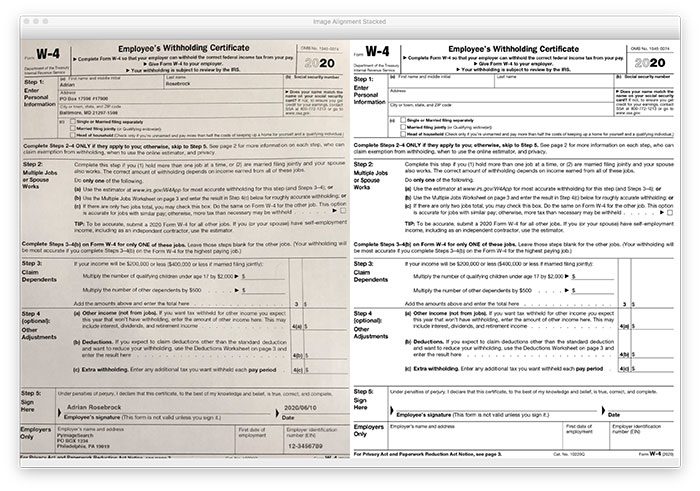
We can then (Step #3) apply automatic image alignment/registration to align the input image with the template form (Figure 6).
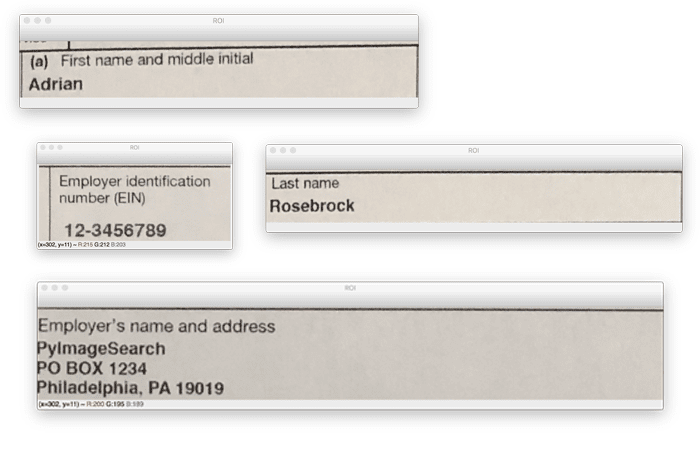
Step #4 loops over all text field locations (which we defined in Step #1), extracts the ROI, and applies OCR to the ROI. It’s during this step that we’re able to OCR the text itself and associate it with a text field in the original template document demonstrated in Figure 7:
The final Step #5 is to display our output OCR’d document depicted in Figure 8:
For a real-world use case, and as an alternative to Step #5, you may wish to pipe the information directly into an accounting database.
We’ll learn how to develop a Python script to accomplish Steps #1 – #5 in this chapter by creating an OCR document pipeline using OpenCV and Tesseract.
Project structure
If you’d like to follow along with today’s tutorial, find the “Downloads” section and grab the code and images archive. Use your favorite unzipping utility to extract the files. From there, open up the folder and you’ll be presented with the following:
$ tree --dirsfirst
.
├── pyimagesearch
│   ├── alignment
│   │   ├── __init__.py
│   │   └── align_images.py
│   └── __init__.py
├── scans
│   ├── scan_01.jpg
│   └── scan_02.jpg
├── form_w4.png
└── ocr_form.py

3 directories, 7 files
As our tree command demonstrates, the directory and file structure for this tutorial is very straightforward.
Inside the project folder, you’ll find three images:
scans/scan_01.jpgscans/scan_02.jpg: A similar example IRS W-4 document that has been populated with fake tax information.form_w4.png
And we have just a single Python driver script to review: ocr_form.py. This form parser relies on two helper functions:
align_images: Contained within thealignmentsubmodule and was first introduced last week. We won’t be reviewing this method again this week, so be sure to refer to my previous tutorial if you missed it!cleanup_text
If you’re ready to dive in, simply head to the implementation section next!
Implementing our document OCR script with OpenCV and Tesseract
We are now ready to implement our document OCR Python script using OpenCV and Tesseract.
Open up a new file, name it ocr_form.py, and insert the following code:
# import the necessary packages
from pyimagesearch.alignment import align_images
from collections import namedtuple
import pytesseract
import argparse
import imutils
import cv2
You should recognize each of the imports on Lines 2-7; however, let’s highlight a few of them. Last week, we learned how to align_images, an essential component for OCR’ing a form. And of course, our effort is a lot easier when we use OpenCV, PyTesseract, and imutils.
Let’s define a string-cleanup convenience utility:
def cleanup_text(text):
	# strip out non-ASCII text so we can draw the text on the image
	# using OpenCV
	return "".join([c if ord(c) < 128 else "" for c in text]).strip()
Our cleanup_text helper function is used to strip out non-ASCII text from a string. We need to cleanse our text because OpenCV’s cv2.putText is unable to draw non-ASCII characters on an image (unfortunately, OpenCV replaces each unknown character with a ?).
Next, let’s handle our command line arguments:
# construct the argument parser and parse the arguments
ap = argparse.ArgumentParser()
ap.add_argument("-i", "--image", required=True,
	help="path to input image that we'll align to template")
ap.add_argument("-t", "--template", required=True,
	help="path to input template image")
args = vars(ap.parse_args())
Our script requires two command line arguments:
--image--template
We’ll align our image to the template and then OCR various fields as needed.
Now, we aren’t creating a “smart form OCR system” in which all text is recognized and fields are designed based on regular expression patterns. That is certainly doable — an advanced method covered in my upcoming OCR Book.
Instead, to keep this tutorial lightweight, I’ve manually defined OCR_Locations for each field we are concerned about. The benefit is that we’ll be able to give each field a name and specify the exact (x, y)-coordinates serving as the bounds of the field. Let’s work on defining the text field locations in Step #1 now:
# create a named tuple which we can use to create locations of the
# input document which we wish to OCR
OCRLocation = namedtuple("OCRLocation", ["id", "bbox",
	"filter_keywords"])

# define the locations of each area of the document we wish to OCR
OCR_LOCATIONS = [
	OCRLocation("step1_first_name", (265, 237, 751, 106),
		["middle", "initial", "first", "name"]),
	OCRLocation("step1_last_name", (1020, 237, 835, 106),
		["last", "name"]),
	OCRLocation("step1_address", (265, 336, 1588, 106),
		["address"]),
	OCRLocation("step1_city_state_zip", (265, 436, 1588, 106),
		["city", "zip", "town", "state"]),
	OCRLocation("step5_employee_signature", (319, 2516, 1487, 156),
		["employee", "signature", "form", "valid", "unless",
		 	"you", "sign"]),
	OCRLocation("step5_date", (1804, 2516, 504, 156), ["date"]),
	OCRLocation("employee_name_address", (265, 2706, 1224, 180),
		["employer", "name", "address"]),
	OCRLocation("employee_ein", (1831, 2706, 448, 180),
		["employer", "identification", "number", "ein"]),
]
Here, Lines 24 and 25 create a named tuple consisting of the following:
name = "OCRLocation""id""bbox"[x, y, w, h]. In this case, x and y are the top-left coordinates, and w and h are the width and height."filter_keywords": A list of words that we do not wish to consider for OCR, such as form field instructions as demonstrated in Figure 12.
Lines 28-45 define eight fields of an official 2020 IRS W-4 tax form as pictured in Figure 9:
Again, bounding box coordinates ("bbox") were manually determined by inspecting the (x, y)-coordinates of the image. If you’d like to do this for your own form, it can be accomplished by means of any photo editing application, such as Photoshop, GIMP, or the basic preview/paint application built into your operating system.
Alternatively, you could use OpenCV mouse click events per my blog post Capturing mouse click events with Python and OpenCV (beyond the scope of today’s tutorial).
Now that we’ve handled imports, configured command line arguments, and defined our OCR field locations, let’s go ahead and load and align our input --image to our --template (Step #2 and Step #3):
# load the input image and template from disk
print("[INFO] loading images...")
image = cv2.imread(args["image"])
template = cv2.imread(args["template"])

# align the images
print("[INFO] aligning images...")
aligned = align_images(image, template)
As you can see, Lines 49 and 50 load both our input --image, such as a scan or snap from your smartphone camera, and our --template, which could be a document straight from the IRS, your mortgage company, accounting department, or anywhere else, depending on your needs.
You may be wondering how I converted the form_w4.png from a PDF file (most IRS documents are PDFs these days). This process is very simple with a free OS-agnostic tool called ImageMagick. With ImageMagick installed, you can simply use the convert command (refer to the docs). For example, you could enter the following command:
$ convert /path/to/taxes/2020/forms/form_w4.pdf ./form_w4.png
ImageMagick is smart enough to recognize that you want to convert a PDF to a PNG image, based on the file extension as well as the file itself. You could alter the command quite easily to produce a JPG if you’d like.
Do you have a lot of forms? Simply use ImageMagick’s mogrify command, which supports wildcard operators (refer to the docs).
Assuming your document is in PNG or JPG form, you can use it with OpenCV and PyTesseract as we do in today’s tutorial!
Once the image files are loaded into memory, we simply take advantage of our align_images helper utility (Line 54) to perform the alignment and perspective warping.
Figure 10 shows the result of aligning our scan01.jpg input to our form template:
Notice how our input image (left) has been aligned to the template document (right).
The next step (Step #4) is to loop over each of our OCR_LOCATIONS and apply Optical Character Recognition to each of the text fields using the power of Tesseract and PyTesseract:
# initialize a results list to store the document OCR parsing results
print("[INFO] OCR'ing document...")
parsingResults = []

# loop over the locations of the document we are going to OCR
for loc in OCR_LOCATIONS:
	# extract the OCR ROI from the aligned image
	(x, y, w, h) = loc.bbox
	roi = aligned[y:y + h, x:x + w]

	# OCR the ROI using Tesseract
	rgb = cv2.cvtColor(roi, cv2.COLOR_BGR2RGB)
	text = pytesseract.image_to_string(rgb)
First, we initialize the parsingResults list to store our OCR results for each field of text (Line 58). From there, we proceed to loop over each of the OCR_LOCATIONS (beginning on Line 61), which we have previously manually defined.
Inside the loop (Lines 63-68), we begin by (1) extracting the particular text field ROI from the aligned image and (2) using PyTesseract to OCR the ROI. Remember, Tesseract expects an RGB format image, so Line 67 swaps color channels accordingly.
Now, let’s break each OCR’d text field into individual lines/rows:
	# break the text into lines and loop over them
	for line in text.split("\n"):
		# if the line is empty, ignore it
		if len(line) == 0:
			continue

		# convert the line to lowercase and then check to see if the
		# line contains any of the filter keywords (these keywords
		# are part of the *form itself* and should be ignored)
		lower = line.lower()
		count = sum([lower.count(x) for x in loc.filter_keywords])

		# if the count is zero then we know we are *not* examining a
		# text field that is part of the document itself (ex., info,
		# on the field, an example, help text, etc.)
		if count == 0:
			# update our parsing results dictionary with the OCR'd
			# text if the line is *not* empty
			parsingResults.append((loc, line))
Line 71 begins a loop over the text lines where we immediately ignore empty lines (Lines 73 and 74). Assuming the line isn’t empty, we filter it for keywords (forcing to lowercase characters in the process) to ensure that we aren’t examining a part of the document itself. In other words, we only care about form-filled information and not the instructional text on the template form itself.
Lines 79-88 accomplish the filtering process and add the OCR’d field to parsingResults accordingly.
For example, consider the “First name and middle initial” field:
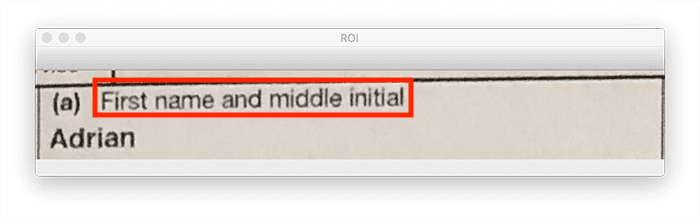
While I’ve filled out this field with my first name, “Adrian,” the text “(a) First name and middle initial” will still be OCR’d by Tesseract — the code above automatically filters out the instructional text inside the field, ensuring only the human inputted text is returned.
We’re getting there, stay with me! Let’s carry on by post-processing our parsingResults to clean them up:
# initialize a dictionary to store our final OCR results
results = {}

# loop over the results of parsing the document
for (loc, line) in parsingResults:
	# grab any existing OCR result for the current ID of the document
	r = results.get(loc.id, None)

	# if the result is None, initialize it using the text and location
	# namedtuple (converting it to a dictionary as namedtuples are not
	# hashable)
	if r is None:
		results[loc.id] = (line, loc._asdict())

	# otherwise, there exists an OCR result for the current area of the
	# document, so we should append our existing line
	else:
		# unpack the existing OCR result and append the line to the
		# existing text
		(existingText, loc) = r
		text = "{}\n{}".format(existingText, line)

		# update our results dictionary
		results[loc["id"]] = (text, loc)
Our final results dictionary (Line 91) will soon hold the cleansed parsing results consisting of the unique ID of the text location (key) and the 2-tuple of the OCR’d text and its location (value). Let’s begin populating our results by looping over our parsingResults on Line 94. Our loop accomplishes three tasks:
- We grab any existing result for the current text field ID.
- If there is no current result, we simply store the text
lineand textloc(location) in theresultsdictionary. - Otherwise, we append the
lineto anyexistingTextseparated by a newline for the field and update theresultsdictionary.
We’re finally ready to perform Step #5 — visualizing our OCR results:
# loop over the results
for (locID, result) in results.items():
	# unpack the result tuple
	(text, loc) = result

	# display the OCR result to our terminal
	print(loc["id"])
	print("=" * len(loc["id"]))
	print("{}\n\n".format(text))

	# extract the bounding box coordinates of the OCR location and
	# then strip out non-ASCII text so we can draw the text on the
	# output image using OpenCV
	(x, y, w, h) = loc["bbox"]
	clean = cleanup_text(text)

	# draw a bounding box around the text
	cv2.rectangle(aligned, (x, y), (x + w, y + h), (0, 255, 0), 2)

	# loop over all lines in the text
	for (i, line) in enumerate(text.split("\n")):
		# draw the line on the output image
		startY = y + (i * 70) + 40
		cv2.putText(aligned, line, (x, startY),
			cv2.FONT_HERSHEY_SIMPLEX, 1.8, (0, 0, 255), 5)
Looping over each of our results begins on Line 116. Our first task is to unpack the 2-tuple consisting of the OCR’d and parsed text as well as its loc (location) via Line 118. Both of these results are then printed in our terminal (Lines 121-123).
From there, we extract the bounding box coordinates of the text field (Line 128).
Subsequently, we strip out non-ASCII characters from the OCR’d text via our cleanup_text helper utility (Line 129). Cleaning up our text ensures we can use OpenCV’s cv2.putText function to annotate the output image.
We then proceed to draw the bounding box rectangle around the text on the aligned image (Line 132) and annotate each line of text (delimited by newlines) on the output image (Lines 135-139).
Finally, we’ll display our (1) original input --image and (2) annotated output result:
# show the input and output images, resizing it such that they fit
# on our screen
cv2.imshow("Input", imutils.resize(image, width=700))
cv2.imshow("Output", imutils.resize(aligned, width=700))
cv2.waitKey(0)
As you can see, Lines 143 and 144 first apply aspect-aware resizing because high-resolution scans tend not to fit on the average computer screen before displaying the result and original to the user. To stop the program, simply press any key while one of the windows is in focus.
Great job implementing your automated from OCR system with Python, OpenCV, and Tesseract! In the next section, we’ll put it to the test.
OCR results using OpenCV and Tesseract
We are now ready to OCR our document using OpenCV and Tesseract.
Make sure you use the “Downloads” section of this tutorial to download the source code and example images associated with this post.
From there, open up a terminal, and execute the following command:
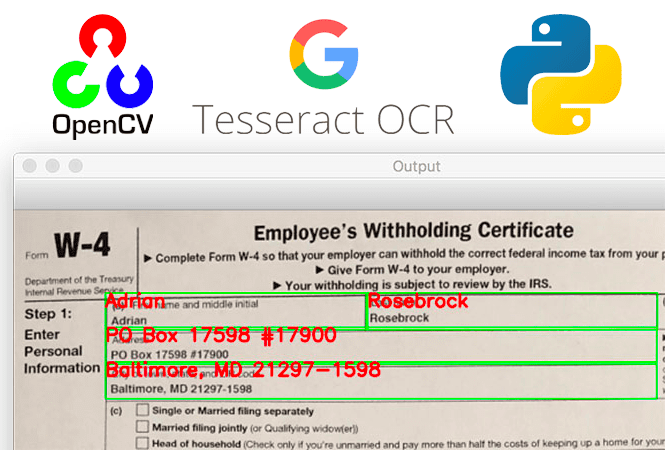
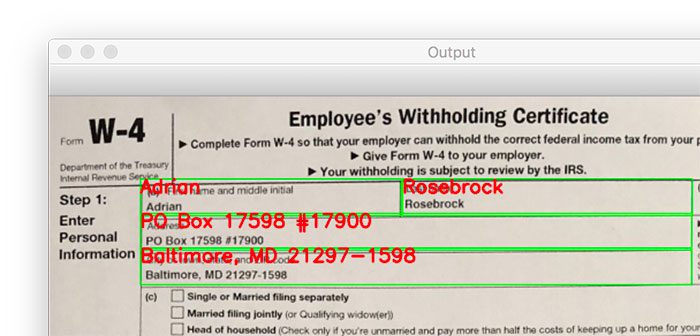
$ python ocr_form.py --image scans/scan_01.jpg --template form_w4.png
[INFO] loading images...
[INFO] aligning images...
[INFO] OCR'ing document...
step1_first_name
================
Adrian


step1_last_name
===============
Rosebrock


step1_address
=============
PO Box 17598 #17900


step1_city_state_zip
====================
Baltimore, MD 21297-1598


step5_employee_signature
========================
Adrian Rosebrock


step5_date
==========
2020/06/10


employee_name_address
=====================
PylmageSearch
PO BOX 1234
Philadelphia, PA 19019


employee_ein
============
12-3456789
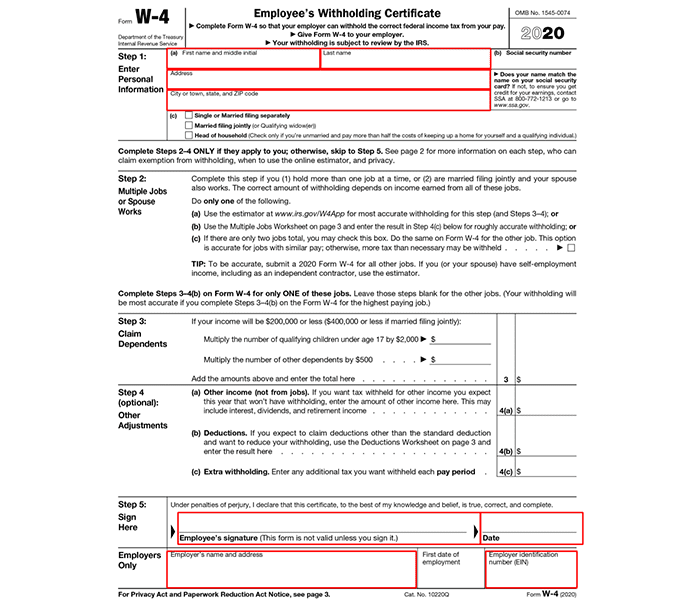
Here, we have our input image and its corresponding template:
And here is the output of the image alignment and document OCR pipeline:
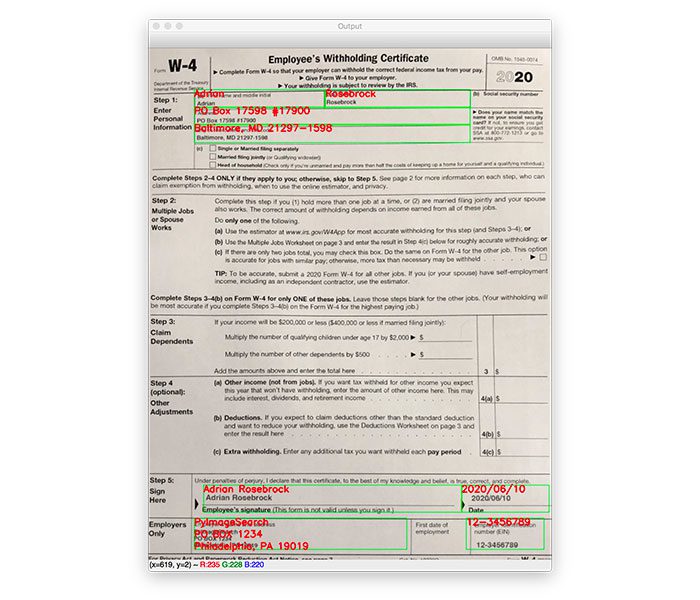
Notice how we’ve been able to successfully align our input image with the document template, localize each of the fields, and then OCR each of the individual fields.
Our implementation also ignores any line of text inside of a field that is part of the document itself.
For example, the first name field provides the instructional text “(a) First name and middle initial”; however, our OCR pipeline and keyword filtering process is able to detect that this is part of the document itself (i.e., not something a human entered) and then simply ignores it.
Overall, we’ve been able to successfully OCR the document!
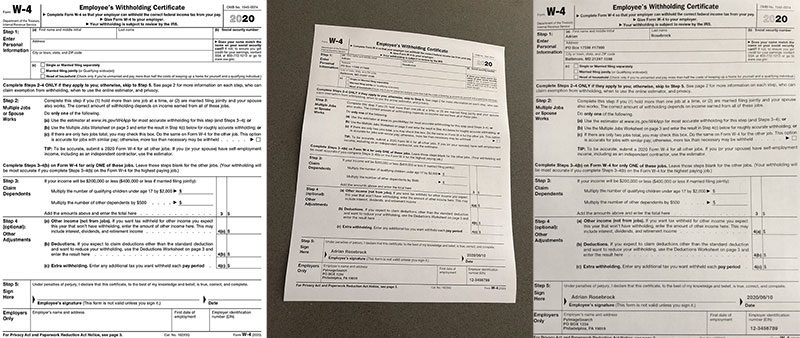
Let’s try another example image, this time with a slightly different viewing angle:
$ python ocr_form.py --image scans/scan_02.jpg --template form_w4.png
[INFO] loading images...
[INFO] aligning images...
[INFO] OCR'ing document...
step1_first_name
================
Adrian


step1_last_name
===============
Rosebrock


step1_address
=============
PO Box 17598 #17900


step1_city_state_zip
====================
Baltimore, MD 21297-1598


step5_employee_signature
========================
Adrian Rosebrock


step5_date
==========
2020/06/10


employee_name_address
=====================
PyimageSearch
PO BOX 1234
Philadelphia, PA 19019


employee_ein
============
12-3456789
Again, here is our input image along with its template:
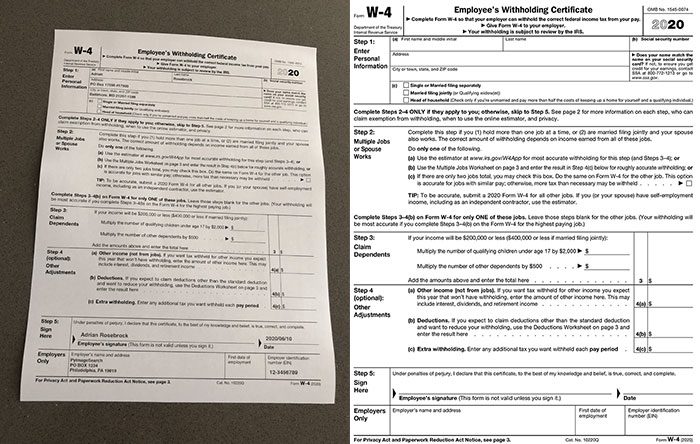
The following figure contains our output where you can see that the image has been aligned to the template, along with OCR being successfully applied to each of the fields:
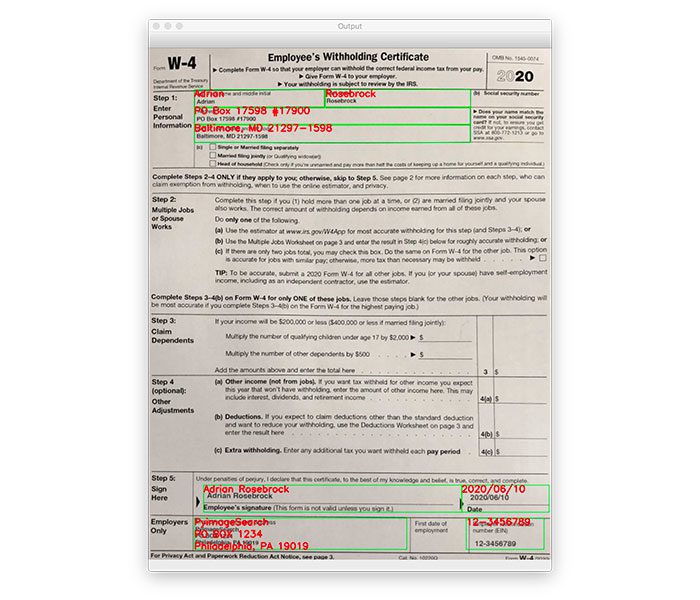
Again, we’ve been able to successfully align the input image with the template document and then OCR each of the individual fields!
What’s next?
Today, we used our knowledge of computer vision and optical character recognition to develop an automated system for extracting text fields from a tax form. We used a combination of Python, OpenCV, and Tesseract along with our sweaty hands on our keyboards to get the job done.
If you enjoyed this project and you’d like to develop your knowledge of OCR further, you really need to check out my new OCR book which I’m actively writing and developing.
Over the years, PyImageSearch content has become synonymous with quality education. I’ve received feedback from readers of my blog and books, informing me about how much they’ve learned and the impacts it has had on their career paths. Hearing success stories often is why I love leading PyImageSearch so much and what motivates me to continue teaching and sharing knowledge.
In continuing with my proven track record, my goal is to deliver you the hands-down best OCR book on the market.
Inside my new book, you’ll find practical code examples, proven use cases, and fundamental knowledge organized in a way that is easy to learn from and straightforward to apply to your own OCR projects.
But I need your help!
In order to ensure that my latest book is a success, on August 19, 2020, I launched an IndieGoGo funding campaign for my new OCR Book.
This funding campaign allows me to offer an exclusive pre-sale of the product and get it into your hands and on your shelf ASAP while also ensuring that I can keep the PyImageSearch lights on, servers running, and pay my team.
So what does my IndieGoGo campaign mean for you?
Did someone whisper “discounts and deals”? Well, they should have screamed it at the top of their lungs because backers of the campaign have the these limited-time opportunities:
- Pre-launch pricing of my new OCR Book – You’ll receive a special pre-launch price if you back the campaign! Yes, prices will go up when the book officially launches.
- Early access to my OCR Book – You’ll receive exclusive early access to each volume and associated files just as soon as we have them ready! Yes, you’ll receive the book before it becomes available to the general public.
- The opportunity to bundle your pledge with existing products – Bundle your OCR book with one of my other books and courses for 25% off! Simply add the product you desire to your shopping cart. And yes, you’ll receive the products just as soon as the funding campaign is over! This is a rare deal, so grab yours while you can!
Interested?
Then head on to the IndieGoGo page if you’re ready to dive into the world of Optical Character Recognition with me!
Summary
In this tutorial, you learned how to OCR a document, form, or invoice using OpenCV and Tesseract.
Our method hinges on image alignment which is the process of accepting an input image and a template image, and then aligning them such that they can neatly “overlay” on top of each other. In the context of Optical Character Recognition, image alignment allows us to align each of the text fields in a template with our input image, meaning that once we’ve OCR’d the document, we can associate the OCR’d text to each field (ex., name, address, etc.).
Once image alignment was applied, we used Tesseract to recognize pre-selected text fields in the input image while filtering out irrelevant instructional information.
I hope you enjoyed this tutorial — and more importantly, I hope that you can use it when applying image alignment and OCR to your own projects.
And if you’d like to learn more about Optical Character Recognition, be sure to check out my book OCR with OpenCV, Tesseract, and Python.
To download the source code to this post (and be notified when future tutorials are published here on PyImageSearch), simply enter your email address in the form below!

Download the Source Code and FREE 17-page Resource Guide
Enter your email address below to get a .zip of the code and a FREE 17-page Resource Guide on Computer Vision, OpenCV, and Deep Learning. Inside you’ll find my hand-picked tutorials, books, courses, and libraries to help you master CV and DL!
The post OCR a document, form, or invoice with Tesseract, OpenCV, and Python appeared first on PyImageSearch.