
In this tutorial, you will learn how to use the EasyOCR package to easily perform Optical Character Recognition and text detection with Python.
EasyOCR, as the name suggests, is a Python package that allows computer vision developers to effortlessly perform Optical Character Recognition.
When it comes to OCR, EasyOCR is by far the most straightforward way to apply Optical Character Recognition:
- The EasyOCR package can be installed with a single
pipcommand. - The dependencies on the EasyOCR package are minimal, making it easy to configure your OCR development environment.
- Once EasyOCR is installed, only one
importstatement is required to import the package into your project. - From there, all you need is two lines of code to perform OCR — one to initialize the
Readerclass and then another to OCR the image via thereadtextfunction.
Sound too good to be true?
Luckily, it’s not — and today I’ll show you how to use EasyOCR to implement Optical Character Recognition in your own projects.
To learn how to use EasyOCR for Optical Character Recognition, just keep reading.
Getting started with EasyOCR for Optical Character Recognition
In the first part of this tutorial, we’ll briefly discuss the EasyOCR package. From there, we’ll configure our OCR development environment and install EasyOCR on our machine.
Next, we’ll implement a simple Python script that performs Optical Character Recognition via the EasyOCR package. You’ll see firsthand how simple and straightforward it is to implement OCR (and even OCR text in multiple languages).
We’ll wrap up this tutorial with a discussion of the EasyOCR results.
What is the EasyOCR package?
The EasyOCR package is created and maintained by Jaided AI, a company that specializes in Optical Character Recognition services.
EasyOCR is implemented using Python and the PyTorch library. If you have a CUDA-capable GPU, the underlying PyTorch deep learning library can speed up your text detection and OCR speed tremendously.
As of this writing, EasyOCR can OCR text in 58 languages, including English, German, Hindi, Russian, and more! The EasyOCR maintainers plan to add additional languages in the future. You can find the full list of languages EasyOCR supports on the following page.
Currently, EasyOCR only supports OCR’ing typed text. Later in 2020 they plan on releasing a handwriting recognition model as well!
How to install EasyOCR on your machine
To get started installing EasyOCR, my recommendation is to follow my pip install opencv tutorial with an important caveat:
Be sure to install opencv-python and not opencv-contrib-python in your virtual environment. Furthermore, if you have both of these packages in the same environment, it could lead to unintended consequences. It is unlikely that pip would complain if you have both installed, so be diligent and check with the pip freeze command.
Of course both OpenCV packages are discussed in the aforementioned tutorial; just be sure to install the correct one.
And my recommendation is that you dedicate a separate Python virtual environment on your system for EasyOCR (Option B of the pip install opencv guide).
However, although option B suggests naming your virtual environment cv, I’d recommend naming it easyocr, ocr_easy, or something similar. If you saw my personal system, you’d be amazed that at any given time, I have 10-20 virtual environments on my system for different purposes, each with a descriptive name that means something to me.
Your installation steps should look like the following:
- Step #1: Install Python 3
- Step #2: Install pip
- Step #3: Install
virtualenvandvirtualenvwrapperon your system, which includes editing your Bash/ZSH profile, as instructed - Step #4: Create a Python 3 virtual environment named
easyocr(or pick a name of your choosing), and ensure that it is active with theworkoncommand - Step #5: Install OpenCV and EasyOCR according to the information below
To accomplish Steps #1-#4, be sure to first follow the installation guide linked above.
When you’re ready for Step #5, simply execute the following:
$ pip install opencv-python # NOTE: *not* opencv-contrib-python
$ pip install easyocr
If you have any installation problems with openv-python, the PyPi package page is helpful. For example, I learned on that page that I needed to upgrade my version of pip.
If you chose to install easyocr into an existing Python virtual environment, be sure to inspect the output of the following commands:
$ workon easyocr # replace `easyocr` with your custom environment name
$ pip freeze
certifi==2020.6.20
cycler==0.10.0
decorator==4.4.2
easyocr==1.1.7
future==0.18.2
imageio==2.9.0
kiwisolver==1.2.0
matplotlib==3.3.1
networkx==2.4
numpy==1.19.1
opencv-python==4.4.0.42
Pillow==7.2.0
pyparsing==2.4.7
python-bidi==0.4.2
python-dateutil==2.8.1
PyWavelets==1.1.1
scikit-image==0.17.2
scipy==1.5.2
six==1.15.0
tifffile==2020.8.13
torch==1.6.0
torchvision==0.7.0
Notice the following packages are installed:
easyocropencv-pythontorchandtorchvision
There are also a handful of other EasyOCR dependencies that are automatically installed for you.
Most importantly, as I mentioned above, ensure that you have opencv-python and NOT opencv-contrib-python installed in your virtual environment.
You’ll be up and running in no time flat if you carefully follow the steps I’ve outlined. Once your environment is ready to go, you can get started with EasyOCR for Optical Character Recognition.
Project structure
Take a moment to find the “Downloads” section of this blog post. Inside the project folder, you’ll find the following files:
$ tree --dirsfirst
.
├── images
│   ├── arabic_sign.jpg
│   ├── swedish_sign.jpg
│   └── turkish_sign.jpg
└── easy_ocr.py

1 directory, 4 files
Today’s EasyOCR project is already appearing to live up to its name. As you can see, we have three testing images/ and a single Python driver script, easy_ocr.py. Our driver script accepts any input image and the desired OCR language to get the job done quite easily, as we’ll see in the implementation section.
Using EasyOCR for Optical Character Recognition
With our development environment configured and our project directory structure reviewed, we are now ready to use the EasyOCR package in our Python script!
Open up the easy_ocr.py file in the project directory structure, and insert the following code:
# import the necessary packages
from easyocr import Reader
import argparse
import cv2
Our EasyOCR package should stand out here; notice how we’re importing Reader from the easyocr package.
Given that OpenCV’s putText function can’t display non-ASCII characters, let’s define a quick convenience function to parse out those potentially pesky symbols:
def cleanup_text(text):
	# strip out non-ASCII text so we can draw the text on the image
	# using OpenCV
	return "".join([c if ord(c) < 128 else "" for c in text]).strip()
As you can see, the cleanup_text helper function simply ensures that character ordinals in the text string parameter are less than 128, stripping out any other characters. If you’re curious about the significance of 128, be sure to check out any standard ASCII character table such as this one.
With our inputs and convenience utility ready to go, let’s now define our command line arguments:
# construct the argument parser and parse the arguments
ap = argparse.ArgumentParser()
ap.add_argument("-i", "--image", required=True,
	help="path to input image to be OCR'd")
ap.add_argument("-l", "--langs", type=str, default="en",
	help="comma separated list of languages to OCR")
ap.add_argument("-g", "--gpu", type=int, default=-1,
	help="whether or not GPU should be used")
args = vars(ap.parse_args())
Our script accepts three command line arguments:
--image: The path to the input image containing text for OCR.--langsdefaultour script assumes English language (en). If you’d like to use the English and French models, you could passen,fr. Or maybe you’d like to use Spanish, Portuguese, and Italian by passinges,pt,it. Be sure to refer to EasyOCR’s listing of supported languages.--gpudefaultis-1, meaning that we’ll use our CPU rather than a GPU. If you have a CUDA-capable GPU, enabling this option will allow faster OCR results.
Given our command line arguments, let’s perform OCR:
# break the input languages into a comma separated list
langs = args["langs"].split(",")
print("[INFO] OCR'ing with the following languages: {}".format(langs))

# load the input image from disk
image = cv2.imread(args["image"])

# OCR the input image using EasyOCR
print("[INFO] OCR'ing input image...")
reader = Reader(langs, gpu=args["gpu"] > 0)
results = reader.readtext(image)
Line 22 breaks our --langs string (comma delimited) into a Python list of languages for our EasyOCR engine.
We then load our input --image via Line 26.
Note: Unlike Tesseract, EasyOCR can work with OpenCV’s default BGR color channel ordering. Therefore, we do not need to swap color channels after loading the image.
To accomplish Optical Character Recognition with EasyOCR, we first instantiate a Reader object, passing the langs and --gpu boolean to the constructor (Line 30). From there, we call the readtext method while passing our input image (Line 31).
Both the Reader class and readtext method are documented in the GitHub project if you’d like to customize your EasyOCR configuration.
Let’s process our EasyOCR results now:
# loop over the results
for (bbox, text, prob) in results:
	# display the OCR'd text and associated probability
	print("[INFO] {:.4f}: {}".format(prob, text))

	# unpack the bounding box
	(tl, tr, br, bl) = bbox
	tl = (int(tl[0]), int(tl[1]))
	tr = (int(tr[0]), int(tr[1]))
	br = (int(br[0]), int(br[1]))
	bl = (int(bl[0]), int(bl[1]))

	# cleanup the text and draw the box surrounding the text along
	# with the OCR'd text itself
	text = cleanup_text(text)
	cv2.rectangle(image, tl, br, (0, 255, 0), 2)
	cv2.putText(image, text, (tl[0], tl[1] - 10),
		cv2.FONT_HERSHEY_SIMPLEX, 0.8, (0, 255, 0), 2)

# show the output image
cv2.imshow("Image", image)
cv2.waitKey(0)
Our EasyOCR results consist of a 3-tuple:
bboxtextprob
Looping over each EasyOCR result, we first unpack the bounding box coordinates (Lines 34-43). To prepare our text for annotation, we sanitize it via our cleanup_text utility (Line 47).
We then overlay our image with a bounding box surrounding the text and the text string itself (Lines 48-50).
After all results are processed and annotated, Lines 53 and 54 display the output image on our screen.
EasyOCR results
We are now ready to see the results of applying Optical Character Recognition with the EasyOCR library.
Start by using the “Downloads” section of this tutorial to download the source code and example images.
From there, open up a terminal, and execute the following command:
$ python easy_ocr.py --image images/arabic_sign.jpg --langs en,ar
[INFO] OCR'ing with the following languages: ['en', 'ar']
[INFO] OCR'ing input image...
Using CPU. Note: This module is much faster with a GPU.
[INFO] 0.8129: خروج
[INFO] 0.7237: EXIT
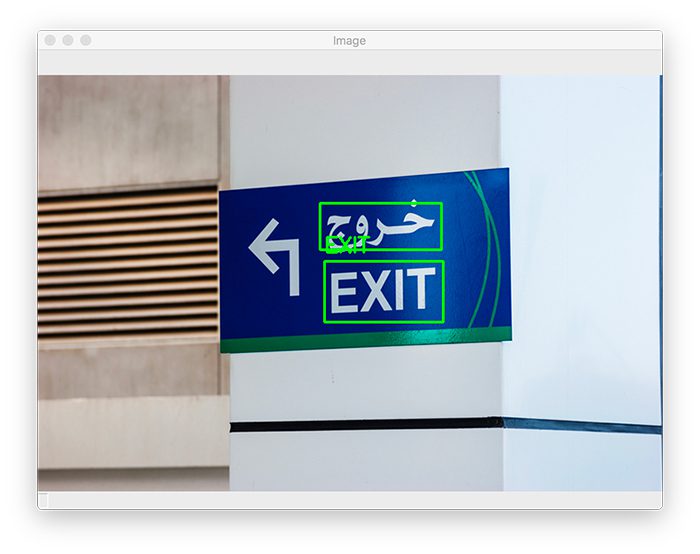
Here you can see that I am OCR’ing an airport sign containing both English and Arabic text.
As the --langs en,ar arguments indicate, we’re instructing our script (and ultimately EasyOCR) to OCR in both Arabic and English. You may pass a comma-separated list of languages that EasyOCR supports.
EasyOCR is able to detect and correctly OCR the English and Arabic text in the input image.
Note: If you are using EasyOCR for the first time, you’ll see an indication printed in your terminal that EasyOCR is “Downloading detection model[s].” Be patient while the files download. Once these models are cached on your system, you can use them again and again seamlessly and quickly.
Let’s try another image, this one containing a Swedish sign:
$ python easy_ocr.py --image images/swedish_sign.jpg --langs en,sv
[INFO] OCR'ing with the following languages: ['en', 'sv']
[INFO] OCR'ing input image...
Using CPU. Note: This module is much faster with a GPU.
[INFO] 0.7078: Fartkontrol
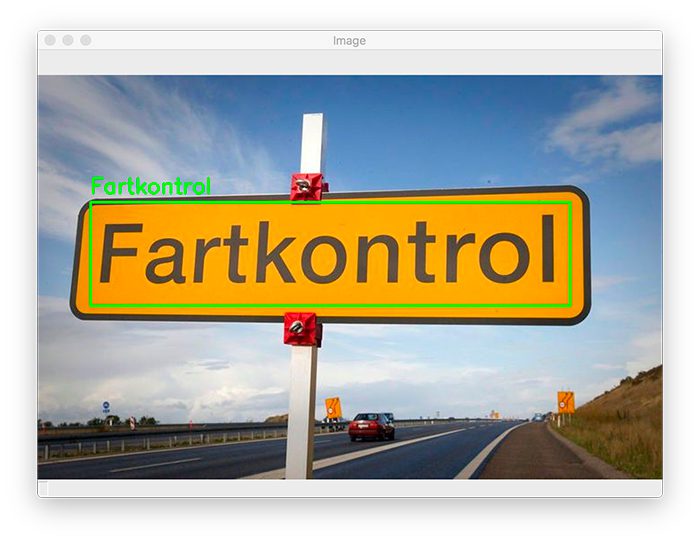
Here we are asking EasyOCR to OCR both English (en) and Swedish (sv).
For those not already familiar with the sign, “Fartkontrol” is a bit of a joke amongst the Swedes and Danes.
Literally translated, “Fartkontrol” in English means “Speed Control” (or simply speed monitoring).
But when pronounced, “Fartkontrol” sounds like “fart control” — perhaps someone who is having an issue controlling their flatulence. In college, I had a friend who hung a Swedish “Fartkontrol” sign on their bathroom door — maybe you don’t find the joke funny, but anytime I see that sign I chuckle to myself (perhaps I’m just an immature 8-year-old).
For our final example, let’s look at a Turkish stop sign:
$ python easy_ocr.py --image images/turkish_sign.jpg --langs en,tr
[INFO] OCR'ing with the following languages: ['en', 'tr']
[INFO] OCR'ing input image...
Using CPU. Note: This module is much faster with a GPU.
[INFO] 0.9741: DUR
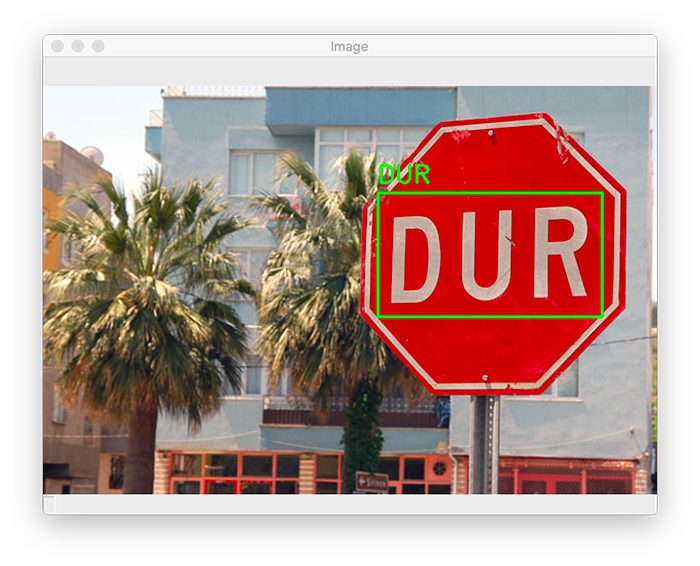
I ask EasyOCR to OCR both English (en) and Turkish (tr) text by supplying those values as a comma-separated list via the --langs command line argument.
EasyOCR is able to detect the text, “DUR,” which when translated from Turkish to English is “STOP.”
As you can see, EasyOCR lives up to it’s name — finally, an easy-to-use Optical Character Recognition package!
Additionally, if you have a CUDA-capable GPU, you can obtain even faster OCR results by supplying the --gpu command line argument, as in the following:
$ python easy_ocr.py --image images/turkish_sign.jpg --langs en,tr --gpu 1
But again, you will need to have a CUDA GPU configured for the PyTorch library (EasyOCR uses the PyTorch deep learning library under the hood).
What’s next?

If you enjoyed this project and you’d like to develop your knowledge of OCR further, you really need to check out my new OCR book, which I’m actively writing and developing.
Over the years, PyImageSearch content has become synonymous with quality education. I’ve received feedback from readers of my blog and books, informing me about how much they’ve learned and the impacts it has had on their career paths. Hearing success stories often is why I love leading PyImageSearch so much and what motivates me to continue teaching and sharing knowledge.
In continuing with my proven track record, my goal is to deliver you the hands-down best OCR book on the market.
Inside my new book, you’ll find practical code examples, proven use cases, and fundamental knowledge organized in a way that is easy to learn from and straightforward to apply to your own OCR projects.
But I need your help!
To ensure that my latest book is a success, on Aug. 19, 2020 I launched an IndieGoGo funding campaign.
This funding campaign allows me to offer an exclusive pre-sale of the product and get it into your hands and on your shelf ASAP while also ensuring that I can keep the PyImageSearch lights on, servers running, and my team paid.
So what does my IndieGoGo campaign mean for you?
Did someone whisper “discounts and deals”? Well, they should have screamed it at the top of their lungs because backers of the campaign have the these limited-time opportunities:
- Pre-launch price of my new OCR Book – You’ll receive a significantly discounted book if you back the campaign! Yes, prices will go up when the book officially launches.
- Early access to my OCR Book – You’ll receive exclusive early access to each volume and associated files just as soon as we have them ready! Yes, you’ll receive the book before it becomes available to the general public.
- Deals on existing products – Bundle your OCR book with one of my other books and courses for 25% off! Simply add the product you desire to your shopping cart. And yes, you’ll receive the products just as soon as the funding campaign is over! This is a rare deal, so grab yours while you can!
Interested? Yes? OK, great!
To back the new book campaign and grab existing products, simply head to my IndieGoGo page prior to the Sept. 21, 2020 deadline:
Summary
In this tutorial, you learned how to perform Optical Character Recognition using the EasyOCR Python package.
Unlike the Tesseract OCR engine and the pytesseract package, which can be a bit tedious to work with if you are new to the world of Optical Character Recognition, the EasyOCR package lives up to its name — EasyOCR makes Optical Character Recognition with Python “easy.”
Furthermore, EasyOCR has a number of benefits going for it:
- You can use your GPU to increase the speed of your Optical Character Recognition pipeline.
- You can use EasyOCR to OCR text in multiple languages at the same time.
- The EasyOCR API is Pythonic, making it simple and intuitive to use.
I’m covering EasyOCR in my book OCR with OpenCV, Tesseract, and Python — be sure to take a look if you are interested in learning more about Optical Character Recognition!
To download the source code to this post (and be notified when future tutorials are published here on PyImageSearch), simply enter your email address in the form below!

Download the Source Code and FREE 17-page Resource Guide
Enter your email address below to get a .zip of the code and a FREE 17-page Resource Guide on Computer Vision, OpenCV, and Deep Learning. Inside you’ll find my hand-picked tutorials, books, courses, and libraries to help you master CV and DL!
The post Getting started with EasyOCR for Optical Character Recognition appeared first on PyImageSearch.