In this tutorial, you will learn how to perform image segmentation with Mask R-CNN, GrabCut, and OpenCV.
A couple months ago, you learned how to use the GrabCut algorithm to segment foreground objects from the background. GrabCut worked fairly well but required that we manually supply where in the input image the object was so that GrabCut could apply its segmentation magic.
Mask R-CNN, on the other hand, can automatically predict both the bounding box and the pixel-wise segmentation mask of each object in an input image. The downside is that masks produced by Mask R-CNN aren’t always “clean” — there is typically a bit of background that “bleeds” into the foreground segmentation.
That raises the following questions:
Is it possible to combine Mask R-CNN and GrabCut together?
Can we use Mask R-CNN to compute the initial segmentation and then refine it using GrabCut?
We certainly can — and the rest of this tutorial will show you how.
To learn how to perform image segmentation with Mask R-CNN, GrabCut, and OpenCV, just keep reading.
Image Segmentation with Mask R-CNN, GrabCut, and OpenCV
In the first part of this tutorial, we’ll discuss why we may want to combine GrabCut with Mask R-CNN for image segmentation.
From there, we’ll implement a Python script that:
- Loads an input image from disk
- Computes a pixel-wise segmentation mask for each object in the input image
- Applies GrabCut to the object via the mask to improve the image segmentation
We’ll then review the results of applying Mask R-CNN and GrabCut together.
The “Summary” of the tutorial covers some of the limitations of this method.
Why use GrabCut and Mask R-CNN together for image segmentation?

Mask R-CNN is a state-of-the-art deep neural network architecture used for image segmentation. Using Mask R-CNN, we can automatically compute pixel-wise masks for objects in the image, allowing us to segment the foreground from the background.
An example mask computed via Mask R-CNN can be seen in Figure 1 at the top of this section.
- On the top-left, we have an input image of a barn scene.
- Mask R-CNN has detected a horse and then automatically computed its corresponding segmentation mask (top-right).
- And on the bottom, we can see the results of applying the computed mask to the input image — notice how the horse has been automatically segmented.
However, the output of Mask R-CNN is far from a perfect mask. We can see that the background (ex., dirt from the field the horse is standing on) is “bleeding” into the foreground.
Our goal here is to refine this mask using GrabCut to obtain a better segmentation:
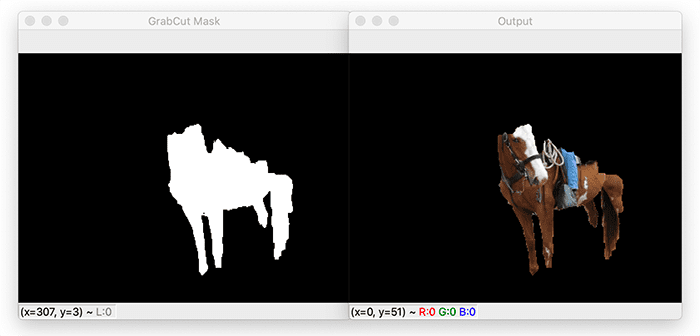
In the image above, you can see the output of applying GrabCut using the mask predicted by Mask R-CNN as the GrabCut seed.
Notice how the segmentation is a bit tighter, specifically around the horse’s legs. Unfortunately, we’ve now lost the top of the horse’s head as well as its hooves.
Using GrabCut and Mask R-CNN together can be a bit of a trade-off. In some cases, it will work very well — and in other cases, it will make your results worse. It’s all highly dependent on your application and what types of images you are segmenting.
In the rest of today’s tutorial, we’ll explore the results of applying Mask R-CNN and GrabCut together.
Configuring your development environment
This tutorial only requires that you have OpenCV installed in a Python virtual environment.
For most readers, the best way to get started is to follow my pip install opencv tutorial, which instructs how to set up the environment and which Python packages you need on macOS, Ubuntu, or Raspbian.
Alternatively, if you have a CUDA-capable GPU on hand, you can follow my OpenCV with CUDA installation guide.
Project structure
Go ahead and grab the code and Mask R-CNN deep learning model from the “Downloads” section of this blog post. Once you extract the .zip, you’ll be presented with the following files:
$ tree --dirsfirst
.
├── mask-rcnn-coco
│   ├── colors.txt
│   ├── frozen_inference_graph.pb
│   ├── mask_rcnn_inception_v2_coco_2018_01_28.pbtxt
│   └── object_detection_classes_coco.txt
├── example.jpg
└── mask_rcnn_grabcut.py

1 directory, 6 files
The mask-rcnn-coco/ directory contains a pre-trained Mask R-CNN TensorFlow model trained on the MS-COCO dataset. Class names are included in a separate text file in the folder.
The logic for our Mask R-CNN and GrabCut image segmentation tutorial is housed in the mask_rcnn_grabcut.py Python script. We’ll test our methodology, seeking to mask out objects from the included example.jpg photo.
Implementing image segmentation with Mask R-CNN and GrabCut
Let’s get started implementing Mask R-CNN and GrabCut together for image segmentation with OpenCV.
Open up a new file, name it mask_rcnn_grabcut.py, and insert the following code:
# import the necessary packages
import numpy as rnp
import argparse
import imutils
import cv2
import os

# construct the argument parser and parse the arguments
ap = argparse.ArgumentParser()
ap.add_argument("-m", "--mask-rcnn", required=True,
	help="base path to mask-rcnn directory")
ap.add_argument("-i", "--image", required=True,
	help="path to input image")
ap.add_argument("-c", "--confidence", type=float, default=0.5,
	help="minimum probability to filter weak detections")
ap.add_argument("-t", "--threshold", type=float, default=0.3,
	help="minimum threshold for pixel-wise mask segmentation")
ap.add_argument("-u", "--use-gpu", type=bool, default=0,
	help="boolean indicating if CUDA GPU should be used")
ap.add_argument("-e", "--iter", type=int, default=10,
	help="# of GrabCut iterations (larger value => slower runtime)")
args = vars(ap.parse_args())
After importing necessary packages (Lines 2-6), we define our command line arguments (Lines 9-22):
--mask-rcnn--image--confidence--threshold--use-gpu--iter
From here, we’ll load our deep learning model’s labels and associate a random color with each:
# load the COCO class labels our Mask R-CNN was trained on
labelsPath = os.path.sep.join([args["mask_rcnn"],
	"object_detection_classes_coco.txt"])
LABELS = open(labelsPath).read().strip().split("\n")

# initialize a list of colors to represent each possible class label
np.random.seed(42)
COLORS = np.random.randint(0, 255, size=(len(LABELS), 3),
	dtype="uint8")
After loading our class LABELS (Lines 25-27), we generate a corresponding set of random COLORS (one for each class) via Lines 30-32.
Let’s go ahead and load our pre-trained Mask R-CNN model:
# derive the paths to the Mask R-CNN weights and model configuration
weightsPath = os.path.sep.join([args["mask_rcnn"],
	"frozen_inference_graph.pb"])
configPath = os.path.sep.join([args["mask_rcnn"],
	"mask_rcnn_inception_v2_coco_2018_01_28.pbtxt"])

# load our Mask R-CNN trained on the COCO dataset (90 classes)
# from disk
print("[INFO] loading Mask R-CNN from disk...")
net = cv2.dnn.readNetFromTensorflow(weightsPath, configPath)

# check if we are going to use GPU
if args["use_gpu"]:
	# set CUDA as the preferable backend and target
	print("[INFO] setting preferable backend and target to CUDA...")
	net.setPreferableBackend(cv2.dnn.DNN_BACKEND_CUDA)
	net.setPreferableTarget(cv2.dnn.DNN_TARGET_CUDA)
Lines 35-38 derive paths to our model’s configuration and pre-trained weights. Our model is TensorFlow-based. However, OpenCV’s DNN module is able to load the model and prepare it for inference using a CUDA-capable NVIDIA GPU, if desired (Lines 43-50).
Now that our model is loaded, we’re ready to also load our image and perform inference:
# load our input image from disk and display it to our screen
image = cv2.imread(args["image"])
image = imutils.resize(image, width=600)
cv2.imshow("Input", image)

# construct a blob from the input image and then perform a
# forward pass of the Mask R-CNN, giving us (1) the bounding box
# coordinates of the objects in the image along with (2) the
# pixel-wise segmentation for each specific object
blob = cv2.dnn.blobFromImage(image, swapRB=True, crop=False)
net.setInput(blob)
(boxes, masks) = net.forward(["detection_out_final",
	"detection_masks"])
We load our input --image from disk and display it to our screen prior to performing any segmentation actions (Lines 53-55).
From there, we pre-process the input by constructing a blob (Line 61).
To perform Mask R-CNN inference, we pass the blob through our network, resulting in both object bounding boxes and pixel-wise segmentation masks (Lines 62-64).
Given each of our detections, now we’ll proceed to generate each of the following four visualization images:
rcnnMask: R-CNN maskrcnnOutputoutputMaskoutput
Be sure to refer to this list so you can keep track of each of the output images over the remaining code blocks.
Let’s begin looping over the detections:
# loop over the number of detected objects
for i in range(0, boxes.shape[2]):
	# extract the class ID of the detection along with the
	# confidence (i.e., probability) associated with the
	# prediction
	classID = int(boxes[0, 0, i, 1])
	confidence = boxes[0, 0, i, 2]

	# filter out weak predictions by ensuring the detected
	# probability is greater than the minimum probability
	if confidence > args["confidence"]:
		# show the class label
		print("[INFO] showing output for '{}'...".format(
			LABELS[classID]))

		# scale the bounding box coordinates back relative to the
		# size of the image and then compute the width and the
		# height of the bounding box
		(H, W) = image.shape[:2]
		box = boxes[0, 0, i, 3:7] * np.array([W, H, W, H])
		(startX, startY, endX, endY) = box.astype("int")
		boxW = endX - startX
		boxH = endY - startY
Line 67 begins our loop over the detection, at which point we proceed to:
- Extract the
classIDandconfidence(Lines 71 and 72) - Filter out weak predictions, based on our
--confidencethreshold (Line 76) - Scale bounding box coordinates according to the original dimensions of the image (Lines 84 and 85)
- Extract bounding box coordinates, and determine the width and height of said box (Lines 86-88)
From here, we’re ready to start working on generating our R-CNN mask and masked image:
		# extract the pixel-wise segmentation for the object, resize
		# the mask such that it's the same dimensions as the bounding
		# box, and then finally threshold to create a *binary* mask
		mask = masks[i, classID]
		mask = cv2.resize(mask, (boxW, boxH),
			interpolation=cv2.INTER_CUBIC)
		mask = (mask > args["threshold"]).astype("uint8") * 255

		# allocate a memory for our output Mask R-CNN mask and store
		# the predicted Mask R-CNN mask in the GrabCut mask
		rcnnMask = np.zeros(image.shape[:2], dtype="uint8")
		rcnnMask[startY:endY, startX:endX] = mask

		# apply a bitwise AND to the input image to show the output
		# of applying the Mask R-CNN mask to the image
		rcnnOutput = cv2.bitwise_and(image, image, mask=rcnnMask)

		# show the output of the Mask R-CNN and bitwise AND operation
		cv2.imshow("R-CNN Mask", rcnnMask)
		cv2.imshow("R-CNN Output", rcnnOutput)
		cv2.waitKey(0)
First, we extract the mask, resize it according to the bounding box dimensions, and binarize it (Lines 93-96).
Then, we allocate memory for the output Mask R-CNN mask and store the object mask into the bounding box ROI (Lines 100 and 101).
Applying a bitwise AND to both the image and the rcnnMask results in our rcnnOutput (Line 105).
The first two images are then displayed via Lines 108-110 with a pause for inspection and a keypress.
Now, we’re ready to perform mask-based GrabCut:
		# clone the Mask R-CNN mask (so we can use it when applying
		# GrabCut) and set any mask values greater than zero to be
		# "probable foreground" (otherwise they are "definite
		# background")
		gcMask = rcnnMask.copy()
		gcMask[gcMask > 0] = cv2.GC_PR_FGD
		gcMask[gcMask == 0] = cv2.GC_BGD

		# allocate memory for two arrays that the GrabCut algorithm
		# internally uses when segmenting the foreground from the
		# background and then apply GrabCut using the mask
		# segmentation method
		print("[INFO] applying GrabCut to '{}' ROI...".format(
			LABELS[classID]))
		fgModel = np.zeros((1, 65), dtype="float")
		bgModel = np.zeros((1, 65), dtype="float")
		(gcMask, bgModel, fgModel) = cv2.grabCut(image, gcMask,
			None, bgModel, fgModel, iterCount=args["iter"],
			mode=cv2.GC_INIT_WITH_MASK)
Recall from my previous GrabCut tutorial that there are two means of performing segmentation with GrabCut:
- Bounding box-based
- Mask-based (the method we’re about to perform)
Line 116 clones the rcnnMask so that we can use it when applying GrabCut.
We then set the “probable foreground” and “definite background” values (Lines 117 and 118). We also allocate arrays for the foreground and background models that OpenCV’s GrabCut algorithm needs internally (Lines 126 and 127).
From there, we call cv2.grabCut with the necessary parameters (Lines 128-130), including our initialized mask (the result of our Mask R-CNN). I highly recommend referring to the “OpenCV GrabCut” section from my first GrabCut blog post if you need a refresher on what each of OpenCV’s GrabCut input parameters and 3-tuple return signature are.
Regarding the return, we only care about the gcMask as we’ll see next.
Let’s go ahead and generate our final two output images:
		# set all definite background and probable background pixels
		# to 0 while definite foreground and probable foreground
		# pixels are set to 1, then scale the mask from the range
		# [0, 1] to [0, 255]
		outputMask = np.where(
			(gcMask == cv2.GC_BGD) | (gcMask == cv2.GC_PR_BGD), 0, 1)
		outputMask = (outputMask * 255).astype("uint8")

		# apply a bitwise AND to the image using our mask generated
		# by GrabCut to generate our final output image
		output = cv2.bitwise_and(image, image, mask=outputMask)

		# show the output GrabCut mask as well as the output of
		# applying the GrabCut mask to the original input image
		cv2.imshow("GrabCut Mask", outputMask)
		cv2.imshow("Output", output)
		cv2.waitKey(0)
To start, we set all “definite background” and “probable background” pixels to 0, and set all “definite foreground” and “probable foreground” pixels to 1 (Lines 136 and 137). Then, Line 138 converts the mask to the [0, 255] range as 8-bit unsigned integers.
Applying a bitwise AND to our original image and Mask R-CNN + GrabCut outputMask results in our output (Line 142).
Our final two image visualizations are then displayed via the remaining lines.
In the next section, we’ll inspect our results.
Mask R-CNN and GrabCut image segmentation results
We are now ready to apply Mask R-CNN and GrabCut for image segmentation.
Make sure you used the “Downloads” section of this tutorial to download the source code, example image, and pre-trained Mask R-CNN weights.
For reference, here is the input image that we’ll be applying GrabCut and Mask R-CNN to:
Open up a terminal, and execute the following command:
$ python mask_rcnn_grabcut.py --mask-rcnn mask-rcnn-coco --image example.jpg
[INFO] loading Mask R-CNN from disk...
[INFO] showing output for 'horse'...
[INFO] applying GrabCut to 'horse' ROI...
[INFO] showing output for 'person'...
[INFO] applying GrabCut to 'person' ROI...
[INFO] showing output for 'dog'...
[INFO] applying GrabCut to 'dog' ROI...
[INFO] showing output for 'truck'...
[INFO] applying GrabCut to 'truck' ROI...
[INFO] showing output for 'person'...
[INFO] applying GrabCut to 'person' ROI...
Let’s now take a look at each individual image segmentation:
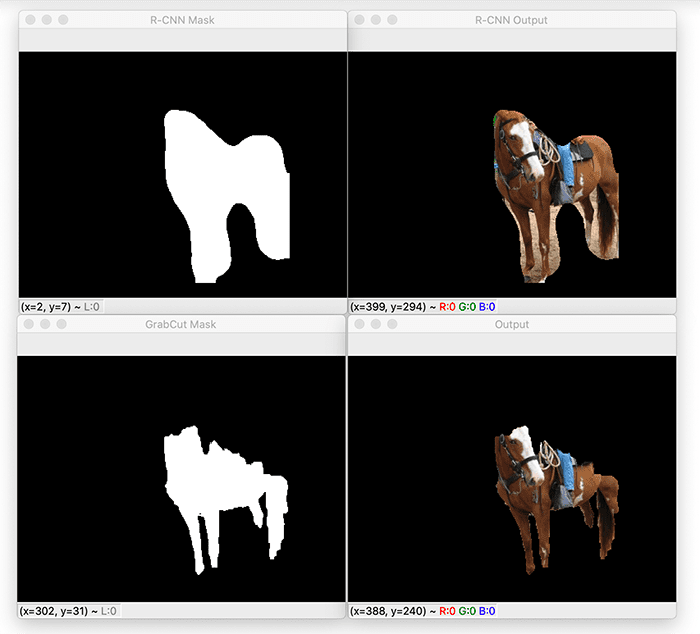
Here, you can see that Mask R-CNN has detected a horse in the input image.
We then pass in that mask through GrabCut to refine the mask in hopes of obtaining a better image segmentation.
While we are able to remove the background by the horse’s legs, it unfortunately cuts off the hooves and the top of the horse’s head.
Let’s now take a look at segmenting the rider sitting on top of the horse:

This segmentation is considerably better than the previous one; however, the hair on the person’s head is lost after applying GrabCut.
Here is the output of segmenting the truck from the input image:

Mask R-CNN does a really great job segmenting the truck; however, GrabCut thinks only the grille, hood, and windshield are in the foreground, removing the rest.
This next image contains the visualizations for segmenting the second person (the one in the distance by the fence):
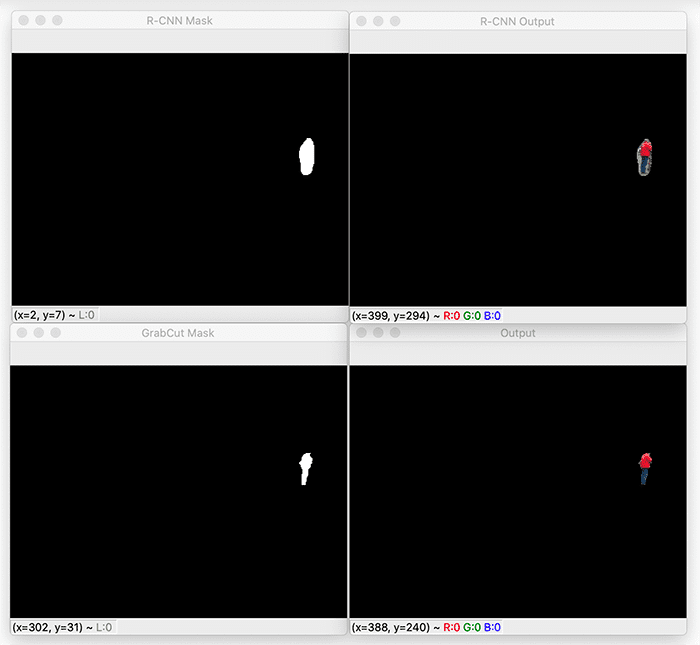
This is one of the best examples of how Mask R-CNN and GrabCut can be successfully used together for image segmentation.
Notice how we have a significantly tighter segmentation — any background (such as the grass in the field) that has bled into the foreground has been removed after applying GrabCut.
And finally, here is the output of applying Mask R-CNN and GrabCut to the dog:
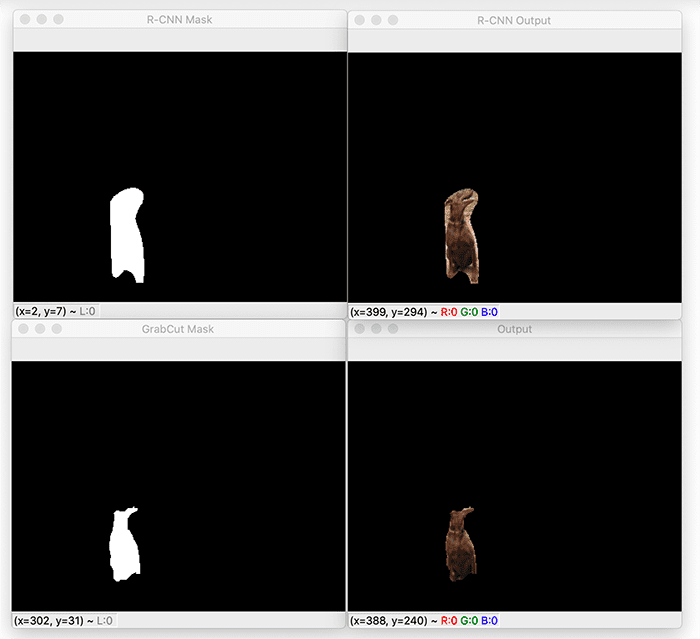
The mask produced by Mask R-CNN still has a significant amount of background in it.
By applying GrabCut, can remove that background, but unfortunately the top of the dog’s head is lost with it.
Mixed results, limitations, and drawbacks
After looking at the mixed results from this tutorial, you’re probably wondering why I even bothered to write a tutorial on using GrabCut and Mask R-CNN together — in many cases, it seemed that applying GrabCut to a Mask R-CNN mask actually made the results worse!
And while that is true, there are still situations (such as the second person segmentation in Figure 7) where applying GrabCut to the Mask R-CNN mask actually improved the segmentation.
I used an image with a complex foreground/background to show you the limitations of this method, but images with less complexity will obtain better results.
A great example could be segmenting clothes from an input image to build a fashion search engine.
Instance segmentation networks such as Mask R-CNN, U-Net, etc. can predict the location and mask of each article of clothing, and from there, GrabCut can refine the mask.
While there will certainly be mixed results when applying Mask R-CNN and GrabCut together for image segmentation, it can still be worth an experiment to see if your results improve.
What’s next?
Inside today’s tutorial, we covered image segmentation based on GrabCut and a pre-trained Mask R-CNN.
If you’re inspired to create your own deep learning projects such as training a custom Mask R-CNN on your own data, I would recommend reading my book Deep Learning for Computer Vision with Python.
Not only do I cover advanced state-of-the-art techniques in my book, but I also teach deep learning fundamentals and basic concepts.
I crafted my book so that it perfectly balances theory with implementation, ensuring you properly master:
- Deep learning fundamentals and theory without unnecessary mathematical fluff. I present the basic equations and back them up with code walkthroughs that you can implement and easily understand. You don’t need a degree in advanced mathematics to understand this book.
- How to implement your own custom neural network architectures. Not only will you learn how to implement state-of-the-art architectures, including ResNet, SqueezeNet, etc., but you’ll also learn how to create your own custom CNNs.
- How to train CNNs on your own datasets. Most deep learning tutorials don’t teach you how to work with your own custom datasets. Mine do. You’ll be training CNNs on your own datasets in no time.
- Object detection (Faster R-CNNs, Single Shot Detectors, and RetinaNet) and instance segmentation (Mask R-CNN). Use these chapters to create your own custom object detectors and segmentation networks.
You’ll also find answers and proven code recipes to:
- Create and prepare your own custom image datasets for image classification, object detection, and segmentation
- Work through hands-on tutorials (with lots of code) that not only show you the algorithms behind deep learning for computer vision but their implementations as well
- Put my tips, suggestions, and best practices into action, ensuring you maximize the accuracy of your models
Beginners and experts alike tend to resonate with my no-nonsense teaching style and high-quality content. In fact, you may wish to read a selection of student success stories from my archives if you’re on the fence about grabbing a copy.
If you’re ready to begin, simply click here.
Summary
In this tutorial, you learned how to perform image segmentation using Mask R-CNN, GrabCut, and OpenCV.
We used the Mask R-CNN deep neural network to compute the initial foreground segmentation mask for a given object in an image.
The mask from Mask R-CNN can be automatically computed but often has background that “bleeds” into the foreground segmentation mask. To remedy that problem, we used GrabCut to refine the mask produced by Mask R-CNN.
In some cases, GrabCut produced image segmentations that were better than the original masks produced by Mask R-CNN. And in other cases, the resulting image segmentations were worse — we would have been better off just sticking with the masks produced by Mask R-CNN.
The biggest limitation is that even with the masks/bounding boxes automatically produced by Mask R-CNN, GrabCut is still an algorithm that iteratively requires manual annotation to provide the best results. Since we’re not manually providing hints and suggestions to GrabCut, the masks cannot be improved further.
Had we been using a photo editing software package like Photoshop, GIMP, etc., then we would have a nice, easy-to-use GUI that would allow us to provide hints to GrabCut as to what is foreground versus what is background.
You should certainly try using GrabCut to refine your Mask R-CNN masks. In some cases, you’ll find that it works perfectly, and you’ll obtain higher quality image segmentations. And in other situations, you might be better off just using the Mask R-CNN masks.
To download the source code to this post (and be notified when future tutorials are published here on PyImageSearch), simply enter your email address in the form below!

Download the Source Code and FREE 17-page Resource Guide
Enter your email address below to get a .zip of the code and a FREE 17-page Resource Guide on Computer Vision, OpenCV, and Deep Learning. Inside you’ll find my hand-picked tutorials, books, courses, and libraries to help you master CV and DL!
The post Image Segmentation with Mask R-CNN, GrabCut, and OpenCV appeared first on PyImageSearch.