In this tutorial you will learn how to generate ArUco markers using OpenCV and Python.
Today’s blog post is part one in our three-part series on ArUCo markers and fiducials:
- Generating ArUco markers with OpenCV and Python (today’s post)
- Detecting ArUco markers in images and video with OpenCV (next week’s tutorial)
- Automatically determining ArUco marker type with OpenCV (blog post two weeks from now)
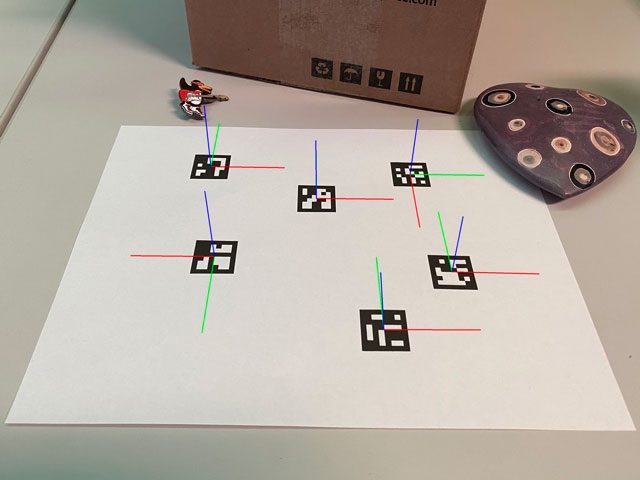
Similar to AprilTags, ArUco markers are 2D binary patterns that computer vision algorithms can easily detect.
Typically, we use AprilTags and ArUco markers for:
- Camera calibration
- Object size estimation
- Measuring the distance between camera and object
- 3D position
- Object orientation
- Robotics and autonomous navigation
- etc.
The primary benefits of using ArUco markers over AprilTags include:
- ArUco markers are built into the OpenCV library via the
cv2.arucosubmodule (i.e., we don’t need additional Python packages). - The OpenCV library itself can generate ArUco markers via the
cv2.aruco.drawMarkerfunction. - There are online ArUco generators that we can use if we don’t feel like coding (unlike AprilTags where no such generators are easily found).
- There are ROS (Robot Operating System) implementations of ArUco markers.
- And from an implementation perspective, ArUco marker detections tend to be more accurate, even when using the default parameters.
In this introductory series to ArUco markers, you will learn how to generate them, detect them in images and real-time video streams, and even how to automatically detect the type of ArUco marker in an image (even if you don’t know what type of marker is being used).
We’ll then take this knowledge and use ArUco markers in our own computer vision and image processing pipelines in future PyImageSearch tutorials.
To learn how to generate ArUco markers with OpenCV and Python, just keep reading.
Generating ArUco markers with OpenCV and Python
In the first part of this tutorial, we’ll discuss ArUco markers, including what they are and why we may want to use them in our computer vision and image processing pipelines.
We’ll then discuss how to generate ArUco markers using OpenCV and Python. I’ll also provide a few example websites that will generate ArUco markers for you if you don’t feel like writing code to generate them (although the code implementation itself is dead simple).
From there we’ll review our project directory structure and then implement a Python script named opencv_generate_aruco.py, which will generate a specific ArUco image and then save it to disk.
We’ll wrap up this tutorial with a discussion of our results.
What are ArUco markers?
I’ve already covered the fundamentals of fiducial markers, AprilTags, and ArUco markers in this previous tutorial, so I’m not going to rehash the basics here.
If you are new to fiducial markers and need to understand why they are important, how they work, or when we would want to use them in a computer vision/image processing pipeline, I suggest you give my AprilTag tutorial a read.
From there you should come back here and finish reading this tutorial on ArUco markers with OpenCV.
How can we generate ArUco markers with OpenCV and Python?

cv2.aruco.drawMarker function to generate and draw ArUco markers using OpenCV and Python.The OpenCV library has a built-in ArUco marker generator through its cv2.aruco.drawMarker function.
The parameters to this function include:
dictionaryiddictionary)sidePixelsborderBits
The drawMarker
As you’ll see later in this tutorial, using the function is fairly straightforward in practice. The steps required include:
- Select which ArUco dictionary you want to use
- Specify which ArUco ID you’re going to draw
- Allocate memory for your output ArUco image (in pixels)
- Use the
drawMarker - Draw the ArUco marker itself
That said, if you don’t want to write any code, you could leverage an online ArUco generator.
Are there online ArUco marker generators?
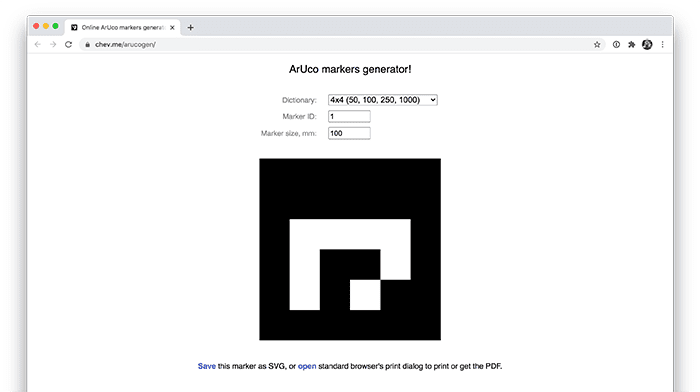
If you don’t feel like writing some code, or are simply in a hurry, there are online ArUco marker generators that you can use.
My favorite is this one, put together by Oleg Kalachev.
All you have to do is:
- Select the ArUco dictionary you want to use
- Enter the marker ID
- Specify the marker size (in millimeters)
From there you can save the ArUco marker as an SVG file or PDF, print it, and then use it in your own OpenCV and computer vision applications.
What are ArUco dictionaries?
So far in this tutorial, I’ve mentioned the concept of an “ArUco dictionary”, but what exactly is an ArUco dictionary? And what role does it play in ArUco generation and detection?
The short answer is that an ArUco dictionary specifies the type of ArUco marker we are generating and detecting. Without the dictionary we would be unable to generate and detect these markers.
Imagine you are kidnapped, blindfolded, put on a plane, and dropped in a random country in the world. You are then given a notebook containing the secret to your release, but it’s written in a language you have never seen before in your life.
One captor takes pity on you and gives you a dictionary to help you translate what you see in your book.
Using the dictionary you are able to translate the document, reveal the secret, and escape with your life intact.
But without that dictionary you would have never been able to escape. Just as you needed that dictionary to translate the secret to your escape, we must know what type of ArUco markers we are working with in order to generate and detect them.
Types of ArUco dictionaries in OpenCV
There are 21 different ArUco dictionaries built into the OpenCV library. I have listed them here in the following Python dictionary:
ARUCO_DICT = {
	"DICT_4X4_50": cv2.aruco.DICT_4X4_50,
	"DICT_4X4_100": cv2.aruco.DICT_4X4_100,
	"DICT_4X4_250": cv2.aruco.DICT_4X4_250,
	"DICT_4X4_1000": cv2.aruco.DICT_4X4_1000,
	"DICT_5X5_50": cv2.aruco.DICT_5X5_50,
	"DICT_5X5_100": cv2.aruco.DICT_5X5_100,
	"DICT_5X5_250": cv2.aruco.DICT_5X5_250,
	"DICT_5X5_1000": cv2.aruco.DICT_5X5_1000,
	"DICT_6X6_50": cv2.aruco.DICT_6X6_50,
	"DICT_6X6_100": cv2.aruco.DICT_6X6_100,
	"DICT_6X6_250": cv2.aruco.DICT_6X6_250,
	"DICT_6X6_1000": cv2.aruco.DICT_6X6_1000,
	"DICT_7X7_50": cv2.aruco.DICT_7X7_50,
	"DICT_7X7_100": cv2.aruco.DICT_7X7_100,
	"DICT_7X7_250": cv2.aruco.DICT_7X7_250,
	"DICT_7X7_1000": cv2.aruco.DICT_7X7_1000,
	"DICT_ARUCO_ORIGINAL": cv2.aruco.DICT_ARUCO_ORIGINAL,
	"DICT_APRILTAG_16h5": cv2.aruco.DICT_APRILTAG_16h5,
	"DICT_APRILTAG_25h9": cv2.aruco.DICT_APRILTAG_25h9,
	"DICT_APRILTAG_36h10": cv2.aruco.DICT_APRILTAG_36h10,
	"DICT_APRILTAG_36h11": cv2.aruco.DICT_APRILTAG_36h11
}
The majority of these dictionaries follow a specific naming convention, cv2.aruco.DICT_NxN_M, with an NxN size followed by an integer value, M — but what do these values mean?
The NxN value is the 2D bit size of the ArUco marker. For example, for a 6×6 marker we have a total of 36 bits.
The integer M following the grid size specifies the total number of unique ArUco IDs that can be generated with that dictionary.
To make the naming convention more concrete, consider the following examples:
The cv2.aruco.DICT_4X4_50 value implies that we want to generate a binary 4×4 square AruCo marker. We’ll be able to generate 50 unique ArUco marker IDs using this dictionary.
The value cv2.aruco.DICT_7X7_250 implies that we’ll be creating a binary 7×7 ArUco marker and that there will be 250 unique ArUco marker IDs in the dictionary.
So, how do you decide on which ArUco marker dictionary you want to use?
- To start, consider how many unique values in the dictionary you need. Only need a small handful of markers? Choose a dictionary that has a smaller unique number of values then. Need to detect a lot of markers? Select a dictionary with more unique ID values. Essentially, pick a dictionary that has the bare minimum number of IDs you need — don’t take more than what you actually need.
- Look at your input image/video resolution size. Keep in mind that the larger your grid size gets, the larger the ArUco marker will need to be when captured by your camera. If you have a large grid but a low resolution input, then the marker may be undetectable (or may be misread).
- Consider the inter-marker distance. OpenCV’s ArUco detection implementation utilizes error correction to improve the accuracy and robustness of marker detection. The error correction hinges on the concept of inter-marker distance. Smaller dictionary sizes with larger NxN marker sizes increase the inter-marker distance, thereby making them less prone to false readings.
Ideal settings for an ArUco dictionary include:
- A low number of unique ArUco IDs that need to be generated and read
- High-quality image input containing the ArUco markers that will be detected
- A larger NxN grid size, balanced with a low number of unique ArUco IDs such that the inter-marker distance can be used to correct misread markers
Be sure to refer to the OpenCV documentation for more details on ArUco dictionaries.
Note: I’ll wrap up this section by saying that the final few entries in the ARUCO_DICT
Configuring your development environment
In order to generate and detect ArUco markers, you need to have the OpenCV library installed.
Luckily, OpenCV is pip-installable:
$ pip install opencv-contrib-python
If you need help configuring your development environment with OpenCV, I highly recommend that you read my pip install OpenCV guide — it will have you up and running in a matter of minutes.
Having problems configuring your development environment?
All that said, are you:
- Short on time?
- Learning on your employer’s administratively locked system?
- Wanting to skip the hassle of fighting with the command line, package managers, and virtual environments?
- Ready to run the code right now on your Windows, macOS, or Linux system?
Then join PyImageSearch Plus today!
Gain access to Jupyter Notebooks for this tutorial and other PyImageSearch guides that are pre-configured to run on Google Colab’s ecosystem right in your web browser! No installation required.
And best of all, these Jupyter Notebooks will run on Windows, macOS, and Linux!
Project structure
Before we start generating ArUco markers with OpenCV, let’s first review our project directory structure.
Use the “Downloads” section of this tutorial to download the source code and example images to this tutorial. From there, let’s inspect what we have:
$ tree . --dirsfirst
.
├── tags
│   ├── DICT_5X5_100_id24.png
│   ├── DICT_5X5_100_id42.png
│   ├── DICT_5X5_100_id66.png
│   ├── DICT_5X5_100_id70.png
│   └── DICT_5X5_100_id87.png
└── opencv_generate_aruco.py

1 directory, 6 files
As the name suggests, the opencv_generate_aruco.py script is used to generate ArUco markers. The resulting ArUco markers are then saved to task in the tags/ directory.
Next week we’ll learn how to actually detect and recognize these (and other) ArUco markers.
Implementing our ArUco marker generation script with OpenCV and Python
Let’s learn how to generate ArUco markers with OpenCV.
Open up the opencv_generate_aruco.py file in your project directory structure, and insert the following code:
# import the necessary packages
import numpy as np
import argparse
import cv2
import sys
Here we import our required Python packages. We’ll use NumPy to allocate an empty NumPy array to store our generated ArUco tag, while cv2 (our OpenCV bindings), will generate the ArUco tag itself.
Let’s move on to our command line arguments:
# construct the argument parser and parse the arguments
ap = argparse.ArgumentParser()
ap.add_argument("-o", "--output", required=True,
	help="path to output image containing ArUCo tag")
ap.add_argument("-i", "--id", type=int, required=True,
	help="ID of ArUCo tag to generate")
ap.add_argument("-t", "--type", type=str,
	default="DICT_ARUCO_ORIGINAL",
	help="type of ArUCo tag to generate")
args = vars(ap.parse_args())
We have three command line arguments to our script, two required and one optional:
--output--id--type: The name of the ArUco dictionary we’ll use to generate the tag; by default, we’ll use the original ArUco dictionary
With our command line arguments parsed, we can move on to define our ARUCO_DICT
# define names of each possible ArUco tag OpenCV supports
ARUCO_DICT = {
	"DICT_4X4_50": cv2.aruco.DICT_4X4_50,
	"DICT_4X4_100": cv2.aruco.DICT_4X4_100,
	"DICT_4X4_250": cv2.aruco.DICT_4X4_250,
	"DICT_4X4_1000": cv2.aruco.DICT_4X4_1000,
	"DICT_5X5_50": cv2.aruco.DICT_5X5_50,
	"DICT_5X5_100": cv2.aruco.DICT_5X5_100,
	"DICT_5X5_250": cv2.aruco.DICT_5X5_250,
	"DICT_5X5_1000": cv2.aruco.DICT_5X5_1000,
	"DICT_6X6_50": cv2.aruco.DICT_6X6_50,
	"DICT_6X6_100": cv2.aruco.DICT_6X6_100,
	"DICT_6X6_250": cv2.aruco.DICT_6X6_250,
	"DICT_6X6_1000": cv2.aruco.DICT_6X6_1000,
	"DICT_7X7_50": cv2.aruco.DICT_7X7_50,
	"DICT_7X7_100": cv2.aruco.DICT_7X7_100,
	"DICT_7X7_250": cv2.aruco.DICT_7X7_250,
	"DICT_7X7_1000": cv2.aruco.DICT_7X7_1000,
	"DICT_ARUCO_ORIGINAL": cv2.aruco.DICT_ARUCO_ORIGINAL,
	"DICT_APRILTAG_16h5": cv2.aruco.DICT_APRILTAG_16h5,
	"DICT_APRILTAG_25h9": cv2.aruco.DICT_APRILTAG_25h9,
	"DICT_APRILTAG_36h10": cv2.aruco.DICT_APRILTAG_36h10,
	"DICT_APRILTAG_36h11": cv2.aruco.DICT_APRILTAG_36h11
}
I reviewed the ArUco dictionaries in the “Types of ArUco dictionaries in OpenCV” section above, so be sure to refer there if you would like additional explanation on this code block.
With our ARUCO_DICT mappings defined, let’s now load the ArUco dictionary using OpenCV:
# verify that the supplied ArUCo tag exists and is supported by
# OpenCV
if ARUCO_DICT.get(args["type"], None) is None:
	print("[INFO] ArUCo tag of '{}' is not supported".format(
		args["type"]))
	sys.exit(0)

# load the ArUCo dictionary
arucoDict = cv2.aruco.Dictionary_get(ARUCO_DICT[args["type"]])
Line 45 makes a check to see if the ArUco dictionary --type exists in our ARUCO_DICT.
If not, we report that the supplied --type does not exist in the ARUCO_DICT and then gracefully exit the script.
Otherwise, we load the ArUco dictionary by looking up the ArUco dictionary --type in our ARUCO_DICT and then passing this value into the cv2.aruco.Dictionary_get function.
The cv2.aruco.Dictionary_get function returns all information OpenCV needs to draw our ArUco tags.
Speaking of drawing the tag, let’s go ahead and do that now:
# allocate memory for the output ArUCo tag and then draw the ArUCo
# tag on the output image
print("[INFO] generating ArUCo tag type '{}' with ID '{}'".format(
	args["type"], args["id"]))
tag = np.zeros((300, 300, 1), dtype="uint8")
cv2.aruco.drawMarker(arucoDict, args["id"], 300, tag, 1)

# write the generated ArUCo tag to disk and then display it to our
# screen
cv2.imwrite(args["output"], tag)
cv2.imshow("ArUCo Tag", tag)
cv2.waitKey(0)
Line 57 allocates memory for a 300x300x1 grayscale image. We use grayscale here, since an ArUco tag is a binary image.
Additionally, you can use whatever image dimensions you wish. I hardcoded 300 pixels here, but again, feel free to increase/decrease resolution as you see fit for your own project.
Line 58 then draws the ArUco tag using OpenCV’s cv2.aruco.drawMarker
arucoDict: The ArUco dictionary loaded bycv2.aruco.Dictionary_get. This function tells OpenCV which ArUco dictionary we are using, how to draw the tags, etc.idarucoDict.300tag1borderBits=1will output a 6×6 image with a 1 bit border surrounding the 5×5 region, making the tag easier to detect and read. Typically you should setborderBits=1.
Finally, Lines 62-64 write the generated ArUco tag to disk via the --output
OpenCV ArUco generation results
We are now ready to generate ArUco markers with OpenCV!
Start by using the “Downloads” section of this tutorial to download the source code and example images.
From there, open up a terminal, and execute the following command:
$ python opencv_generate_aruco.py --id 24 --type DICT_5X5_100 \
	--output tags/DICT_5X5_100_id24.png
[INFO] generating ArUCo tag type 'DICT_5X5_100' with ID '24'
Here we have generated a 5×5 ArUco marker using a dictionary that allows for 100 unique ArUco IDs. This marker has an ID value of 24.
Let’s create another image using the same dictionary, but with a value of 42:
$ python opencv_generate_aruco.py --id 42 --type DICT_5X5_100 \
	--output tags/DICT_5X5_100_id42.png
[INFO] generating ArUCo tag type 'DICT_5X5_100' with ID '42'

Again, we use the same cv2.aruco.DICT_5X5_100 dictionary, but this time creating an ArUco marker with an ID of 42.
Let’s generate another marker:
$ python opencv_generate_aruco.py --id 66 --type DICT_5X5_100 \
	--output tags/DICT_5X5_100_id66.png
[INFO] generating ArUCo tag type 'DICT_5X5_100' with ID '66'
The marker in Figure 9 has a value of 66.
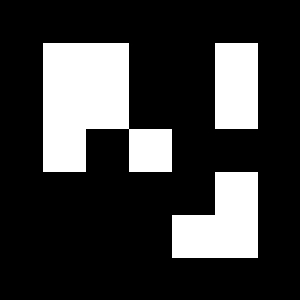
Now let’s generate an ArUco marker with an ID of an 87:
$ python opencv_generate_aruco.py --id 87 --type DICT_5X5_100 \
	--output tags/DICT_5X5_100_id87.png
[INFO] generating ArUCo tag type 'DICT_5X5_100' with ID '87'

In Figure 10 you can see our 5×5 ArUco marker with an ID of 87.
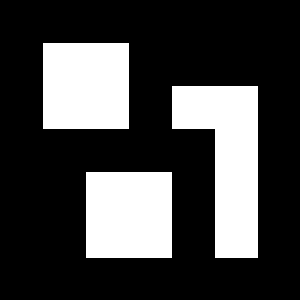
The final example here generates an ArUco marker with a value of 70:
$ python opencv_generate_aruco.py --id 70 --type DICT_5X5_100 \
	--output tags/DICT_5X5_100_id70.png
[INFO] generating ArUCo tag type 'DICT_5X5_100' with ID '70'

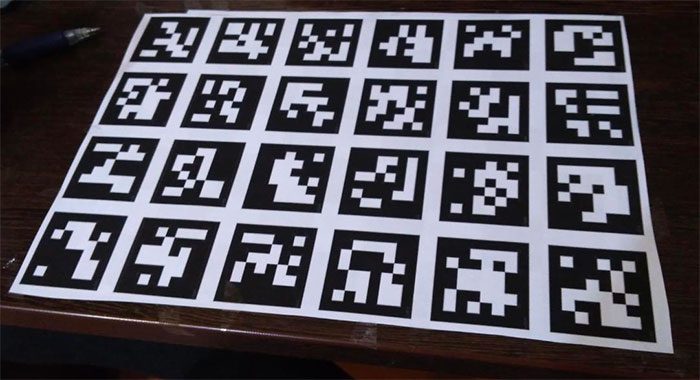
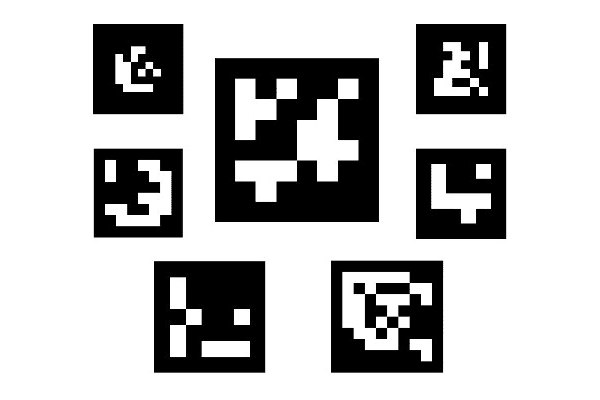
At this point we’ve generated five ArUco markers, a montage of which I’ve created below:
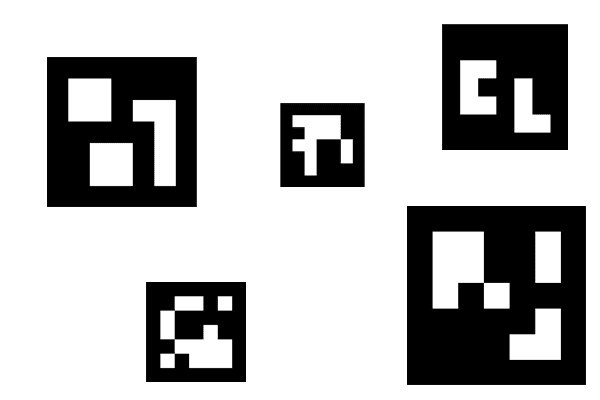
But so what? The markers don’t do much use just sitting on our disk.
How can we take these markers and then detect them in images and real-time video streams?
I’ll be addressing that very question in next week’s tutorial.
Stay tuned.
What’s next?

If you’re relatively new to OpenCV and computer vision, you need to focus on the fundamentals before you dive into more advanced projects and tutorials.
The easiest way to do this is to follow a program that teaches computer vision systematically through practical use cases and Python code examples. That’s exactly what you’ll find in the PyImageSearch Gurus course.
It’s the course I wish I’d had when I started studying computer vision back in college.
Inside this course, you’ll learn from me in a central place with other motivated students.
Inside PyImageSearch Gurus you get:
- Highly actionable content on Computer Vision, Deep Learning, and OpenCV. You’ll learn in the same hands-on, easy to understand PyImageSearch style that you know and love.
- The most comprehensive computer vision education course that exists online. You get everything you need to actually apply what you’re learning and solve real-world problems.
- Membership in a community of like-minded developers, researchers, and students who are learning computer vision, leveling-up their skills, and are keen to collaborate on projects. I’m inside the forums regularly — as are advanced students who answer your questions and offer you expert advice.
Not sure if the PyImageSearch Gurus course is right for you? Take a look at what previous students have achieved. You can have the same kind of success — and in a short time. You just have to start.
Want to check if this course is right for you before you enroll? Grab the course syllabus and 10 free sample lessons right here.
If you’re ready to take the first step in achieving a new level of computer vision skill, sign up for PyImageSearch Gurus. We’ll be here to guide you through to the finish line!
Summary
In this tutorial you learned how to generate ArUco markers with OpenCV and Python.
Working with ArUco tags with OpenCV is dead simple due to the handy cv2.aruco
Now that we’ve actually generated some ArUco tags, next week I will show you how to take the generated tags and actually detect them in images and real-time video streams.
By the end of this series of tutorials, you will have the knowledge necessary to confidently and successfully work with ArUco tags in your own OpenCV projects.
To download the source code to this post (and be notified when future tutorials are published here on PyImageSearch), simply enter your email address in the form below!

Download the Source Code and FREE 17-page Resource Guide
Enter your email address below to get a .zip of the code and a FREE 17-page Resource Guide on Computer Vision, OpenCV, and Deep Learning. Inside you'll find my hand-picked tutorials, books, courses, and libraries to help you master CV and DL!
The post Generating ArUco markers with OpenCV and Python appeared first on PyImageSearch.