In this tutorial, you will learn how to split and merge channels with OpenCV.
As we know, an image is represented by three components: a Red, Green, and Blue channel.
And while we’ve briefly discussed grayscale and binary representations of an image, you may be wondering:
How do I access each individual Red, Green, and Blue channel of an image?
Since images in OpenCV are internally represented as NumPy arrays, accessing each channel can be accomplished in multiple ways, implying multiple ways to skin this cat. However, we’ll focus on the two main methods that you should use: cv2.split and cv2.merge.
By the end of this tutorial, you will have a good understanding of how to split images into channels using cv2.split and merge the individual channels back together with cv2.merge.
To learn how to split and merge channels with OpenCV, just keep reading.
Splitting and Merging Channels with OpenCV
In the first part of this tutorial, we will configure our development environment and review our project structure.
We’ll then implement a Python script that will:
- Load an input image from disk
- Split it into its respective Red, Green, and Blue channels
- Display each channel onto our screen for visualization purposes
- Merge the individual channels back together to form the original image
Let’s get started!
Configuring your development environment
To follow this guide, you need to have the OpenCV library installed on your system.
Luckily, OpenCV is pip-installable:
$ pip install opencv-contrib-python
If you need help configuring your development environment for OpenCV, I highly recommend that you read my pip install OpenCV guide — it will have you up and running in a matter of minutes.
Having problems configuring your development environment?
All that said, are you:
- Short on time?
- Learning on your employer’s administratively locked system?
- Wanting to skip the hassle of fighting with the command line, package managers, and virtual environments?
- Ready to run the code right now on your Windows, macOS, or Linux system?
Then join PyImageSearch Plus today!
Gain access to Jupyter Notebooks for this tutorial and other PyImageSearch guides that are pre-configured to run on Google Colab’s ecosystem right in your web browser! No installation required.
And best of all, these Jupyter Notebooks will run on Windows, macOS, and Linux!
Project structure
Let’s start by reviewing our project directory structure. Be sure to use the “Downloads” section of this tutorial to download the source code and example images:
$ tree . --dirsfirst
.
├── adrian.png
├── opencv_channels.py
└── opencv_logo.png

0 directories, 3 files
Inside our project, you’ll see that we have a single Python script, opencv_channels.py, which will show us:
- How to split an input image (
adrian.pngandopencv_logo.png) into their respective Red, Green, and Blue channels - Visualize each of the RGB channels
- Merge the RGB channels back into the original image
Let’s get started!
How to split and merge channels with OpenCV
A color image consists of multiple channels: a Red, a Green, and a Blue component. We have seen that we can access these components via indexing into NumPy arrays. But what if we wanted to split an image into its respective components?
As you’ll see, we’ll make use of the cv2.split function.
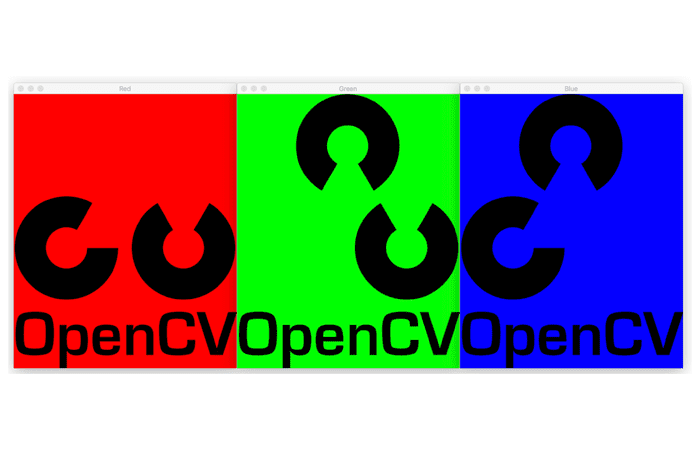
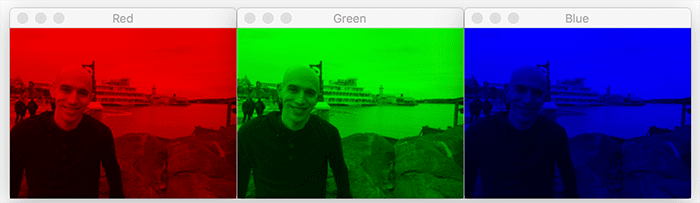
But for the time being, let’s take a look at an example image in Figure 2:
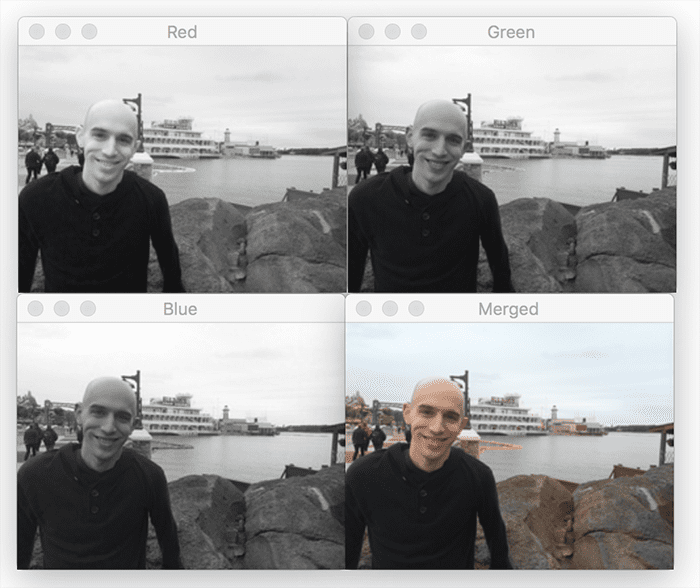
Here, we have (in the order of appearance) Red, Green, Blue, and original image of myself on a trip to Florida.
But given these representations, how do we interpret the different channels of the image?
Let’s take a look at the sky’s color in the original image (bottom-right). Notice how the sky is a slightly blue tinge. And when we look at the blue channel image (bottom-left), we see that the blue channel is very light in the region that corresponds to the sky. This is because the blue channel pixels are very bright, indicating that they contribute heavily to the output image.
Then, take a look at the black hoodie that I am wearing. In each of the Red, Green, and Blue channels of the image, my black hoodie is very dark — indicating that each of these channels contributes very little to the hoodie region of the output image (giving it a very dark black color).
When you investigate each channel individually rather than as a whole, you can visualize how much each channel contributes to the overall output image. Performing this exercise is extremely helpful, especially when applying methods such as thresholding and edge detection, which we’ll cover later in this module.
Now that we have visualized our channels, let’s examine some code to accomplish this for us:
# import the necessary packages
import numpy as np
import argparse
import cv2

# construct the argument parser and parse the arguments
ap = argparse.ArgumentParser()
ap.add_argument("-i", "--image", type=str, default="opencv_logo.png",
	help="path to the input image")
args = vars(ap.parse_args())
Lines 2-4 import our required Python packages. We then parse our command line arguments on Lines 7-10.
We only need a single argument here, --image, which points to our input image residing on disk.
Let’s now load this image and split it into its respective channels:
# load the input image and grab each channel -- note how OpenCV
# represents images as NumPy arrays with channels in Blue, Green,
# Red ordering rather than Red, Green, Blue
image = cv2.imread(args["image"])
(B, G, R) = cv2.split(image)

# show each channel individually
cv2.imshow("Red", R)
cv2.imshow("Green", G)
cv2.imshow("Blue", B)
cv2.waitKey(0)
Line 15 loads our image from disk. We then split it into its Red, Green, and Blue channel components on Line 16 with a call to cv2.split.
Usually, we think of images in the RGB color space — the red pixel first, the green pixel second, and the blue pixel third. However, OpenCV stores RGB images as NumPy arrays in reverse channel order. Instead of storing an image in RGB order, it stores the image in BGR order. Thus we unpack the tuple in reverse order.
Lines 19-22 then show each channel individually, as in Figure 2.
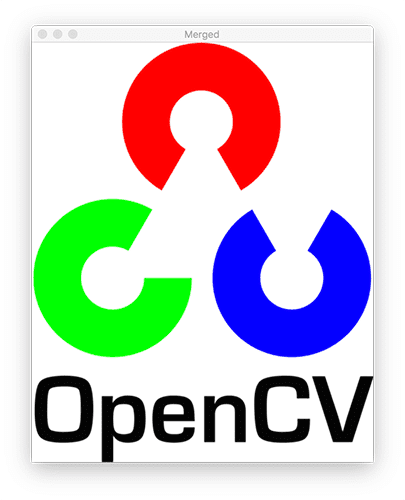
We can also merge the channels back together again using the cv2.merge function:
# merge the image back together again
merged = cv2.merge([B, G, R])
cv2.imshow("Merged", merged)
cv2.waitKey(0)
cv2.destroyAllWindows()
We simply specify our channels, again in BGR order, and then cv2.merge takes care of the rest for us (Line 25)!
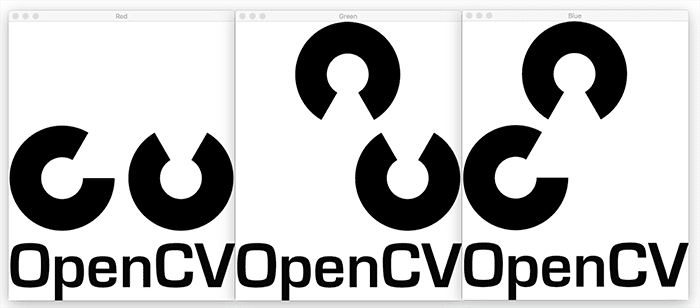
Notice how we reconstruct our original input image from each of the individual RGB channels:
There is also a second method to visualize each channel’s color contribution. In Figure 3, we simply examine the single-channel representation of an image, which looks like a grayscale image.
However, we can also visualize the color contribution of the image as a full RGB image, like this:
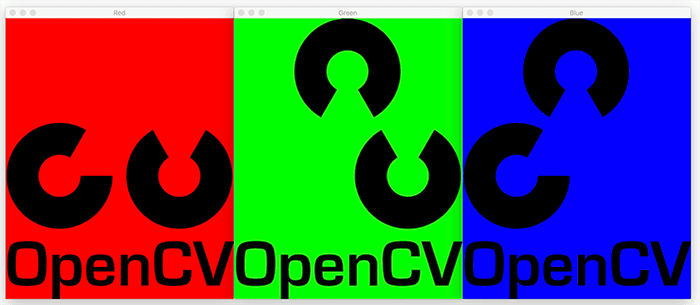
Using this method, we can visualize each channel in “color” rather than “grayscale.” This is strictly a visualization technique and not something we would use in a standard computer vision or image processing application.
But that said, let’s investigate the code to see how to construct this representation:
# visualize each channel in color
zeros = np.zeros(image.shape[:2], dtype="uint8")
cv2.imshow("Red", cv2.merge([zeros, zeros, R]))
cv2.imshow("Green", cv2.merge([zeros, G, zeros]))
cv2.imshow("Blue", cv2.merge([B, zeros, zeros]))
cv2.waitKey(0)
To show the actual “color” of the channel, we first need to take apart the image using cv2.split. We need to reconstruct the image, but this time, having all pixels but the current channel as zero.
On Line 31, we construct a NumPy array of zeros, with the same width and height as our original image.
Then, to construct the Red channel representation of the image, we make a call to cv2.merge, specifying our zeros array for the Green and Blue channels.
We take similar approaches to the other channels in Lines 33 and 34.
You can refer to Figure 5 for this code’s output visualization.
Channel splitting and merging results
To split and merge channels with OpenCV, be sure to use the “Downloads” section of this tutorial to download the source code.
Let’s execute our opencv_channels.py script to split each of the individual channels and visualize them:
$ python opencv_channels.py
You can refer to the previous section to see the script’s output.
If you wish to supply a different image to the opencv_channels.py script, all you need to do is supply the --image command line argument:
$ python opencv_channels.py --image adrian.png
Here, you can see that we’ve taken the input image and split it into its respective Red, Green, and Blue channel components:

And here is the second visualization of each channel:
What’s next?

Would you like to learn how to successfully and confidently apply OpenCV to your projects?
Are you worried that configuring your development environment for Computer Vision, Deep Learning, and OpenCV will be too challenging, resulting in confusing, hard to debug error messages?
Concerned that you’ll get lost sifting through endless tutorials and video guides on your own as you struggle to master Computer Vision?
Great, because I’ve got you covered. PyImageSearch University is your chance to learn from me at your own pace.
You’ll find everything you need to master the basics (like we did together in this tutorial) and move on to advanced concepts.
Don’t worry about your operating system or development environment. I’ve got you covered with pre-configured Jupyter Notebooks in Google Colab for every tutorial on PyImageSearch, including Jupyter Notebooks for our new weekly tutorials as well!
Best of all, these Jupyter Notebooks will run on your machine, regardless of whether you are using Windows, macOS, or Linux! Irrespective of the operating system used, you will still be able to follow along and run the code in every lesson (all inside the convenience of your web browser).
Additionally, you can massively accelerate your progress by watching our video lessons accompanying each post. Every lesson in PyImageSearch University includes a detailed, step-by-step video guide.
You may feel that learning Computer Vision, Deep Learning, and OpenCV is too hard. Don’t worry; I’ll guide you gradually through each lecture and topic, so we build a solid foundation, and you grasp all the content.
When you think about it, PyImageSearch University is almost an unfair advantage compared to self-guided learning. You’ll learn more efficiently and master Computer Vision faster.
Oh, and did I mention you’ll also receive Certificates of Completion as you progress through each course at PyImageSearch University?
I’m sure PyImageSearch University will help you master OpenCV drawing and all the other computer vision skills you will need. Why not join today?
Summary
In this tutorial, you learned how to split and merge image channels using OpenCV and the cv2.split and cv2.merge functions.
While there are NumPy functions you can use for splitting and merging, I strongly encourage you to use the cv2.split and cv2.merge functions — they tend to be easier to read and understand from a code perspective.
To download the source code to this post (and be notified when future tutorials are published here on PyImageSearch), simply enter your email address in the form below!

Download the Source Code and FREE 17-page Resource Guide
Enter your email address below to get a .zip of the code and a FREE 17-page Resource Guide on Computer Vision, OpenCV, and Deep Learning. Inside you'll find my hand-picked tutorials, books, courses, and libraries to help you master CV and DL!
The post Splitting and Merging Channels with OpenCV appeared first on PyImageSearch.