In this tutorial you will learn how to perform Human Activity Recognition with OpenCV and Deep Learning.
Our human activity recognition model can recognize over 400 activities with 78.4-94.5% accuracy (depending on the task).
A sample of the activities can be seen below:
- archery
- arm wrestling
- baking cookies
- counting money
- driving tractor
- eating hotdog
- flying kite
- getting a tattoo
- grooming horse
- hugging
- ice skating
- juggling fire
- kissing
- laughing
- motorcycling
- news anchoring
- opening present
- playing guitar
- playing tennis
- robot dancing
- sailing
- scuba diving
- snowboarding
- tasting beer
- trimming beard
- using computer
- washing dishes
- welding
- yoga
- …and more!
Practical applications of human activity recognition include:
- Automatically classifying/categorizing a dataset of videos on disk.
- Training and monitoring a new employee to correctly perform a task (ex., proper steps and procedures when making a pizza, including rolling out the dough, heating oven, putting on sauce, cheese, toppings, etc.).
- Verifying that a food service worker has washed their hands after visiting the restroom or handling food that could cause cross-contamination (i.e,. chicken and salmonella).
- Monitoring bar/restaurant patrons and ensuring they are not over-served.
To learn how to perform human activity recognition with OpenCV and Deep Learning, just keep reading!
Looking for the source code to this post?
Jump right to the downloads section.
Human Activity Recognition with OpenCV and Deep Learning
In the first part of this tutorial we’ll discuss the Kinetics dataset, the dataset used to train our human activity recognition model.
From there we’ll discuss how we can extend ResNet, which typically uses 2D kernels, to instead leverage 3D kernels, enabling us to include a spatiotemporal component used for activity recognition.
We’ll then implement two versions of human activity recognition using the OpenCV library and the Python programming language.
Finally, we’ll wrap up the tutorial by looking at the results of applying human activity recognition to a few sample videos.
The Kinetics Dataset

Figure 1: The pre-trained human activity recognition deep learning model used in today’s tutorial was trained on the Kinetics 400 dataset.
The dataset our human activity recognition model was trained on is the Kinetics 400 Dataset.
This dataset consists of:
- 400 human activity recognition classes
- At least 400 video clips per class (downloaded via YouTube)
- A total of 300,000 videos
You can view the full list of classes the model can recognize here.
To learn more about the dataset, including how it was curated, be sure to refer to Kay et al.’s 2017 paper, The Kinetics Human Action Video Dataset.
3D ResNet for Human Activity Recognition
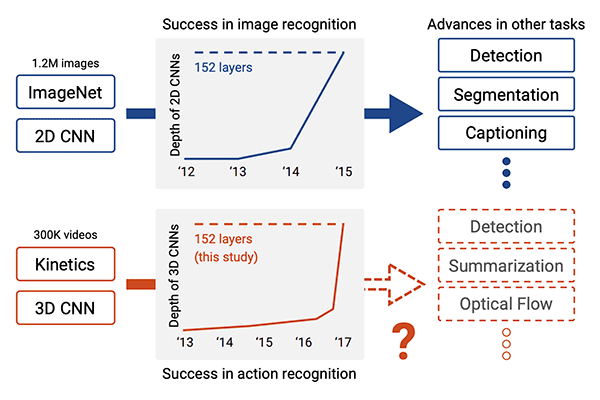
Figure 2: Deep neural network advances on image classification with ImageNet have also led to success in deep learning activity recognition (i.e. on videos). In this tutorial, we perform deep learning activity recognition with OpenCV. (image source: Figure 1 from Hara et al.)
The model we’re using for human activity recognition comes from Hara et al.’s 2018 CVPR paper, Can Spatiotemporal 3D CNNs Retrace the History of 2D CNNs and ImageNet?
In this work the authors explore how existing state-of-the-art 2D architectures (such as ResNet, ResNeXt, DenseNet, etc.) can be extended to video classification via 3D kernels.
The authors argue:
- These architectures have been successfully applied to image classification.
- The large-scale ImageNet dataset allowed such models to be trained to such high accuracy.
- The Kinetics dataset is also sufficiently large.
…and therefore, these architectures should be able to perform video classification by (1) changing the input volume shape to include spatiotemporal information and (2) utilizing 3D kernels inside of the architecture.
The authors were in fact correct!
By modifying both the input volume shape and the kernel shape, the authors obtained:
- 78.4% accuracy on the Kinetics test set
- 94.5% accuracy on the UCF-101 test set
- 70.2% accuracy on the HMDB-51 test set
These results are similar to rank-1 accuracies reported on state-of-the-art models trained on ImageNet, thereby demonstrating that these model architectures can be utilized for video classification simply by including spatiotemporal information and swapping 2D kernels for 3D ones.
For more information on our modified ResNet architecture, experiment design, and final accuracies, be sure to refer to the paper.
Downloading the Human Activity Recognition Model for OpenCV

Figure 3: Files required for human activity recognition with OpenCV and deep learning.
To follow along with the rest of this tutorial you’ll need to download the:
- Human activity model
- Python + OpenCV source code
- Example video for classification
You can use the “Downloads” section of this tutorial to download a .zip containing all three.
Once downloaded, continue on with the rest of this tutorial.
Project structure
Let’s inspect our project files:
$ tree
.
├── action_recognition_kinetics.txt
├── resnet-34_kinetics.onnx
├── example_activities.mp4
├── human_activity_reco.py
└── human_activity_reco_deque.py

0 directories, 5 files
Our project consists of three auxiliary files:
action_recognition_kinetics.txt
: The class labels for the Kinetics dataset.resnet-34_kinetics.onx
: Hara et al.’s pre-trained and serialized human activity recognition convolutional neural network trained on the Kinetics dataset.example_activities.mp4
: A compilation of clips for testing human activity recognition.
We will review two Python scripts, each of which accepts the above three files as input:
human_activity_reco.py
: Our human activity recognition script which samples N frames at a time to make an activity classification prediction.human_activity_reco_deque.py
: A similar human activity recognition script that implements a rolling average queue. This script is slower to run; however, I’m providing the implementation so that you can learn from and experiment with it.
Implementing Human Activity Recognition with OpenCV
Let’s go ahead and implement human activity recognition with OpenCV. Our implementation is based on OpenCV’s official example; however, I’ve provided additional changes (both in this example and the next) along with additional commentary/detailed explanations on what the code is doing.
Open up the
human_activity_reco.pyfile in your project structure and insert the following code:
# import the necessary packages
import numpy as np
import argparse
import imutils
import sys
import cv2

# construct the argument parser and parse the arguments
ap = argparse.ArgumentParser()
ap.add_argument("-m", "--model", required=True,
	help="path to trained human activity recognition model")
ap.add_argument("-c", "--classes", required=True,
	help="path to class labels file")
ap.add_argument("-i", "--input", type=str, default="",
	help="optional path to video file")
args = vars(ap.parse_args())
We begin with imports on Lines 2-6. For today’s tutorial you need OpenCV 4 and imutils installed. Visit my pip install opencv instructions to install OpenCV on your system if you have not done so already.
Lines 10-16 parse our command line arguments:
--model
: The path to the trained human activity recognition model.--classes
: The path to the activity recognition class labels file.--input
: An optional path to your input video file. If this argument is not included on the command line, your webcam will be invoked.
From here we’ll perform initializations:
# load the contents of the class labels file, then define the sample
# duration (i.e., # of frames for classification) and sample size
# (i.e., the spatial dimensions of the frame)
CLASSES = open(args["classes"]).read().strip().split("\n")
SAMPLE_DURATION = 16
SAMPLE_SIZE = 112
Line 21 loads our class labels from the text file.
Lines 22 and 23 define the sample duration (i.e. the number of frames for classification) and sample size (i.e. the spatial dimensions of the frame).
Next, we’ll load and initialize our human activity recognition model:
# load the human activity recognition model
print("[INFO] loading human activity recognition model...")
net = cv2.dnn.readNet(args["model"])

# grab a pointer to the input video stream
print("[INFO] accessing video stream...")
vs = cv2.VideoCapture(args["input"] if args["input"] else 0)
Line 27 uses OpenCV’s DNN module to read the PyTorch pre-trained human activity recognition model.
Line 31 then instantiates our video stream using either a video file or webcam.
We’re now ready to begin looping over frames and performing human activity recognition:
# loop until we explicitly break from it
while True:
	# initialize the batch of frames that will be passed through the
	# model
	frames = []

	# loop over the number of required sample frames
	for i in range(0, SAMPLE_DURATION):
		# read a frame from the video stream
		(grabbed, frame) = vs.read()

		# if the frame was not grabbed then we've reached the end of
		# the video stream so exit the script
		if not grabbed:
			print("[INFO] no frame read from stream - exiting")
			sys.exit(0)

		# otherwise, the frame was read so resize it and add it to
		# our frames list
		frame = imutils.resize(frame, width=400)
		frames.append(frame)
Line 34 begins a loop over our frames where first we initialize the batch of
framesthat will be passed through the neural net (Line 37).
From there, Lines 40-53 populate the batch of
framesdirectly from our video stream. Line 52 resizes each frame to a
widthof
400pixels while maintaining aspect ratio.
Let’s construct our
blobof input frames which we will soon pass through the human activity recognition CNN:
# now that our frames array is filled we can construct our blob
	blob = cv2.dnn.blobFromImages(frames, 1.0,
		(SAMPLE_SIZE, SAMPLE_SIZE), (114.7748, 107.7354, 99.4750),
		swapRB=True, crop=True)
	blob = np.transpose(blob, (1, 0, 2, 3))
	blob = np.expand_dims(blob, axis=0)
Lines 56-60 construct a
blobfrom our input
frameslist.
Notice that we’re using the blobFromImages
(i.e. plural) rather than the blobFromImage
(i.e. singular) function — the reason here is that we’re building a batch of multiple images to be passed through the human activity recognition network, enabling it to take advantage of spatiotemporal information.
If you were to insert a
print(blob.shape)statement into your code you would notice that the
blobhas the following dimensionality:
(1, 3, 16, 112, 112)
Let’s unpack this dimensionality a bit more:
1
: The batch dimension. Here we have only a single data point that is being passed through the network (a “data point” in this context means the N frames that will be passed through the network to obtain a single classification).3
: The number of channels in our input frames.16
: The total number offrames
in theblob
.112
(first occurrence): The height of the frames.112
(second occurrence): The width of the frames.
At this point, we’re ready to perform human activity recognition inference followed by annotating the frame with the predicted label and showing the prediction to our screen:
# pass the blob through the network to obtain our human activity
	# recognition predictions
	net.setInput(blob)
	outputs = net.forward()
	label = CLASSES[np.argmax(outputs)]

	# loop over our frames
	for frame in frames:
		# draw the predicted activity on the frame
		cv2.rectangle(frame, (0, 0), (300, 40), (0, 0, 0), -1)
		cv2.putText(frame, label, (10, 25), cv2.FONT_HERSHEY_SIMPLEX,
			0.8, (255, 255, 255), 2)

		# display the frame to our screen
		cv2.imshow("Activity Recognition", frame)
		key = cv2.waitKey(1) & 0xFF

		# if the `q` key was pressed, break from the loop
		if key == ord("q"):
			break
Lines 64 and 65 pass the
blobthrough the network, obtaining a list of
outputs, the predictions.
We then grab the
labelof the highest prediction for the
blob(Line 66).
Using the
label, we can then draw the prediction on each and every frame in the
frameslist (Lines 69-73), displaying the output frames until the
qkey is pressed at which point we
breakand exit.
An Alternate Human Activity Implementation Using a Deque Data Structure
Inside our human activity recognition from the previous section, you’ll notice the following lines:
# loop until we explicitly break from it
while True:
	# initialize the batch of frames that will be passed through the
	# model
	frames = []

	# loop over the number of required sample frames
	for i in range(0, SAMPLE_DURATION):
		# read a frame from the video stream
		(grabbed, frame) = vs.read()

		# if the frame was not grabbed then we've reached the end of
		# the video stream so exit the script
		if not grabbed:
			print("[INFO] no frame read from stream - exiting")
			sys.exit(0)

		# otherwise, the frame was read so resize it and add it to
		# our frames list
		frame = imutils.resize(frame, width=400)
		frames.append(frame)
This implementation implies that:
- We read a total of
SAMPLE_DURATION
frames from our input video. - We pass those frames through our human activity recognition model to obtain the output.
- And then we read another
SAMPLE_DURATION
frames and repeat the process.
Thus, our implementation is not a rolling prediction.
Instead, it’s simply grabbing a sample of frames, classifying them, and moving on to the next batch — any frames from the previous batch are discarded.
The reason we do this is for speed.
If we classified each individual frame it would take longer for the script to run.
That said, using rolling frame prediction via a deque data structure can lead to better results as it does not discard all of the previous frames — rolling frame prediction only discards the oldest frame in the list, making room for the newest frame.
To see how this can cause a problem related to inference speed, let’s suppose there are
Ntotal frames in a video file:
- If we do use rolling frame prediction, we perform
N
classifications, one for each frame (once thedeque
data structure is filled, of course) - If we do not use rolling frame prediction, we only have to perform
N / SAMPLE_DURATION
classifications, thus reducing the amount of time it takes to process a video stream significantly.
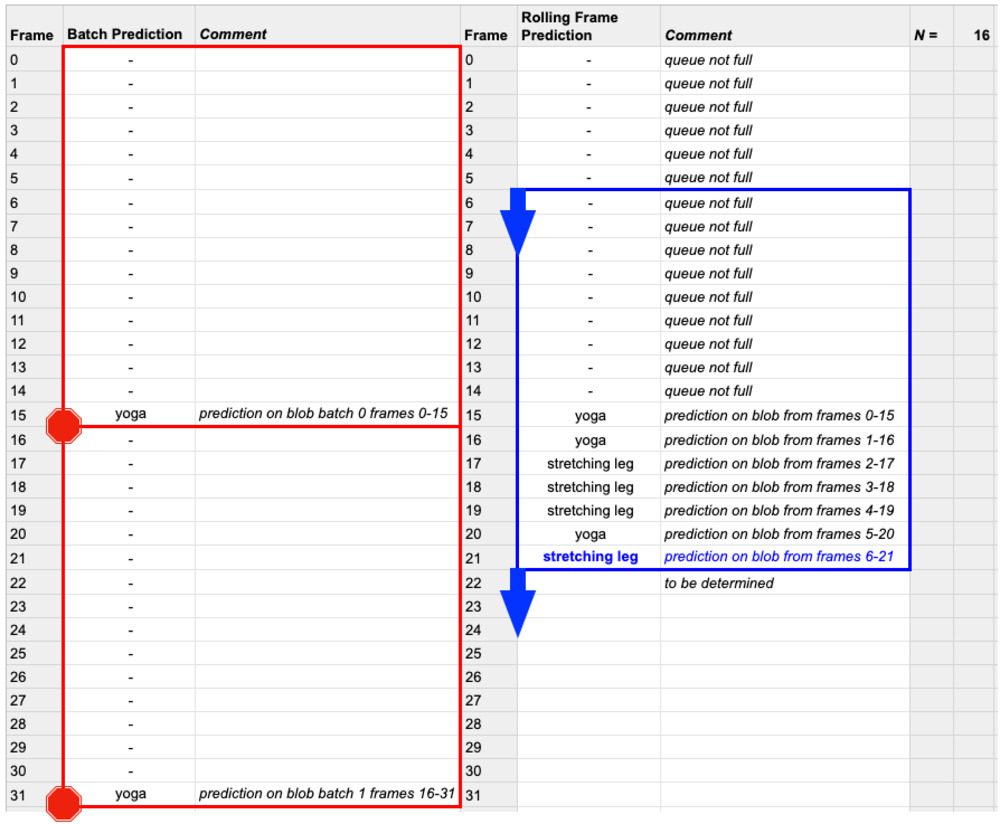
Figure 4: Rolling prediction (blue) uses a fully populated FIFO queue window to make predictions. Batch prediction (red) does not “roll” from frame to frame. Rolling prediction requires more computational horsepower but leads to better results for human activity recognition with OpenCV and deep learning.
Given that OpenCV’s
dnnmodule does not support most GPUs (including NVIDIA GPUs), I would recommend you do not use rolling frame prediction for most applications.
That said, inside the .zip file for today’s tutorial (found in the “Downloads” section of the post) you’ll find a file named
human_activity_reco_deque.py— this file contains an implementation of Human Activity Recognition that performs rolling frame prediction.
The script is very similar to the previous one, but I’m including it here for you to experiment with:
# import the necessary packages
from collections import deque
import numpy as np
import argparse
import imutils
import cv2

# construct the argument parser and parse the arguments
ap = argparse.ArgumentParser()
ap.add_argument("-m", "--model", required=True,
	help="path to trained human activity recognition model")
ap.add_argument("-c", "--classes", required=True,
	help="path to class labels file")
ap.add_argument("-i", "--input", type=str, default="",
	help="optional path to video file")
args = vars(ap.parse_args())

# load the contents of the class labels file, then define the sample
# duration (i.e., # of frames for classification) and sample size
# (i.e., the spatial dimensions of the frame)
CLASSES = open(args["classes"]).read().strip().split("\n")
SAMPLE_DURATION = 16
SAMPLE_SIZE = 112

# initialize the frames queue used to store a rolling sample duration
# of frames -- this queue will automatically pop out old frames and
# accept new ones
frames = deque(maxlen=SAMPLE_DURATION)

# load the human activity recognition model
print("[INFO] loading human activity recognition model...")
net = cv2.dnn.readNet(args["model"])

# grab a pointer to the input video stream
print("[INFO] accessing video stream...")
vs = cv2.VideoCapture(args["input"] if args["input"] else 0)
Imports are the same with the exception of Python’s built-in
dequeimplementation from the
collectionsmodule (Line 2).
On Line 28, we initialize the FIFO
framesqueue with a maximum length equal to our sample duration. Our “first-in, first-out” (FIFO) queue will automatically pop out old frames and accept new ones. We’ll perform rolling inference on the queue of frames.
All other lines above are the same, so let’s now inspect our frame processing loop:
# loop over frames from the video stream
while True:
	# read a frame from the video stream
	(grabbed, frame) = vs.read()

	# if the frame was not grabbed then we've reached the end of
	# the video stream so break from the loop
	if not grabbed:
		print("[INFO] no frame read from stream - exiting")
		break

	# resize the frame (to ensure faster processing) and add the
	# frame to our queue
	frame = imutils.resize(frame, width=400)
	frames.append(frame)

	# if our queue is not filled to the sample size, continue back to
	# the top of the loop and continue polling/processing frames
	if len(frames) < SAMPLE_DURATION:
		continue
Lines 41-57 are different than in our previous script.
Previously, we sampled a batch of
SAMPLE_DURATIONframes and would later perform inference on that batch.
In this script, we still perform inference in batch; however, it is now a rolling batch. The difference is that we add frames to our FIFO queue on Line 52. Again, this queue has a
maxlenof our sample duration and the head of the queue will always be the current
frameof our video stream. Once the queue fills up, old frames are popped out automatically with the deque FIFO implementation.
The result of this rolling implementation is that once the queue is full, any given frame (with the exception of the very first frame) will be “touched” (i.e. included in the rolling batch) more than once. This method is less efficient; however, it leads to more accurate activity recognition, especially when the video/scene’s activities change periodically.
Lines 56 and 57 allow our
framesqueue to fill up (i.e. to 16 frames as shown in Figure 4, blue) prior to any inference being performed.
Once the queue is full, we will perform a rolling human activity recognition prediction:
# now that our frames array is filled we can construct our blob
	blob = cv2.dnn.blobFromImages(frames, 1.0,
		(SAMPLE_SIZE, SAMPLE_SIZE), (114.7748, 107.7354, 99.4750),
		swapRB=True, crop=True)
	blob = np.transpose(blob, (1, 0, 2, 3))
	blob = np.expand_dims(blob, axis=0)

	# pass the blob through the network to obtain our human activity
	# recognition predictions
	net.setInput(blob)
	outputs = net.forward()
	label = CLASSES[np.argmax(outputs)]

	# draw the predicted activity on the frame
	cv2.rectangle(frame, (0, 0), (300, 40), (0, 0, 0), -1)
	cv2.putText(frame, label, (10, 25), cv2.FONT_HERSHEY_SIMPLEX,
		0.8, (255, 255, 255), 2)

	# display the frame to our screen
	cv2.imshow("Activity Recognition", frame)
	key = cv2.waitKey(1) & 0xFF

	# if the `q` key was pressed, break from the loop
	if key == ord("q"):
		break
This code block contains lines of code identical to our previous script. Here we:
- Construct a
blob
from our queue offrames
. - Perform inference and grab the highest probability prediction for the
blob
. - Annotate and display the current
frame
with the resultinglabel
of rolling average human activity recognition. - Exit upon the
q
key being pressed.
Human Activity Recognition Results
Let’s see the results of our human activity recognition code in action!
Use the “Downloads” section of this tutorial to download the pre-trained human activity recognition model, Python + OpenCV source code, and example demo video.
From there, open up a terminal and execute the following command:
$ python human_activity_reco_deque.py --model resnet-34_kinetics.onnx \
	--classes action_recognition_kinetics.txt \
	--input example_activities.mp4
[INFO] loading human activity recognition model...
[INFO] accessing video stream...
Below is an example of our model correctly labeling an input video clip as “yoga”
Notice how the model waffles back and forth between “yoga” and “stretching leg” — both are technically correct here as in a downward dog position you are, by definition, doing yoga, but also stretching your legs at the same time.
In the next example our human activity recognition model correctly predicts this video as “skateboarding”:
You can see why the model also predicted “parkour” as well — the skater is jumping over a railing which is similar to an action that a parkourist may perform.
Anyone hungry?
If so, you might be interested in “making pizza”:
But before you eat, make sure you’re “washing hands” before you sit down to eat:
If you choose to indulge in “drinking beer” you better watch how much you’re drinking — the bartender might cut you off:
As you can see, our human activity recognition model, while not perfect, is still performing quite well given the simplicity of our technique (converting ResNet to handle 3D inputs versus 2D ones).
Human activity recognition is far from solved, but with deep learning and Convolutional Neural Networks, we’re making great strides.
Credits
The videos on this page, including the ones in the
example_activities.mp4file found in the “Downloads” of this guide come from the following sources:
- Beginner Yoga | Floating the Foot Forward Tutorial by Stouffville Yoga Life
- Lad downs 23 pints for his 21st birthday by CONTENTbible
- Proper Hand Washing Technique by Children’s Hospital Los Angeles
- Best Skateboarding Clips of the Year (2019) by Skate Box
- Food in Rome – Wood Fired Pizza – Italy by Aden Films
Summary
In this tutorial you learned how to perform human activity recognition using OpenCV and Deep Learning.
To accomplish this task, we leveraged a human activity recognition model pre-trained on the Kinetics dataset, which includes 400-700 human activities (depending on which version of the dataset you’re using) and over 300,000 video clips.
The model we utilized was ResNet, but with a twist — the model architecture had been modified to utilize 3D kernels rather than the standard 2D filters, enabling the model to include a temporal component for activity recognition.
You can read more about the model in Hara et al.’s 2018 paper, Can Spatiotemporal 3D CNNs Retrace the History of 2D CNNs and ImageNet?
Finally, we implemented human activity recognition using OpenCV and Hara et al.’s PyTorch implementation which we loaded via OpenCV’s
dnnmodule.
Based on our results, we can see that while not perfect, our human activity recognition model is performing quite well!
To download the source code and pre-trained human activity recognition model (and be notified when future tutorials are published here on PyImageSearch), just enter your email address in the form below!
Downloads:
The post Human Activity Recognition with OpenCV and Deep Learning appeared first on PyImageSearch.