
In this tutorial you will learn how to use my pre-configured NVIDIA Jetson Nano .img for Computer Vision and Deep Learning. This .img includes TensorFlow, Keras, TensorRT, OpenCV, etc. pre-installed!
If you’ve ever configured an NVIDIA product such as the TX1, TX2, and even the Nano, you know that working with NVIDIA’s Jetpack and installing libraries is far from straightforward.
Today, I’m pleased to announce my pre-configured NVIDIA Jetson Nano .img!
This .img will save you hours, if not days, of labor setting up your NVIDIA Jetson Nano. It is developed and supported by my team here at PyImageSearch to save you time and bring you up to speed quickly for developing your own embedded CV/DL projects and for following along with my new book Raspberry Pi for Computer Vision.
If you purchase a copy of the Complete Bundle of Raspberry Pi for Computer Vision, you’ll gain access to this accompanying .img.
All you have to do is (1) download the .img file, (2) flash it to your microSD card using balenaEtcher, and (3) boot your NVIDIA Jetson Nano.
From there, you’ll have a complete listing of software ready to go in a virtual environment without all the hassle of configuring, compiling, and installing the software. Highlighted software on the image includes, but is not limited to, Python, OpenCV, TensorFlow, TensorFlow Lite, Keras, and TensorRT.
To learn more about the Jetson Nano .img, just keep reading.
NVIDIA Jetson Nano .img preconfigured for Deep Learning and Computer Vision
Typically, setting up your NVIDIA Jetson Nano would take three days to make it fully capable of handling deep learning-powered inference. That includes:
- System-level packages
- OpenCV compiled from source (CUDA-capable)
- NVIDIA’s distribution of TensorFlow 1.13.1
- TensorRT
- Python libraries as needed
- Research time, trial and error, starting over from scratch, and banging your head on your keyboard
Yes, we at PyImageSearch did all of those things over the course of 2-3 days. And we do this stuff all the time. If you don’t have the same experience, it may take you closer to a week to figure out how to configure the Jetson Nano. And even if you are experienced, maybe you just don’t have the time at the moment (you’d rather focus on training and deployment).
Let’s face it: System admin work just isn’t fun, and it is downright frustrating.
By bundling the pre-configured Nano .img together with Raspberry Pi for Computer Vision Complete Bundle, my goal is to:
- Jump-start your computer vision and deep learning education by skipping the tedious process of installing Python, OpenCV, TensorFlow/Keras, TensorRT, and more on your Jetson Nano
- Provide you with a book with the best introduction to embedded computer vision and deep learning that you can possibly get
This preconfigured Nano .img is intended for PyImageSearch readers who want to save time and jump-start their computer vision education.
If that doesn’t sound like you, no worries. I’ll still be providing free tutorials to help you configure your Jetson Nano. Just keep in mind that customers of PyImageSearch receive priority support.
Jetson Nano .img setup instructions
The rest of this document describes how to install and use the NVIDIA Jetson Nano .img included in your purchase of the Raspberry Pi for Computer Vision Complete Bundle.
The end of the guide discusses many frequently asked questions (FAQs) regarding the .img file. If you have a question that is not covered in the FAQ, please send us a message.
Step #1: Download and Unpack the Archive
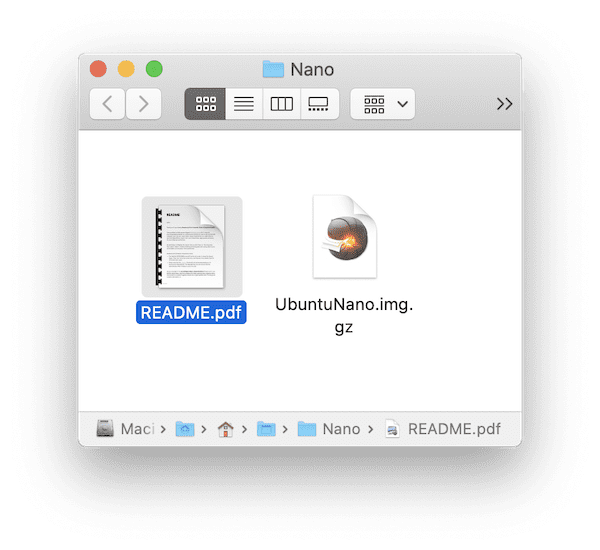
UbuntuNano.img.gz and README.pdf files. The .gz file is ready to be flashed with balenaEtcher.When you receive the link to your purchase, be sure to download the book, code, Raspbian .img, and Nano .img. Each file is in the form of a .zip. The UbuntuNano.zip archive contains the preconfigured .img and a README.pdf file.
Go ahead and unzip the files using your favorite unarchiving utility (7zip, Keka, WinRAR, etc.). Once your .zip is extracted, you’ll be presented with a .img.gz file. There is no need to extract the included .img.gz file, since we will flash with them directly with balenaEtcher.
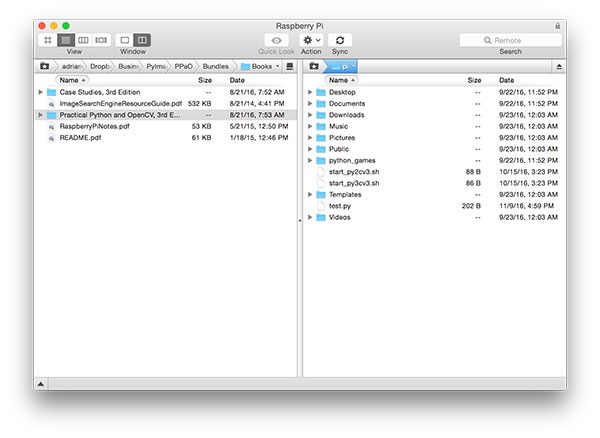
After you unzip UbuntuNano.zip, your folder should look like Figure 1.
Step #2: Write the .img to a 32GB microSD using balenaEtcher

This Jetson Nano .img will work only on 32GB microSD cards. Do not attempt to use 8GB, 16GB, 64GB, 128GB or higher cards. While technically the Jetson Nano supports 32GB and up microSDs, our .img will only flash to a 32GB memory card.
Additionally, I recommend the high quality Sandisk 32GB 98MB/s cards. They are available at Amazon and many online distributors. Often readers that purchase off-branded less expensive cards run into reliability issues.
To write the preconfigured Nano .img to your card, simply use the free tool named balenaEtcher (compatible with Mac, Linux, and Windows).
BalenaEtcher can handle compressed files such as .gz (there is no need to extract the .img.gz before loading into Etcher).
Simply:
- Select the
UnuntuNano.img.gzfile. - Specify the target device (your 32GB microSD).
- Click the Flash! button.
Flashing can take approximately 30 minutes or more (far less time than it would take to install the software by hand). Be patient — perhaps go for a walk, read a book, or have a cup of tea while the system is flashing. There’s nothing like watching water boil or waiting for paint to dry, so contain your excitement and step away from your screen.
Step #3: Booting your NVIDIA Jetson Nano for the first time
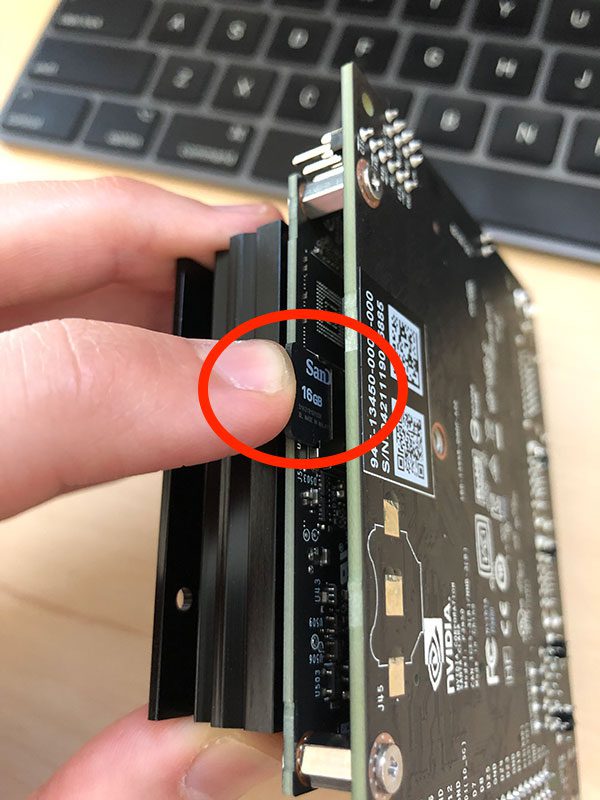
After flashing your microSD with the PyImageSearch pre-configured .img, insert the card into your Jetson Nano under the heatsink as shown in Figure 3.
From there, power up your Jetson Nano, and enter the username and password:
- Username: pyimagesearch
- Password: pyimagesearch
If you are having trouble with logging in, it is likely due to your non-U.S. keyboard layout. You may need to plug in a U.S. keyboard or carefully map your existing keyboard keys to the username and password.
At any point before or after the login procedure, go ahead and plug in an Ethernet cable to the Nano and your network switch — the Jetson Nano does not come with WiFi capability out of the box. Scroll to the “Adding a WiFi module to the Jetson Nano” section if you wish to use WiFi.
Step #4: Opening a terminal and activating the preconfigured virtual environment
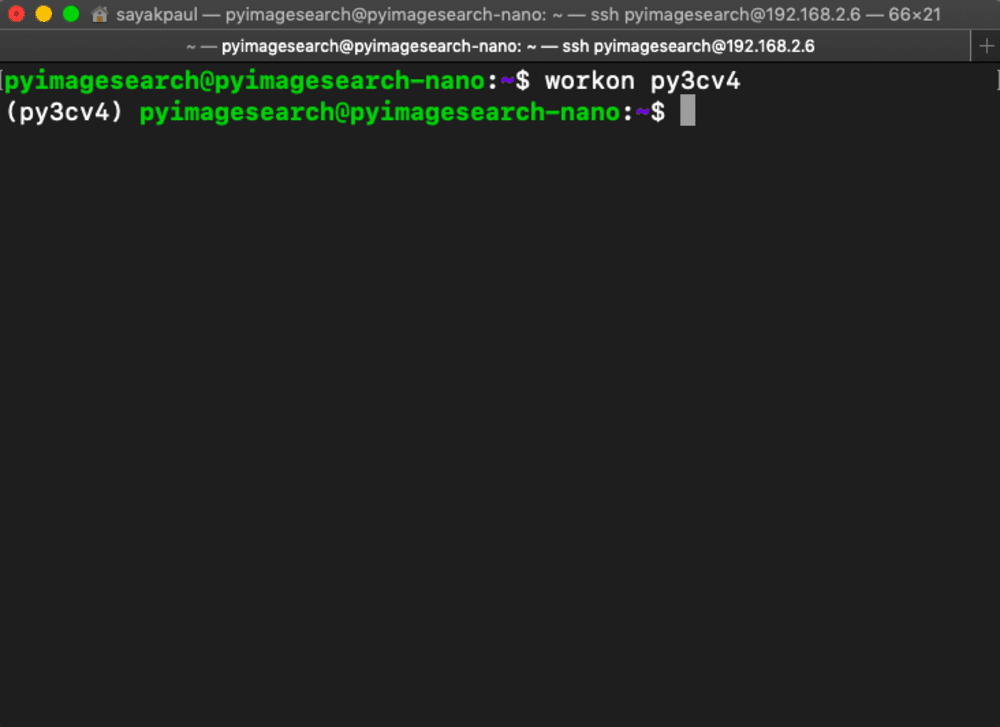
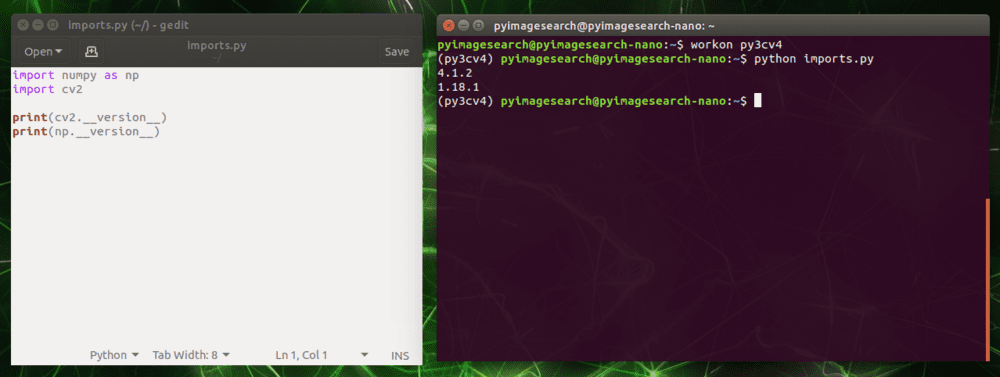
My pre-configured Jetson Nano .img ships with all the software you need for deep learning and computer vision deployment. You can find the software under a Python virtual environment named py3cv4.
To access the Python virtual environment simply activate it via:
$ workon py3cv4
Notice in Figure 4 that the bash prompt is then preceded with the environment name in parentheses.
Executing code from PyImageSearch books on your Jetson Nano
There are multiple methods to access the source code for Raspberry Pi for Computer Vision on your Nano. The first is to use a web browser to download the .zip archive(s):
Simply download the source code .zip directly to your Pi.
If the code currently resides on your laptop/desktop, you may also use your favorite SFTP/FTP client and transfer the code from your system to your Pi:
Or you may want to manually write the code on the Nano using a text editor such as Sublime:
I would suggest either downloading the book’s source code via a web browser or using SFTP/FTP, as this also includes the datasets utilized in the book as well. However, manually coding along is a great way to learn, and I highly recommend it as well!
For more tips on how to work remotely with your Jetson Nano, be sure to read my Remote development blog post (despite the title of the post containing “Raspberry Pi,” the concepts apply to the Jetson Nano as well).
How to test and use a USB or PiCamera with your Jetson Nano
Raspberry Pi users will be happy to know that the assortment of PiCamera modules you have stockpiled in a drawer for the apocalypse (i.e., zombie object detection with deep learning) are compatible with the Jetson Nano!
In this section, we won’t be detecting zombies. Instead, we will simply test both our USB and PiCamera using a short Python script.
Before we begin, head to the “Downloads” section of this blog post and grab the .zip containing the code.
Inside you will find a single, lone Python script named test_camera_nano.py. Let’s review it now:
# import the necessary packages
from imutils.video import VideoStream
import imutils
import time
import cv2

# grab a reference to the webcam
print("[INFO] starting video stream...")
#vs = VideoStream(src=0).start()
vs = VideoStream(src="nvarguscamerasrc ! video/x-raw(memory:NVMM), " \
	"width=(int)1920, height=(int)1080,format=(string)NV12, " \
	"framerate=(fraction)30/1 ! nvvidconv ! video/x-raw, " \
	"format=(string)BGRx ! videoconvert ! video/x-raw, " \
	"format=(string)BGR ! appsink").start()
time.sleep(2.0)
Here we import our VideoStream class from imutils. We will use this class to work with either (1) a PiCamera or (2) a USB camera.
Let’s go ahead and set up our stream on Lines 9-14:
- USB Camera: Currently commented out on Line 9, to use your USB webcam, you simply need to provide
src=0or another device ordinal if you have more than one USB camera connected to your Nano. - PiCamera: Currently active on Lines 10-14, a lengthy
srcstring is used to work with the driver on the Nano to access a PiCamera plugged into the MIPI port. As you can see, the width and height in the format string indicate 1080p resolution. You can also use other resolutions that your PiCamera is compatible with.
Now that our camera stream is ready, we will loop over frames and display them with OpenCV:
# loop over frames
while True:
	# grab the next frame
	frame = vs.read()

	# resize the frame to have a maximum width of 500 pixels
	frame = imutils.resize(frame, width=500)

	# show the output frame
	cv2.imshow("Frame", frame)
	key = cv2.waitKey(1) & 0xFF

	# if the `q` key was pressed, break from the loop
	if key == ord("q"):
		break

# release the video stream and close open windows
vs.stop()
cv2.destroyAllWindows()
Inside the loop, we grab a frame and resize it, maintaining the aspect ratio (Lines 20-23). While you aren’t required to resize your frame, we do so ensuring that it will fit on our screen in case the resolution of your camera is larger than your screen to begin with.
From there, we display the frame and capture keypresses; when the q key is pressed we break and clean up.
Let’s learn to execute our Jetson Nano camera test script.
First, decide whether you would like to use a USB webcam or a PiCamera. Comment/uncomment Lines 9-14 appropriately. In the script’s current form, we choose the PiCamera.
Then, activate your virtual environment (it is preconfigured on the .img):
$ workon py3cv4
And from there, execute the script:
$ python test_camera_nano.py
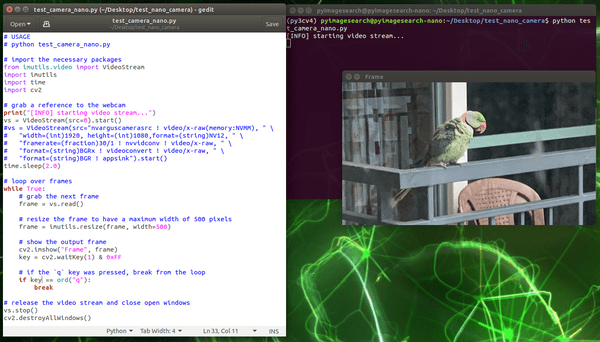
As you can see in Figure 9, the NVIDIA Jetson Nano is watching Abhishek Thanki’s neighbor’s bird using a PiCamera.
Considering that the Jetson Nano supports the PiCamera, the product is a nice step up from the Raspberry Pi in terms of deep learning capability.
Optional: Adding a WiFi module to the Jetson Nano
Out of the box, the first revision of the Jetson Nano hardware does not have WiFi. NVIDIA really screwed the pooch there — the cheaper Raspberry Pis have it, and most people are accustomed to an IoT device having WiFi.
You have options though!
If you want WiFi (most people do), you must add a WiFi module on your own. Two great options for adding WiFi to your Jetson Nano include:
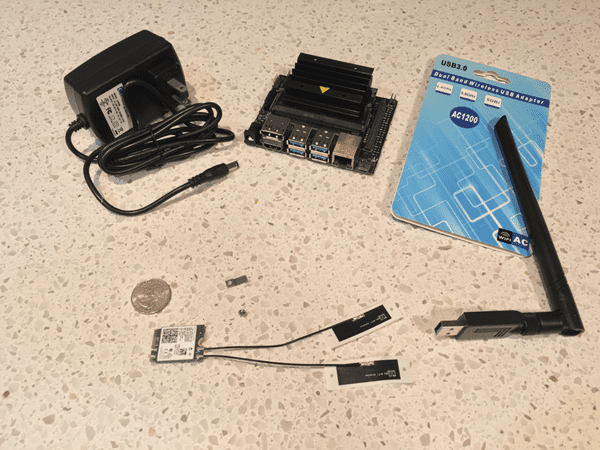
- USB to WiFi adapter (Figure 10, left). No tools are required and it is portable to other devices. Pictured is the Geekworm Dual Band USB 1200m.
- WiFi module such as the Intel Dual Band Wireless-Ac 8265 W/Bt (Intel 8265NGW) and 2x Molex Flex 2042811100 Flex Antennas (Figure 10, right). You must install the WiFi module and antennas under the main heatsink on your Jetson Nano. This upgrade requires a Phillips #2 screwdriver, the wireless module, and antennas (not to mention about 10-20 minutes of your time).
Figure 11: NVIDIA Jetson Nano Wifi Module installation steps.
The animation above shows a selection of photos that we collected while we fitted a Jetson Nano with the Intel WiFi module. One benefit here is that Ubuntu 18.04 does not need a special driver to be manually installed to use the WiFi module. It is “plug and play” — once you boot up, just select your WiFi network and enter the credentials if needed.
For most users, it is not convenient or practical to insert a WiFi module under the heatsink. It may not be worth the effort, especially if you are just developing a proof of concept product.
For this reason, we highly recommend USB WiFi sticks. There are many options, and we recommend trying to find one with a driver built in to Ubuntu 18.04. Unfortunately the Geekworm product pictured requires a manual driver install (and you’ll need a wired connection to install the driver or patience and a thumb drive).
Frequently Asked Questions (FAQ)
Q: What if I want to configure my Jetson Nano on my own?
A: Stay tuned for a tutorial with instructions on how to configure your Jetson Nano by hand. Be sure to budget 2-5 days of your time to install everything.
Q: How long will it take to install deep learning and computer vision software by hand?
A: At a bare minimum, it will take about two days if you know what you are doing. We recommend budgeting 3-5 days to resolve issues as they arise.
Q: Which Raspberry Pi for Computer Vision bundle is the Nano .img included with?
A: The Nano .img comes with the Complete Bundle only.
Q: Which Operating System version is on the .img?
A: The .img runs Ubuntu 18.04.
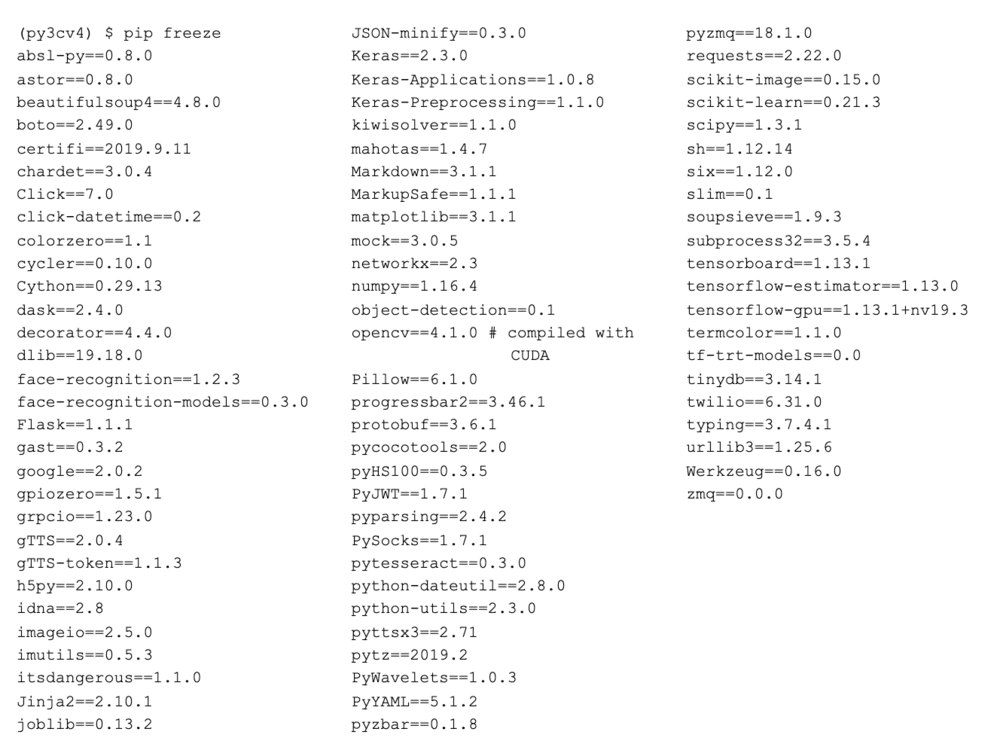
Q: What packages are installed on the .img?
A: Refer to Figure 12 for a listing of all packages on the .img. You are also welcome to install other packages you need!
Q: Where can I learn more about Python virtual environments?
My favorite resource and introduction to Python virtual environments can be found here. I also discuss them in the first half of this blog post.
Q: Can I purchase the .img as a standalone product?
The .img file is intended to accompany Raspberry Pi for Computer Vision, ensuring you can run the examples in the text right out of the box (and not to mention, develop your own projects).
I would recommend purchasing a copy to gain access to the .img.
Q: I have another question.
If you have a question not listed in this FAQ, please send me a message.
I’m sold! How can I obtain the PyImageSearch Jetson Nano .img?
PyImageSearch readers who purchase a copy of the Complete Bundle of Raspberry Pi for Computer Vision get the Jetson Nano .img as part of the book.
All the Jetson Nano code that comes with the book is ready to go on this .img. We provide full support for users of this .img (it is difficult for us to support custom installations because we aren’t sitting in front of your own Nano).
If you’re just getting started with embedded computer vision and want to start with the Raspberry Pi, simply pick up a copy of the Hobbyist or Hacker bundles, both of which come with our pre-configured Raspbian .img.
Again, the Complete Bundle is the only one that comes with the Jetson Nano .img.
To purchase your copy of Raspberry Pi for Computer Vision, just click here.
To see all the products PyImageSearch offers, click here.

Download the Source Code and FREE 17-page Resource Guide
Enter your email address below to get a .zip of the code and a FREE 17-page Resource Guide on Computer Vision, OpenCV, and Deep Learning. Inside you’ll find my hand-picked tutorials, books, courses, and libraries to help you master CV and DL!
The post NVIDIA Jetson Nano .img pre-configured for Deep Learning and Computer Vision appeared first on PyImageSearch.