
In this tutorial, you will learn how to use Keras to train a neural network, stop training, update your learning rate, and then resume training from where you left off using the new learning rate. Using this method you can increase your accuracy while decreasing model loss.
Today’s tutorial is inspired by a question I received from PyImageSearch reader, Zhang Min.
Zhang Min writes:
Hi Adrian, thanks for the PyImageSearch blog. I have two questions:
First, I am working on my graduation project and my university is allowing me to share time on their GPU machines. The problem is that I can only access a GPU machine in two hour increments — after my two hours is up I’m automatically booted off the GPU. How can I save my training progress, safely stop training, and then resume training from where I left off?
Secondly, my initial experiments aren’t going very well. My model quickly jumps to 80%+ accuracy but then stays there for another 50 epochs. What else can I be doing to improve my model accuracy? My advisor said I should look into adjusting the learning rate but I’m not really sure how to do that.
Thanks Adrian!
Learning how to start, stop, and resume training a deep learning model is a super important skill to master — at some point in your deep learning practitioner career you’ll run into a situation similar to Zhang Min’s where:
- You have limited time on a GPU instance (which can happen on Google Colab or when using Amazon EC2’s cheaper spot instances).
- Your SSH connection is broken and you forgot to use a terminal multiplexer to save your session (such as
screen
ortmux
). - Your deep learning rig locks up and forces shuts down.
Just imagine spending an entire week to train a state-of-the-art deep neural network…only to have your model lost due to a power failure!
Luckily, there’s a solution — but when those situations happen you need to know how to:
- Take a snapshotted model that was saved/serialized to disk during training.
- Load the model into memory.
- Resume training from where you left off.
Secondly, starting, stopping, and resume training is standard practice when manually adjusting the learning rate:
- Start training your model until loss/accuracy plateau
- Snapshot your model every N epochs (typically N={1, 5, 10})
- Stop training, normally by force exiting via
ctrl + c
- Open your code editor and adjust your learning rate (typically lowering it by an order
of magnitude) - Go back to your terminal and restart the training script, picking up from the last
snapshot of model weights
Using this
ctrl + cmethod of training you can boost your model accuracy while simultaneously driving down loss, leading to a more accurate model.
The ability to adjust the learning rate is a critical skill for any deep learning practitioner to master, so take the time now to study and practice it!
To learn how to start, stop, and resume training with Keras, just keep reading!
Looking for the source code to this post?
Jump right to the downloads section.
Keras: Starting, stopping, and resuming training
In the first part of this blog post, we’ll discuss why we would want to start, stop, and resume training of a deep learning model.
We’ll also discuss how stopping training to lower your learning rate can improve your model accuracy (and why a learning rate schedule/decay may not be sufficient).
From there we’ll implement a Python script to handle starting, stopping, and resuming training with Keras.
I’ll then walk you through the entire training process, including:
- Starting the initial training script
- Monitoring loss/accuracy
- Noticing when loss/accuracy is plateauing
- Stopping training
- Lowering your learning rate
- Resuming training from where you left off with the new, lowered learning rate
Using this method of training you’ll often be able to improve your model accuracy.
Let’s go ahead and get started!
Why do we need to start, stop, and resume training?
There are a number of reasons you may need to start, stop, and resume training of your deep learning model, but the two primary grounds include:
- Your training session being terminated and training stopping (due to a power outage, GPU session timing out, etc.).
- Needing to adjust your learning rate to improve model accuracy (typically by lowering the learning rate by an order of magnitude).
The second point is especially important — if you go back and read the seminal AlexNet, SqueezeNet, ResNet, etc. papers you’ll find that the authors all say something along the lines of:
We started training our model with the SGD optimizer and an initial learning rate of 1e-1. We reduced our learning rate by an order of magnitude on epochs 30 and 50, respectively.
Why is the drop-in learning rate so important? And how can it lead to a more accurate model?
To explore that question, take a look at the following plot of ResNet-18 trained on the CIFAR-10 dataset:
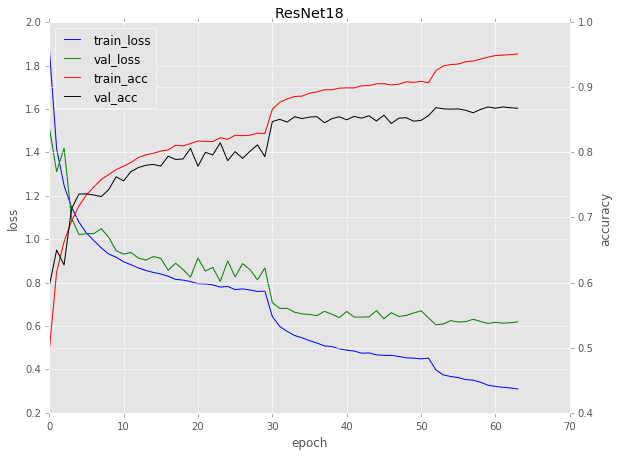
Figure 1: Training ResNet-18 on the CIFAR-10 dataset. The characteristic drops in loss and increases in accuracy are evident of learning rate changes. Here, (1) training was stopped on epochs 30 and 50, (2) the learning rate was lowered, and (3) training was resumed. (image source)
Notice for epochs 1-29 there is a fairly “standard” curve that you come across when training a network:
- Loss starts off very high but then quickly drops
- Accuracy starts off very low but then quickly rises
- Eventually loss and accuracy plateau out
But what is going on around epoch 30?
Why does the loss drop so dramatically? And why does the accuracy rise so considerably?
The reason for this behavior is because:
- Training was stopped
- The learning rate was lowered by an order of magnitude
- And then training was resumed
The same goes for epoch 50 as well — again, training was stopped, the learning rate lowered, and then training resumed.
Each time we encounter a characteristic drop in loss and then a small increase in accuracy.
As the learning rate becomes smaller, the impact of the learning rate reduction has less and less impact.
Eventually, we run into two issues:
- The learning rate becomes very small which in turn makes the weight updates very small and thus the model cannot make any meaningful progress.
- We start to overfit due to the small learning rate. The model descends into areas of lower loss in the loss landscape, overfitting to the training data and not generalizing to the validation data.
The overfitting behavior is evident past epoch 50 in Figure 1 above.
Notice how validation loss has plateaued and is even started to rise a bit. And the same time training loss is continuing to drop, a clear sign of overfitting.
Dropping your learning rate is a great way to boost the accuracy of your model during training, just realize there is (1) a point of diminishing returns, and (2) a chance of overfitting if training is not properly monitored.
Why not use learning rate schedulers or decay?
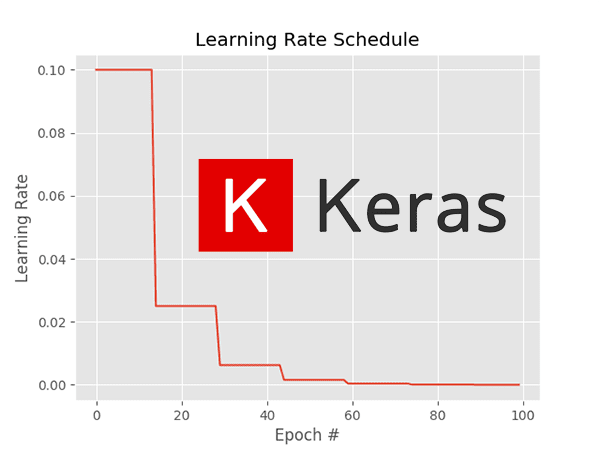
Figure 2: Learning rate schedulers are great for some training applications; however, starting/stopping Keras training typically leads to more control over your deep learning model.
You might be wondering “Why not use a learning rate scheduler?”
There are a number of learning rate schedulers available to us, including:
- Linear and polynomial decay
- Cyclical Learning Rates (CLRs)
- Keras’
ReduceLROnPlateau
class
If the goal is to improve model accuracy by dropping the learning rate, then why not just rely on those respective schedules and classes?
Great question.
The problem is that you may not have a good idea on:
- The approximate number of epochs to train for
- What a proper initial learning rate is
- What learning rate range to use for CLRs
Additionally, one of the benefits of using what I call
ctrl + ctraining is that it gives you more fine-grained control over your model.
Being able to manually stop your training at a specific epoch, adjust your learning rate, and then resume training from where you left off (and with the new learning rate) is something most learning rate schedulers will not allow you to do.
Once you’ve ran a few experiments with
ctrl + ctraining you’ll have a good idea on what your hyperparameters should be — when that happens, then you start incorporating hardcoded learning rate schedules to boost your accuracy even further.
Finally, keep in mind that nearly all seminal CNN papers that were trained on ImageNet used a method to start/stop/resume training.
Just because other methods exist doesn’t make them inherently better — as a deep learning practitioner, you need to learn how to use
ctrl + ctraining along with learning rate scheduling (don’t rely strictly on the latter).
If you’re interested in learning more about
ctrl + ctraining, along with my tips, suggestions, and best practices when training your own models, be sure to refer to my book, Deep Learning for Computer Vision with Python.
Project structure
Let’s review our project structure:
$ tree --dirsfirst
.
├── output
│   ├── checkpoints
│   ├── resnet_fashion_mnist.json
│   └── resnet_fashion_mnist.png
├── pyimagesearch
│   ├── callbacks
│   │   ├── __init__.py
│   │   ├── epochcheckpoint.py
│   │   └── trainingmonitor.py
│   ├── nn
│   │   ├── __init__.py
│   │   └── resnet.py
│   └── __init__.py
└── train.py

5 directories, 9 files
Today we will review
train.py, our training script. This script trains Fashion MNIST on ResNet.
The key to this training script is that it uses two “callbacks”,
epochcheckpoint.pyand
trainingmonitor.py. I review these callbacks in detail inside Deep Learning for Computer Vision with Python — they aren’t covered today, but I encourage you to review the code.
These two callbacks allow us to (1) save our model at the end of every N-th epoch so we can resume training on demand, and (2) output our training plot at the conclusion of each epoch, ensuring we can easily monitor our model for signs of overfitting.
The models are checkpointed (i.e. saved) in the
output/checkpoints/directory and the accompanying JSON file. The training plot is overwritten upon each epoch end as
resnet_fashion_mnist.png. We’ll be paying close attention to the training plot to determine when to stop training.
Implementing the training script
Let’s get started implementing our Python script that will be used for starting, stopping, and resuming training with Keras.
This guide is written for intermediate practitioners, even though it teaches an essential skill. If you are new to Keras or deep learning, or maybe you just need to brush up on the basics, definitely check out my Keras Tutorial first.
Open up a new file, name it
train.py, and insert the following code:
# set the matplotlib backend so figures can be saved in the background
import matplotlib
matplotlib.use("Agg")

# import the necessary packages
from pyimagesearch.callbacks.epochcheckpoint import EpochCheckpoint
from pyimagesearch.callbacks.trainingmonitor import TrainingMonitor
from pyimagesearch.nn.resnet import ResNet
from sklearn.preprocessing import LabelBinarizer
from keras.preprocessing.image import ImageDataGenerator
from keras.optimizers import SGD
from keras.datasets import fashion_mnist
from keras.models import load_model
import keras.backend as K
import numpy as np
import argparse
import cv2
import sys
import os
Lines 2-19 import our required packages, namely our
EpochCheckpointand
TrainingMonitorcallbacks. We also import our
fashion_mnistdataset and
ResNetCNN. The
keras.backend as Kwill allow us to retrieve and set our learning rate.
Now let’s go ahead and parse command line arguments:
# construct the argument parse and parse the arguments
ap = argparse.ArgumentParser()
ap.add_argument("-c", "--checkpoints", required=True,
	help="path to output checkpoint directory")
ap.add_argument("-m", "--model", type=str,
	help="path to *specific* model checkpoint to load")
ap.add_argument("-s", "--start-epoch", type=int, default=0,
	help="epoch to restart training at")
args = vars(ap.parse_args())
Our command line arguments include:
--checkpoints
: The path to our output checkpoints directory.--model
: The optional path to a specific model checkpoint to load when resuming training.--start-epoch
: The optional start epoch can be provided if you are resuming training. By default, training starts at epoch0
.
Let’s go ahead and load our dataset:
# grab the Fashion MNIST dataset (if this is your first time running
# this the dataset will be automatically downloaded)
print("[INFO] loading Fashion MNIST...")
((trainX, trainY), (testX, testY)) = fashion_mnist.load_data()

# Fashion MNIST images are 28x28 but the network we will be training
# is expecting 32x32 images
trainX = np.array([cv2.resize(x, (32, 32)) for x in trainX])
testX = np.array([cv2.resize(x, (32, 32)) for x in testX])

# scale data to the range of [0, 1]
trainX = trainX.astype("float32") / 255.0
testX = testX.astype("float32") / 255.0

# reshape the data matrices to include a channel dimension (required
# for training)
trainX = trainX.reshape((trainX.shape[0], 32, 32, 1))
testX = testX.reshape((testX.shape[0], 32, 32, 1))
Line 34 loads Fashion MNIST.
Lines 38-48 then preprocess the data including (1) resizing to 32×32, (2) scaling pixel intensities to the range [0, 1], and (3) adding a channel dimension.
From here we’ll (1) binarize our labels, and (2) initialize our data augmentation object:
# convert the labels from integers to vectors
lb = LabelBinarizer()
trainY = lb.fit_transform(trainY)
testY = lb.transform(testY)

# construct the image generator for data augmentation
aug = ImageDataGenerator(width_shift_range=0.1,
	height_shift_range=0.1, horizontal_flip=True,
	fill_mode="nearest")
And now to the code for loading model checkpoints:
# if there is no specific model checkpoint supplied, then initialize
# the network (ResNet-56) and compile the model
if args["model"] is None:
	print("[INFO] compiling model...")
	opt = SGD(lr=1e-1)
	model = ResNet.build(32, 32, 1, 10, (9, 9, 9),
		(64, 64, 128, 256), reg=0.0001)
	model.compile(loss="categorical_crossentropy", optimizer=opt,
		metrics=["accuracy"])

# otherwise, we're using a checkpoint model
else:
	# load the checkpoint from disk
	print("[INFO] loading {}...".format(args["model"]))
	model = load_model(args["model"])

	# update the learning rate
	print("[INFO] old learning rate: {}".format(
		K.get_value(model.optimizer.lr)))
	K.set_value(model.optimizer.lr, 1e-2)
	print("[INFO] new learning rate: {}".format(
		K.get_value(model.optimizer.lr)))
If no model checkpoint is supplied then we need to initialize the model (Lines 62-68). Notice that we specify our initial learning rate as
1e-1on Line 64.
Otherwise, Lines 71-81 load the model checkpoint (i.e. a model that was previously stopped via
ctrl + c) and update the learning rate. Line 79 will be the line you edit whenever you want to update the learning rate.
Next, we’ll construct our callbacks:
# build the path to the training plot and training history
plotPath = os.path.sep.join(["output", "resnet_fashion_mnist.png"])
jsonPath = os.path.sep.join(["output", "resnet_fashion_mnist.json"])

# construct the set of callbacks
callbacks = [
	EpochCheckpoint(args["checkpoints"], every=5,
		startAt=args["start_epoch"]),
	TrainingMonitor(plotPath,
		jsonPath=jsonPath,
		startAt=args["start_epoch"])]
Lines 84 and 85 specify our plot and JSON paths.
Lines 88-93 construct two
callbacks, putting them directly into a list:
EpochCheckpoint
: This callback is responsible for saving our model as it currently stands at the conclusion of every epoch. That way, if we stop training viactrl + c
(or an unforeseeable power failure), we don’t lose our machine’s work — for training complex models on huge datasets, this could quite literally save you days of time.TrainingMonitor
: A callback that saves our training accuracy/loss information as a PNG image plot and JSON dictionary. We’ll be able to open our training plot at any time to see our training progress — valuable information to you as the practitioner, especially for multi-day training processes.
Again, please review
epochcheckpoint.pyand
trainingmonitor.pyon your own time for the details and/or if you need to add functionality. I cover these callbacks in detail inside Deep Learning for Computer Vision with Python.
Finally, we have everything we need to start, stop, and resume training. This last block actually starts or resumes training:
# train the network
print("[INFO] training network...")
model.fit_generator(
	aug.flow(trainX, trainY, batch_size=128),
	validation_data=(testX, testY),
	steps_per_epoch=len(trainX) // 128,
	epochs=80,
	callbacks=callbacks,
	verbose=1)
Our call to
.fit_generatorfits/trains our
modelusing and our callbacks (Lines 97-103). Be sure to review my tutorial on Keras’ fit_generator for more details on how the
.fit_generatorfunction is used to train our model.
I’d like to call your attention to the
epochsparameter (Line 101) — when you adjust your learning rate you’ll typically want to update the epochs as well. Typically you should over-estimate the number of epochs as you’ll see in the next three sections.
For a more detailed explanation of starting, stopping, and resuming training (along with the implementations of my
EpochCheckpointand
TrainingMonitorclasses), be sure to refer to Deep Learning for Computer Vision with Python.
Phase #1: 40 epochs at 1e-1
Make sure you’ve used the “Downloads” section of this blog post to download the source code to this tutorial.
From there, open up a terminal and execute the following command:
$ python train.py --checkpoints output/checkpoints
[INFO] loading Fashion MNIST...
[INFO] compiling model...
[INFO] training network...
Epoch 1/40
468/468 [==============================] - 219s 468ms/step - loss: 1.2396 - acc: 0.7171 - val_loss: 0.9564 - val_acc: 0.8130
Epoch 2/40
468/468 [==============================] - 204s 435ms/step - loss: 0.8993 - acc: 0.8307 - val_loss: 0.8464 - val_acc: 0.8553
Epoch 3/40
468/468 [==============================] - 204s 435ms/step - loss: 0.8092 - acc: 0.8625 - val_loss: 0.8407 - val_acc: 0.8513
Epoch 4/40
468/468 [==============================] - 204s 435ms/step - loss: 0.7623 - acc: 0.8780 - val_loss: 0.7457 - val_acc: 0.8869
Epoch 5/40
468/468 [==============================] - 203s 435ms/step - loss: 0.7266 - acc: 0.8895 - val_loss: 0.7809 - val_acc: 0.8682
...
Epoch 36/40
468/468 [==============================] - 204s 435ms/step - loss: 0.4075 - acc: 0.9482 - val_loss: 0.4584 - val_acc: 0.9334
Epoch 37/40
468/468 [==============================] - 204s 435ms/step - loss: 0.4041 - acc: 0.9475 - val_loss: 0.4693 - val_acc: 0.9297
Epoch 38/40
468/468 [==============================] - 204s 435ms/step - loss: 0.3937 - acc: 0.9511 - val_loss: 0.4774 - val_acc: 0.9246
Epoch 39/40
468/468 [==============================] - 203s 434ms/step - loss: 0.3936 - acc: 0.9492 - val_loss: 0.4918 - val_acc: 0.9191
Epoch 40/40
468/468 [==============================] - 204s 435ms/step - loss: 0.3856 - acc: 0.9508 - val_loss: 0.4690 - val_acc: 0.9266
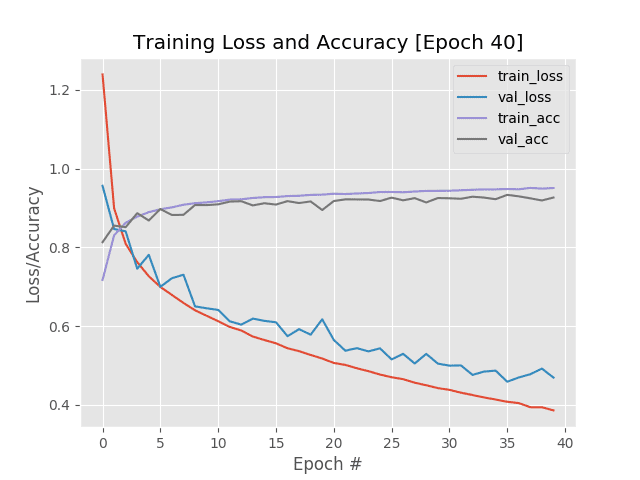
Figure 3: Phase 1 of training ResNet on the Fashion MNIST dataset with a learning rate of 1e-1 for 40 epochs before we stop via ctrl + c, adjust the learning rate, and resume Keras training.
Here I’ve started training ResNet on the Fashion MNIST dataset using the SGD optimizer and an initial learning rate of 1e-1.
After every epoch my loss/accuracy plot in Figure 3 updates, enabling me to monitor training in real-time.
Past epoch 20 we can see training and validation loss starting to diverge, and by epoch 40 I decided to
ctrl + cout of the
train.pyscript.
Phase #2: 10 epochs at 1e-2
The next step is to update both:
- My learning rate
- The number of epochs to train for
For the learning rate, the standard practice is to lower it by an order of magnitude.
Going back to Line 64 of
train.pywe can see that my initial learning rate is
1e-1:
# if there is no specific model checkpoint supplied, then initialize
# the network (ResNet-56) and compile the model
if args["model"] is None:
	print("[INFO] compiling model...")
	opt = SGD(lr=1e-1)
	model = ResNet.build(32, 32, 1, 10, (9, 9, 9),
		(64, 64, 128, 256), reg=0.0001)
	model.compile(loss="categorical_crossentropy", optimizer=opt,
		metrics=["accuracy"])
I’m now going to update my learning rate to be
1e-2on Line 79:
# otherwise, we're using a checkpoint model
else:
	# load the checkpoint from disk
	print("[INFO] loading {}...".format(args["model"]))
	model = load_model(args["model"])

	# update the learning rate
	print("[INFO] old learning rate: {}".format(
		K.get_value(model.optimizer.lr)))
	K.set_value(model.optimizer.lr, 1e-2)
	print("[INFO] new learning rate: {}".format(
		K.get_value(model.optimizer.lr)))
So, why am I updating Line 79 and not Line 64?
The reason is due to the
if/elsestatement.
The
elsestatement handles when we need to load a specific checkpoint from disk — once we have the checkpoint we’ll resume training, thus the learning rate needs to be updated in the
elseblock.
Secondly, I also update my
epochson Line 101. Initially, the
epochsvalue was
80:
# train the network
print("[INFO] training network...")
model.fit_generator(
	aug.flow(trainX, trainY, batch_size=128),
	validation_data=(testX, testY),
	steps_per_epoch=len(trainX) // 128,
	epochs=80,
	callbacks=callbacks,
	verbose=1)
I have decided to lower the number of epochs to train for to
40epochs:
# train the network
print("[INFO] training network...")
model.fit_generator(
	aug.flow(trainX, trainY, batch_size=128),
	validation_data=(testX, testY),
	steps_per_epoch=len(trainX) // 128,
	epochs=40,
	callbacks=callbacks,
	verbose=1)
Typically you’ll set the epochs
value to be much larger than what you think it should actually be.
The reason for this is due to the fact that we’re using the
EpochCheckpointclass to save model snapshots every 5 epochs — if at any point we decide we’re unhappy with the training progress we can just
ctrl + cout of the script and go back to a previous snapshot.
Thus, there is no harm in training for longer since we can always resume training from a previous model weight file.
After both my learning rate and the number of epochs to train for were updated, I then executed the following command:
$ python train.py --checkpoints output/checkpoints \
	--model output/checkpoints/epoch_40.hdf5 --start-epoch 40
[INFO] loading Fashion MNIST...
[INFO] loading output/checkpoints/epoch_40.hdf5...
[INFO] old learning rate: 0.10000000149011612
[INFO] new learning rate: 0.009999999776482582
[INFO] training network...
Epoch 1/10
468/468 [==============================] - 215s 460ms/step - loss: 0.3569 - acc: 0.9617 - val_loss: 0.4245 - val_acc: 0.9413
Epoch 2/10
468/468 [==============================] - 204s 435ms/step - loss: 0.3452 - acc: 0.9662 - val_loss: 0.4272 - val_acc: 0.9393
Epoch 3/10
468/468 [==============================] - 203s 434ms/step - loss: 0.3423 - acc: 0.9666 - val_loss: 0.4276 - val_acc: 0.9404
Epoch 4/10
468/468 [==============================] - 203s 434ms/step - loss: 0.3400 - acc: 0.9677 - val_loss: 0.4246 - val_acc: 0.9411
Epoch 5/10
468/468 [==============================] - 203s 434ms/step - loss: 0.3377 - acc: 0.9677 - val_loss: 0.4256 - val_acc: 0.9412
Epoch 6/10
468/468 [==============================] - 203s 435ms/step - loss: 0.3346 - acc: 0.9698 - val_loss: 0.4268 - val_acc: 0.9415
Epoch 7/10
468/468 [==============================] - 203s 435ms/step - loss: 0.3353 - acc: 0.9681 - val_loss: 0.4245 - val_acc: 0.9411
Epoch 8/10
468/468 [==============================] - 203s 434ms/step - loss: 0.3301 - acc: 0.9701 - val_loss: 0.4266 - val_acc: 0.9418
Epoch 9/10
468/468 [==============================] - 203s 435ms/step - loss: 0.3280 - acc: 0.9712 - val_loss: 0.4313 - val_acc: 0.9411
Epoch 10/10
468/468 [==============================] - 203s 434ms/step - loss: 0.3291 - acc: 0.9712 - val_loss: 0.4302 - val_acc: 0.9393
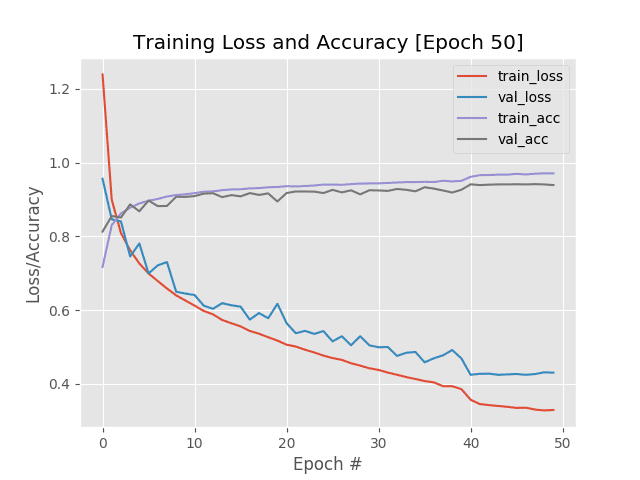
Figure 4: Phase 2 of Keras start/stop/resume training. The learning rate is dropped from 1e-1 to 1e-2 as is evident in the plot at epoch 40. I continued training for 10 more epochs until I noticed validation metrics plateauing at which point I stopped training via ctrl + c again.
Notice how we’ve updated our learning rate from
1e-1to
1e-2and then resumed training.
We immediately see a drop in both training/validation loss as well as an increase in training/validation accuracy.
The problem here is that our validation metrics have plateaued out — there may not be much more gains left without risking overfitting. Because of this, I only allowed training to continue for another 10 epochs before once again
ctrl + cing out of the script.
Phase #3: 5 epochs at 1e-3
For the final phase of training I decided to:
- Lower my learning rate from
1e-2
to1e-3
. - Allow training to continue (but knowing I would likely only be training for a few epochs given the risk of overfitting).
After updating my learning rate, I executed the following command:
$ python train.py --checkpoints output/checkpoints \
	--model output/checkpoints/epoch_50.hdf5 --start-epoch 50
[INFO] loading Fashion MNIST...
[INFO] loading output/checkpoints/epoch_50.hdf5...
[INFO] old learning rate: 0.009999999776482582
[INFO] new learning rate: 0.0010000000474974513
[INFO] training network...
Epoch 1/5
468/468 [==============================] - 214s 457ms/step - loss: 0.3257 - acc: 0.9721 - val_loss: 0.4278 - val_acc: 0.9411
Epoch 2/5
468/468 [==============================] - 203s 433ms/step - loss: 0.3232 - acc: 0.9728 - val_loss: 0.4292 - val_acc: 0.9406
Epoch 3/5
468/468 [==============================] - 202s 433ms/step - loss: 0.3232 - acc: 0.9730 - val_loss: 0.4291 - val_acc: 0.9399
Epoch 4/5
468/468 [==============================] - 203s 433ms/step - loss: 0.3228 - acc: 0.9729 - val_loss: 0.4287 - val_acc: 0.9407
Epoch 5/5
468/468 [==============================] - 203s 433ms/step - loss: 0.3226 - acc: 0.9725 - val_loss: 0.4276 - val_acc: 0.9415
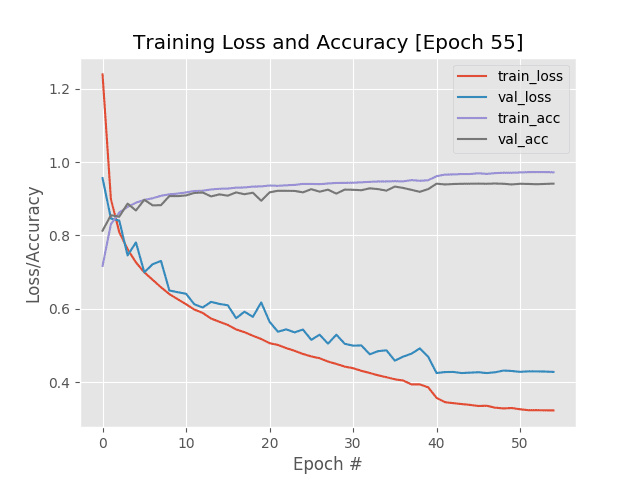
Figure 5: Upon resuming Keras training for phase 3, I only let the network train for 5 epochs because there is not significant learning progress being made. Using a start/stop/resume training approach with Keras, we have achieved 94.15% validation accuracy.
At this point the learning rate has become so small that the corresponding weight updates are also very small, implying that the model cannot learn much more.
I only allowed training to continue for 5 epochs before killing the script. However, looking at my final metrics you can see what we are obtaining 97.25% training accuracy along with 94.15% validation accuracy.
We were able to achieve this result by using our start, stop, and resuming training method.
At this point, we could either continue to tune our learning rate, utilize a learning rate scheduler, apply Cyclical Learning Rates, or try a new model architecture altogether.
Where can I learn more deep learning tips, suggestions, and best practices?

Figure 6: My deep learning book is the go-to resource for deep learning students, developers, researchers, and hobbyists, alike. Use the book to build your skillset from the bottom up, or read it to gain a deeper understanding. Don’t be left in the dust as the fast-paced AI revolution continues to accelerate.
Today’s tutorial introduced you to starting, stopping, and resuming training with Keras.
If you’re looking for more of my tips, suggestions, and best practices when training deep neural networks, be sure to refer to my book, Deep Learning for Computer Vision with Python.
Inside the book I cover:
- Deep learning fundamentals and theory without unnecessary mathematical fluff. I present the basic equations and back them up with code walkthroughs that you can implement and easily understand.
- How to spot underfitting and overfitting while you’re using the TrainingMonitor callback.
- Recommendations and best practices for selecting learning rates.
- My tips/tricks, suggestions, and best practices for training CNNs.
Besides content on learning rates, you’ll also find:
- Super practical walkthroughs that present solutions to actual, real-world image classification, object detection, and segmentation problems.
- Hands-on tutorials (with lots of code) that not only show you the algorithms behind deep learning for computer vision but their implementations as well.
- A no-nonsense teaching style that is guaranteed to help you master deep learning for image understanding and visual recognition.
To learn more about the book, and grab the table of contents + free sample chapters, just click here!
Summary
In this tutorial you learned how to start, stop, and resume training using Keras and Deep Learning.
Learning how to resume from where your training left off is a super valuable skill for two reasons:
- It ensures that if your training script crashes, you can pick up again from the most recent model checkpoint.
- It enables you to adjust your learning rate and improve your model accuracy.
When training your own custom neural networks you’ll want to monitor your loss and accuracy — once you start to see validation loss/accuracy plateau, try killing the training script, lowering your learning rate by an order of magnitude, and then resume training.
You’ll often find that this method of training can lead to higher accuracy models.
However, you should be wary of overfitting!
Lowering your learning rate enables your model to descend into lower areas of the loss landscape; however, there is no guarantee that these lower loss areas will still generalize!
You likely will only be able to drop the learning rate 1-3 times before either:
- The learning rate becomes too small, making the corresponding weight updates too small, and preventing the model from learning further.
- Validation loss stagnates or explodes while training loss continues to drop (implying that the model is overfitting).
If those cases occur and your model is still not satisfactory you should consider adjusting other hyperparameters to your model, including regularization strength, dropout, etc. You may want to explore other model architectures as well.
For more of my tips, suggestions, and best practices when training your own neural networks on your custom datasets, be sure to refer to Deep Learning for Computer Vision with Python, where I cover my best practices in-depth.
To download the source code to this tutorial (and be notified when future tutorials are published on the PyImageSearch blog), just enter your email address in the form below!
Downloads:
The post Keras: Starting, stopping, and resuming training appeared first on PyImageSearch.