
In this tutorial, you will learn how to use Keras and the Rectified Adam optimizer as a drop-in replacement for the standard Adam optimizer, potentially leading to a higher accuracy model (and in fewer epochs).
Today we’re kicking off a two-part series on the Rectified Adam optimizer:
- Rectified Adam (RAdam) optimizer with Keras (today’s post)
- Is Rectified Adam actually *better* than Adam? (next week’s tutorial)
Rectified Adam is a brand new deep learning model optimizer introduced by a collaboration between members of the University of Illinois, Georgia Tech, and Microsoft Research.
The goal of the Rectified Adam optimizer is two-fold:
- Obtain a more accurate/more generalizable deep neural network
- Complete training in fewer epochs
Sound too good to be true?
Well, it might just be.
You’ll need to read the rest of this tutorial to find out.
To learn how to use the Rectified Adam optimizer with Keras, just keep reading!
Looking for the source code to this post?
Jump right to the downloads section.
Rectified Adam (RAdam) optimizer with Keras
In the first part of this tutorial, we’ll discuss the Rectified Adam optimizer, including how it’s different than the standard Adam optimizer (and why we should care).
From there I’ll show you how to use the Rectified Adam optimizer with the Keras deep learning library.
We’ll then run some experiments and compare Adam to Rectified Adam.
What is the Rectified Adam optimizer?
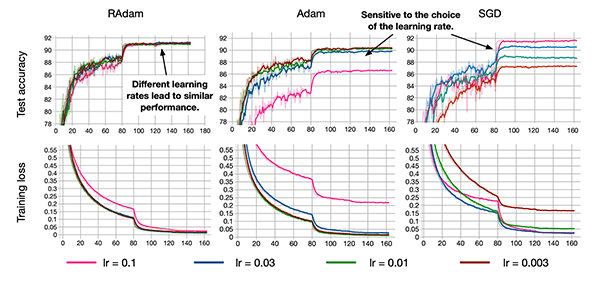
Figure 1: Using the Rectified Adam (RAdam) deep learning optimizer with Keras. (image source: Figure 6 from Liu et al.)
A few weeks ago the deep learning community was all abuzz after Liu et al. published a brand new paper entitled On the Variance of the Adaptive Learning Rate and Beyond.
This paper introduced a new deep learning optimizer called Rectified Adam (or RAdam for short).
Rectified Adam is meant to be a drop-in replacement for the standard Adam optimizer.
So, why is Liu et al.’s contribution so important? And why is the deep learning community so excited about it?
Here’s a quick rundown on why you should care about it:
- Learning rate warmup heuristics work well to stabilize training.
- These heuristics also work well to improve generalization.
- Liu et al. decided to study the theory behind learning rate warmup…
- …but they found a problem with adaptive learning rates — during the first few batches the model did not generalize well and had very high variance.
- The authors studied the problem in detail and concluded that the issue can be resolved/mitigated by:
- 1. Applying warm up with a low initial learning rate.
- 2. Or, simply turning off the momentum term for the first few sets of input batches.
- As training continues, the variance will stabilize, and from there, the learning rate can be increased and the momentum term can be added back in.
The authors call this optimizer Rectified Adam (RAdam), a variant of the Adam optimizer, as it “rectifies” (i.e., corrects) the variance/generalization issues apparent in other adaptive learning rate optimizers.
But the question remains — is Rectified Adam actually better than standard Adam?
To answer that, you’ll need to finish reading this tutorial and read next week’s post which includes a full comparison.
For more information about Rectified Adam, including details on both the theoretical and empirical results, be sure to refer to Liu et al.’s paper.
Project structure
Let’s inspect our project layout:
$ tree --dirsfirst
.
├── pyimagesearch
│   ├── __init__.py
│   └── resnet.py
├── cifar10_adam.png
├── cifar10_rectified_adam.png
└── train.py

1 directory, 5 files
Our ResNet CNN is contained within the
pyimagesearchmodule. The
resnet.pyfile contains the exact ResNet model class included with Deep Learning for Computer Vision with Python.
We will train ResNet on the CIFAR-10 dataset with both the Adam or RAdam optimizers inside of
train.py, which we’ll review later in this tutorial. The training script will generate an accuracy/loss plot each time it is run — two .png files for each of the Adam and Rectified Adam experiments are included in the “Downloads”.
Installing Rectified Adam for Keras
This tutorial requires the following software to be installed in your environment:
- TensorFlow
- Keras
- Rectified Adam for Keras
- scikit-learn
- matplotlib
Luckily, all of the software is pip installable. If you’ve ever followed one of my installation tutorials, then you know I’m a fan of virtualenv and virtualenvwrapper for managing Python virtual environments. The first command below,
workon, assumes that you have these packages installed, but it is optional.
Let’s install the software now:
$ workon <env_name> # replace "<env_name>" with your environment
$ pip install tensorflow # or tensorflow-gpu
$ pip install keras
$ pip install scikit-learn
$ pip install matplotlib
The original implementation of RAdam by Liu et al. was in PyTorch; however, a Keras implementation was created by Zhao HG.
You can install the Keras implementation of Rectified Adam via the following command:
$ pip install keras-rectified-adam
To verify that the Keras + RAdam package has been successfully installed, open up a Python shell and attempt to import
keras_radam:
$ python
>>> import keras_radam
>>>
Provided there are no errors during the import, you can assume Rectified Adam is successfully installed on your deep learning box!
Implementing Rectified Adam with Keras
Let’s now learn how we can use Rectified Adam with Keras.
If you are unfamiliar with Keras and/or deep learning, please refer to my Keras Tutorial. For a full review of deep learning optimizers, refer to the following chapters of Deep Learning for Computer Vision with Python:
- Starter Bundle – Chapter 9: “Optimization Methods and Regularization Techniques”
- Practitioner Bundle – Chapter 7: “Advanced Optimization Methods”
Otherwise, if you’re ready to go, let’s dive in.
Open up a new file, name it
train.py, and insert the following code:
# set the matplotlib backend so figures can be saved in the background
import matplotlib
matplotlib.use("Agg")

# import the necessary packages
from pyimagesearch.resnet import ResNet
from sklearn.preprocessing import LabelBinarizer
from sklearn.metrics import classification_report
from keras.preprocessing.image import ImageDataGenerator
from keras.optimizers import Adam
from keras_radam import RAdam
from keras.datasets import cifar10
import matplotlib.pyplot as plt
import numpy as np
import argparse

# construct the argument parser and parse the arguments
ap = argparse.ArgumentParser()
ap.add_argument("-p", "--plot", type=str, required=True,
	help="path to output training plot")
ap.add_argument("-o", "--optimizer", type=str, default="adam",
	choices=["adam", "radam"],
	help="type of optmizer")
args = vars(ap.parse_args())
Lines 2-15 import our packages and modules. Most notably, Lines 10 and 11 import
Adamand
RAdamoptimizers. We will use the
"Agg"backend of matplotlib so that we can save our training plots to disk (Line 3).
Lines 18-24 then parse two command line arguments:
--plot
: The path to our output training plot.--optimizer
: The type of optimizer that we’ll use for training (eitheradam
orradam
).
From here, let’s go ahead and perform a handful of initializations:
# initialize the number of epochs to train for and batch size
EPOCHS = 75
BS = 128

# load the training and testing data, then scale it into the
# range [0, 1]
print("[INFO] loading CIFAR-10 data...")
((trainX, trainY), (testX, testY)) = cifar10.load_data()
trainX = trainX.astype("float") / 255.0
testX = testX.astype("float") / 255.0

# convert the labels from integers to vectors
lb = LabelBinarizer()
trainY = lb.fit_transform(trainY)
testY = lb.transform(testY)

# construct the image generator for data augmentation
aug = ImageDataGenerator(width_shift_range=0.1,
	height_shift_range=0.1, horizontal_flip=True,
	fill_mode="nearest")

# initialize the label names for the CIFAR-10 dataset
labelNames = ["airplane", "automobile", "bird", "cat", "deer",
	"dog", "frog", "horse", "ship", "truck"]
Lines 27 and 28 initialize the number of epochs to train for as well as our batch size. Feel free to tune these hyperparameters, just keep in mind that they will affect results.
Lines 33-35 load and preprocess our CIFAR-10 data including scaling data to the range [0, 1].
Lines 38-40 then binarize our class labels from integers to vectors.
Lines 43-45 construct our data augmentation object. Be sure to refer to my data augmentation tutorial if you are new to data augmentation, how it works, or why we use it.
Our CIFAR-10 class
labelNamesare listed on Lines 48 and 49.
Now we’re to the meat of this tutorial — initializing either the Adam or RAdam optimizer:
# check if we are using Adam
if args["optimizer"] == "adam":
	# initialize the Adam optimizer
	print("[INFO] using Adam optimizer")
	opt = Adam(lr=1e-3)

# otherwise, we are using Rectified Adam
else:
	# initialize the Rectified Adam optimizer
	print("[INFO] using Rectified Adam optimizer")
	opt = RAdam(total_steps=5000, warmup_proportion=0.1, min_lr=1e-5)
Depending on the
--optimizercommand line argument, we’ll either initialize:
Adam
with a learning rate of1e-3
(Lines 52-55)- Or
RAdam
with a minimum learning rate of1e-5
and warm up (Lines 58-61). Be sure to refer to the original implementation notes on warm up which Zhao HG also implemented
With our optimizer ready to go, now we’ll compile and train our model:
# initialize our optimizer and model, then compile it
model = ResNet.build(32, 32, 3, 10, (9, 9, 9),
	(64, 64, 128, 256), reg=0.0005)
model.compile(loss="categorical_crossentropy", optimizer=opt,
	metrics=["accuracy"])

# train the network
H = model.fit_generator(
	aug.flow(trainX, trainY, batch_size=BS),
	validation_data=(testX, testY),
	steps_per_epoch=trainX.shape[0] // BS,
	epochs=EPOCHS,
	verbose=1)
We compile
ResNetwith our specified optimizer (either Adam or RAdam) via Lines 64-67.
Lines 70-75 launch the training process. Be sure to refer to my tutorial on Keras’ fit_generator method if you are new to using this function to train a deep neural network with Keras.
To wrap up, we print our classification report and plot our loss/accuracy curves over the duration of the training epochs:
# evaluate the network
print("[INFO] evaluating network...")
predictions = model.predict(testX, batch_size=BS)
print(classification_report(testY.argmax(axis=1),
	predictions.argmax(axis=1), target_names=labelNames))

# determine the number of epochs and then construct the plot title
N = np.arange(0, EPOCHS)
title = "Training Loss and Accuracy on CIFAR-10 ({})".format(
	args["optimizer"])

# plot the training loss and accuracy
plt.style.use("ggplot")
plt.figure()
plt.plot(N, H.history["loss"], label="train_loss")
plt.plot(N, H.history["val_loss"], label="val_loss")
plt.plot(N, H.history["acc"], label="train_acc")
plt.plot(N, H.history["val_acc"], label="val_acc")
plt.title(title)
plt.xlabel("Epoch #")
plt.ylabel("Loss/Accuracy")
plt.legend()
plt.savefig(args["plot"])
Standard Adam Optimizer Results
To train ResNet on the CIFAR-10 dataset using the Adam optimizer, make sure you use the “Downloads” section of this blog post to download the source guide to this guide.
From there, open up a terminal and execute the following command:
$ python train.py --plot cifar10_adam.png --optimizer adam
[INFO] loading CIFAR-10 data...
[INFO] using Adam optimizer
Epoch 1/75
390/390 [==============================] - 205s 526ms/step - loss: 1.9642 - acc: 0.4437 - val_loss: 1.7449 - val_acc: 0.5248
Epoch 2/75
390/390 [==============================] - 185s 475ms/step - loss: 1.5199 - acc: 0.6050 - val_loss: 1.4735 - val_acc: 0.6218
Epoch 3/75
390/390 [==============================] - 185s 474ms/step - loss: 1.2973 - acc: 0.6822 - val_loss: 1.2712 - val_acc: 0.6965
Epoch 4/75
390/390 [==============================] - 185s 474ms/step - loss: 1.1451 - acc: 0.7307 - val_loss: 1.2450 - val_acc: 0.7109
Epoch 5/75
390/390 [==============================] - 185s 474ms/step - loss: 1.0409 - acc: 0.7643 - val_loss: 1.0918 - val_acc: 0.7542
...
Epoch 71/75
390/390 [==============================] - 185s 474ms/step - loss: 0.4215 - acc: 0.9358 - val_loss: 0.6372 - val_acc: 0.8775
Epoch 72/75
390/390 [==============================] - 185s 474ms/step - loss: 0.4241 - acc: 0.9347 - val_loss: 0.6024 - val_acc: 0.8819
Epoch 73/75
390/390 [==============================] - 185s 474ms/step - loss: 0.4226 - acc: 0.9350 - val_loss: 0.5906 - val_acc: 0.8835
Epoch 74/75
390/390 [==============================] - 185s 474ms/step - loss: 0.4198 - acc: 0.9369 - val_loss: 0.6321 - val_acc: 0.8759
Epoch 75/75
390/390 [==============================] - 185s 474ms/step - loss: 0.4127 - acc: 0.9391 - val_loss: 0.5669 - val_acc: 0.8953
[INFO] evaluating network...
[INFO] evaluating network...
              precision    recall  f1-score   support

    airplane       0.81      0.94      0.87      1000
  automobile       0.96      0.96      0.96      1000
        bird       0.86      0.87      0.86      1000
         cat       0.84      0.75      0.79      1000
        deer       0.91      0.91      0.91      1000
         dog       0.86      0.84      0.85      1000
        frog       0.89      0.95      0.92      1000
       horse       0.93      0.92      0.93      1000
        ship       0.97      0.88      0.92      1000
       truck       0.96      0.92      0.94      1000

   micro avg       0.90      0.90      0.90     10000
   macro avg       0.90      0.90      0.90     10000
weighted avg       0.90      0.90      0.90     10000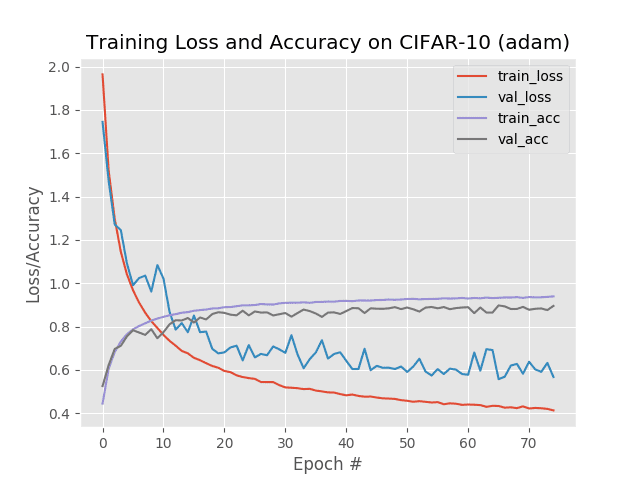
Figure 2: To achieve a baseline, we first train ResNet using the Adam optimizer on the CIFAR-10 dataset. We will compare the results to the Rectified Adam (RAdam) optimizer using Keras.
Looking at our output you can see that we obtained 90% accuracy on our testing set.
Examining Figure 2 shows that there is little overfitting going on as well — our training progress is quite stable.
Rectified Adam Optimizer Results
Now, let’s train ResNet on CIFAR-10 using the Rectified Adam optimizer:
$ python train.py --plot cifar10_rectified_adam.png --optimizer radam
[INFO] loading CIFAR-10 data...
[INFO] using Rectified Adam optimizer
Epoch 1/75
390/390 [==============================] - 212s 543ms/step - loss: 2.4813 - acc: 0.2489 - val_loss: 2.0976 - val_acc: 0.3921
Epoch 2/75
390/390 [==============================] - 188s 483ms/step - loss: 1.8771 - acc: 0.4797 - val_loss: 1.8231 - val_acc: 0.5041
Epoch 3/75
390/390 [==============================] - 188s 483ms/step - loss: 1.5900 - acc: 0.5857 - val_loss: 1.4483 - val_acc: 0.6379
Epoch 4/75
390/390 [==============================] - 188s 483ms/step - loss: 1.3919 - acc: 0.6564 - val_loss: 1.4264 - val_acc: 0.6466
Epoch 5/75
390/390 [==============================] - 188s 483ms/step - loss: 1.2457 - acc: 0.7046 - val_loss: 1.2151 - val_acc: 0.7138
...
Epoch 71/75
390/390 [==============================] - 188s 483ms/step - loss: 0.6256 - acc: 0.9054 - val_loss: 0.7919 - val_acc: 0.8551
Epoch 72/75
390/390 [==============================] - 188s 482ms/step - loss: 0.6184 - acc: 0.9071 - val_loss: 0.7894 - val_acc: 0.8537
Epoch 73/75
390/390 [==============================] - 188s 483ms/step - loss: 0.6242 - acc: 0.9051 - val_loss: 0.7981 - val_acc: 0.8519
Epoch 74/75
390/390 [==============================] - 188s 483ms/step - loss: 0.6191 - acc: 0.9062 - val_loss: 0.7969 - val_acc: 0.8519
Epoch 75/75
390/390 [==============================] - 188s 483ms/step - loss: 0.6143 - acc: 0.9098 - val_loss: 0.7935 - val_acc: 0.8525
[INFO] evaluating network...
              precision    recall  f1-score   support

    airplane       0.86      0.88      0.87      1000
  automobile       0.91      0.95      0.93      1000
        bird       0.83      0.76      0.79      1000
         cat       0.76      0.69      0.72      1000
        deer       0.85      0.81      0.83      1000
         dog       0.79      0.79      0.79      1000
        frog       0.81      0.94      0.87      1000
       horse       0.89      0.89      0.89      1000
        ship       0.94      0.91      0.92      1000
       truck       0.88      0.91      0.89      1000

   micro avg       0.85      0.85      0.85     10000
   macro avg       0.85      0.85      0.85     10000
weighted avg       0.85      0.85      0.85     10000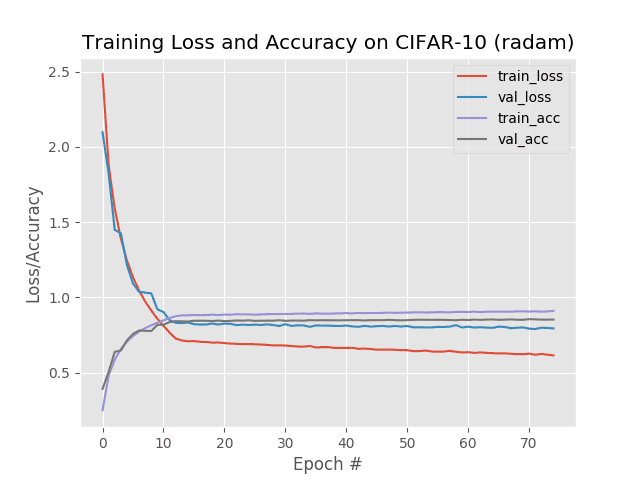
Figure 3: The Rectified Adam (RAdam) optimizer is used in conjunction with ResNet using Keras on the CIFAR-10 dataset. But how to the results compare to the standard Adam optimizer?
Notice how the
--optimizerswitch is set to
radamfor this second run of our training script.
But wait a second — why are we only obtaining 85% accuracy here?
Isn’t the Rectified Adam optimizer supposed to outperform standard Adam?
Why is our accuracy somehow worse?
Let’s discuss that in the next section.
Is Rectified Adam actually better than Adam?
If you look at our results you’ll see that the standard Adam optimizer outperformed the new Rectified Adam optimizer.
What’s going on here?
Isn’t Rectified Adam supposed to obtain higher accuracy and in fewer epochs?
Why is Rectified Adam performing worse than standard Adam?
Well, to start, keep in mind that we’re looking at the results from only a single dataset here — a true evaluation would look at the results across multiple datasets.
…and that’s exactly what I’ll be doing next week!
To see a full-blown comparison between Adam and Rectified Adam, and determine which optimizer is better, you’ll need to tune in for next week’s blog post!
What’s next?
Figure 4: My deep learning book, Deep Learning for Computer Vision with Python, is trusted by employees and students of top institutions.
If you’re interested in diving head-first into the world of computer vision/deep learning and discovering how to:
- Select the best optimizer for the job
- Train Convolutional Neural Networks on your own custom datasets
- Replicate the results of state-of-the-art papers, including ResNet, SqueezeNet, VGGNet, and others
- Train your own custom Faster R-CNN, Single Shot Detectors (SSDs), and RetinaNet object detectors
- Use Mask R-CNN to train your own instance segmentation networks
- Train Generative Adversarial Networks (GANs)
…then be sure to take a look at my book, Deep Learning for Computer Vision with Python!
My complete, self-study deep learning book is trusted by members of top machine learning schools, companies, and organizations, including Microsoft, Google, Stanford, MIT, CMU, and more!
Readers of my book have gone on to win Kaggle competitions, secure academic grants, and start careers in CV and DL using the knowledge they gained through study and practice.
My book not only teaches the fundamentals, but also teaches advanced techniques, best practices, and tools to ensure that you are armed with practical knowledge and proven coding recipes to tackle nearly any computer vision and deep learning problem presented to you in school, in your research, or in the modern workforce.
Be sure to take a look — and while you’re at it, don’t forget to grab your (free) table of contents + sample chapters.
Summary
In this tutorial, you learned how to use the Rectified Adam optimizer as a drop-in replacement for the standard Adam optimizer using the Keras deep learning library.
We then ran a set of experiments comparing Adam performance to Rectified Adam performance. Our results show that standard Adam actually outperformed the RAdam optimizer.
So what gives?
Liu et al. reported higher accuracy with fewer epochs in their paper — are we doing anything wrong?
Is something broken with our Rectified Adam optimizer?
To answer those questions you’ll need to tune in next week where I’ll be providing a full set of benchmark experiments comparing Adam to Rectified Adam. You won’t want to miss next week’s post, it’s going to be a good one!
To download the source code to this post (and be notified when next week’s tutorial goes live), be sure to enter your email address in the form below!
Downloads:
The post Rectified Adam (RAdam) optimizer with Keras appeared first on PyImageSearch.