In this tutorial, you will learn how to implement a COVID-19 social distancing detector using OpenCV, Deep Learning, and Computer Vision.
Today’s tutorial is inspired by PyImageSearch reader Min-Jun, who emailed in asking:
Hi Adrian,
I’ve seen a number of people in the computer vision community implementing “social distancing detectors”, but I’m not sure how they work.
Would you consider writing a tutorial on the topic?
Thank you.
Min-Jun is correct — I’ve seen a number of social distancing detector implementations on social media, my favorite ones being from reddit user danlapko and Rohit Kumar Srivastava’s implementation.
Today, I’m going to provide you with a starting point for your own social distancing detector. You can then extend it as you see fit to develop your own projects.
To learn how to implement a social distancing detector with OpenCV, just keep reading.
OpenCV Social Distancing Detector
In the first part of this tutorial, we’ll briefly discuss what social distancing is and how OpenCV and deep learning can be used to implement a social distancing detector.
We’ll then review our project directory structure including:
- Our configuration file used to keep our implementation neat and tidy
- Our
detect_peopleutility function, which detects people in video streams using the YOLO object detector - Our Python driver script, which glues all the pieces together into a full-fledged OpenCV social distancing detector
We’ll wrap up the post by reviewing the results, including a brief discussion on limitations and future improvements.
What is social distancing?
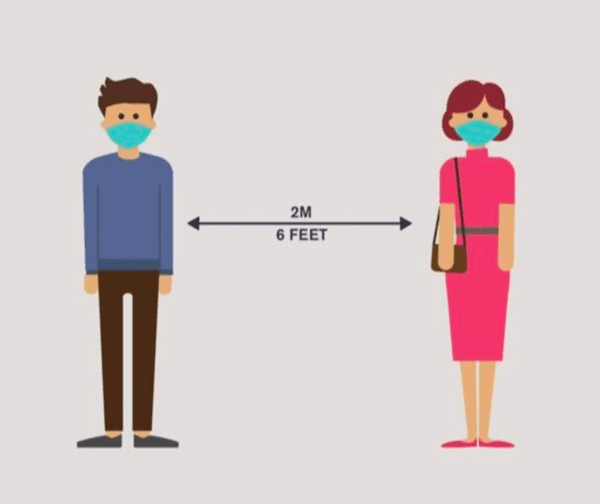
Social distancing is a method used to control the spread of contagious diseases.
As the name suggests, social distancing implies that people should physically distance themselves from one another, reducing close contact, and thereby reducing the spread of a contagious disease (such as coronavirus):

Social distancing is not a new concept, dating back to the fifth century (source), and has even been referenced in religious texts such as the Bible:
And the leper in whom the plague is … he shall dwell alone; [outside] the camp shall his habitation be. — Leviticus 13:46
Social distancing is arguably the most effective nonpharmaceutical way to prevent the spread of a disease — by definition, if people are not close together, they cannot spread germs.
Using OpenCV, computer vision, and deep learning for social distancing
We can use OpenCV, computer vision, and deep learning to implement social distancing detectors.
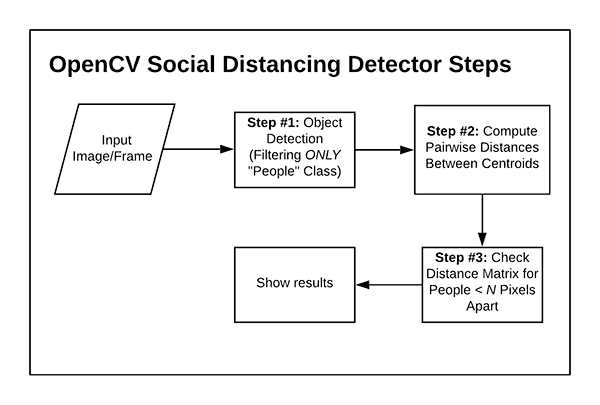
The steps to build a social distancing detector include:
- Apply object detection to detect all people (and only people) in a video stream (see this tutorial on building an OpenCV people counter)
- Compute the pairwise distances between all detected people
- Based on these distances, check to see if any two people are less than N pixels apart
For the most accurate results, you should calibrate your camera through intrinsic/extrinsic parameters so that you can map pixels to measurable units.
An easier alternative (but less accurate) method would be to apply triangle similarity calibration (as discussed in this tutorial).
Both of these methods can be used to map pixels to measurable units.
Finally, if you do not want/cannot apply camera calibration, you can still utilize a social distancing detector, but you’ll have to rely strictly on the pixel distances, which won’t necessarily be as accurate.
For the sake of simplicity, our OpenCV social distancing detector implementation will rely on pixel distances — I will leave it as an exercise for you, the reader, to extend the implementation as you see fit.
Project structure
Be sure to grab the code from the “Downloads” section of this blog post. From there, extract the files, and use the tree command to see how our project is organized:
$ tree --dirsfirst
.
├── pyimagesearch
│   ├── __init__.py
│   ├── detection.py
│   └── social_distancing_config.py
├── yolo-coco
│   ├── coco.names
│   ├── yolov3.cfg
│   └── yolov3.weights
├── output.avi
├── pedestrians.mp4
└── social_distance_detector.py

2 directories, 9 files
Our YOLO object detector files including the CNN architecture definition, pre-trained weights, and class names are housed in the yolo-coco/ directory. This YOLO model is compatible with OpenCV’s DNN module.
Today’s pyimagesearch module (in the “Downloads”) consists of:
social_distancing_config.py: A Python file holding a number of constants in one convenient place.detection.py: YOLO object detection with OpenCV involves more lines of code that some easier models. I’ve decided to put the object detection logic in a function in this file for convenience. Doing so frees up our driver script’s frame processing loop from becoming especially cluttered.
Our social distance detector application logic resides in the social_distance_detector.py script. This file is responsible for looping over frames of a video stream and ensuring that people are maintaining a healthy distance from one another during a pandemic. It is compatible with both video files and webcam streams.
Our input video file is pedestrians.mp4 and comes from TRIDE’s Test video for object detection. The output.avi file contains the processed output file.
Let’s dive into the Python configuration file in the next section.
Our configuration file
To help keep our code tidy and organized, we’ll be using a configuration file to store important variables.
Let’s take a look at them now — open up the social_distancing_config.py file inside the pyimagesearch module, and take a peek:
# base path to YOLO directory
MODEL_PATH = "yolo-coco"

# initialize minimum probability to filter weak detections along with
# the threshold when applying non-maxima suppression
MIN_CONF = 0.3
NMS_THRESH = 0.3
Here, we have the path to the YOLO object detection model (Line 2). We also define the minimum object detection confidence and non-maxima suppression threshold.
We have two more configuration constants to define:
# boolean indicating if NVIDIA CUDA GPU should be used
USE_GPU = False

# define the minimum safe distance (in pixels) that two people can be
# from each other
MIN_DISTANCE = 50
The USE_GPU boolean on Line 10 indicates whether your NVIDIA CUDA-capable GPU will be used to speed up inference (requires that OpenCV’s “dnn” module be installed with NVIDIA GPU support).
Line 14 defines the minimum distance (in pixels) that people must stay from each other in order to adhere to social distancing protocols.
Detecting people in images and video streams with OpenCV
We’ll be using the YOLO object detector to detect people in our video stream.
Using YOLO with OpenCV requires a bit more output processing than other object detection methods (such as Single Shot Detectors or Faster R-CNN), so in order to keep our code tidy, let’s implement a detect_people function that encapsulates any YOLO object detection logic.
Open up the detection.py file inside the pyimagesearch module, and let’s get started:
# import the necessary packages
from .social_distancing_config import NMS_THRESH
from .social_distancing_config import MIN_CONF
import numpy as np
import cv2
We begin with imports, including those needed from our configuration file on Lines 2 and 3 — the NMS_THRESH and MIN_CONF (refer to the previous section as needed). We’ll also take advantage of NumPy and OpenCV in this script (Lines 4 and 5).
Our script consists of a single function definition for detecting people — let’s define that function now:
def detect_people(frame, net, ln, personIdx=0):
	# grab the dimensions of the frame and  initialize the list of
	# results
	(H, W) = frame.shape[:2]
	results = []
Beginning on Line 7, we define detect_people; the function accepts four parameters:
frame: The frame from your video file or directly from your webcamnet: The pre-initialized and pre-trained YOLO object detection modelln: The YOLO CNN output layer namespersonIdx: The YOLO model can detect many types of objects; this index is specifically for the person class, as we won’t be considering other objects
Line 10 grabs the frame dimensions for scaling purposes.
We then initialize our results list, which the function ultimately returns. The results consist of (1) the person prediction probability, (2) bounding box coordinates for the detection, and (3) the centroid of the object.
Given our frame, now it is time to perform inference with YOLO:
	# construct a blob from the input frame and then perform a forward
	# pass of the YOLO object detector, giving us our bounding boxes
	# and associated probabilities
	blob = cv2.dnn.blobFromImage(frame, 1 / 255.0, (416, 416),
		swapRB=True, crop=False)
	net.setInput(blob)
	layerOutputs = net.forward(ln)

	# initialize our lists of detected bounding boxes, centroids, and
	# confidences, respectively
	boxes = []
	centroids = []
	confidences = []
Pre-processing our frame requires that we construct a blob (Lines 16 and 17). From there, we are able to perform object detection with YOLO and OpenCV (Lines 18 and 19).
Lines 23-25 initialize lists that will soon hold our bounding boxes, object centroids, and object detection confidences.
Now that we’ve performed inference, let’s process the results:
	# loop over each of the layer outputs
	for output in layerOutputs:
		# loop over each of the detections
		for detection in output:
			# extract the class ID and confidence (i.e., probability)
			# of the current object detection
			scores = detection[5:]
			classID = np.argmax(scores)
			confidence = scores[classID]

			# filter detections by (1) ensuring that the object
			# detected was a person and (2) that the minimum
			# confidence is met
			if classID == personIdx and confidence > MIN_CONF:
				# scale the bounding box coordinates back relative to
				# the size of the image, keeping in mind that YOLO
				# actually returns the center (x, y)-coordinates of
				# the bounding box followed by the boxes' width and
				# height
				box = detection[0:4] * np.array([W, H, W, H])
				(centerX, centerY, width, height) = box.astype("int")

				# use the center (x, y)-coordinates to derive the top
				# and and left corner of the bounding box
				x = int(centerX - (width / 2))
				y = int(centerY - (height / 2))

				# update our list of bounding box coordinates,
				# centroids, and confidences
				boxes.append([x, y, int(width), int(height)])
				centroids.append((centerX, centerY))
				confidences.append(float(confidence))
Looping over each of the layerOutputs and detections (Lines 28-30), we first extract the classID and confidence (i.e., probability) of the current detected object (Lines 33-35).
From there, we verify that (1) the current detection is a person and (2) the minimum confidence is met or exceeded (Line 40).
Assuming so, we compute bounding box coordinates and then derive the center (i.e., centroid) of the bounding box (Lines 46 and 47). Notice how we scale (i.e., multiply) our detection by the frame dimensions we gathered earlier.
Using the bounding box coordinates, Lines 51 and 52 then derive the top-left coordinates for the object.
We then update each of our lists (boxes, centroids, and confidences) via Lines 56-58.
Next, we apply non-maxima suppression:
	# apply non-maxima suppression to suppress weak, overlapping
	# bounding boxes
	idxs = cv2.dnn.NMSBoxes(boxes, confidences, MIN_CONF, NMS_THRESH)

	# ensure at least one detection exists
	if len(idxs) > 0:
		# loop over the indexes we are keeping
		for i in idxs.flatten():
			# extract the bounding box coordinates
			(x, y) = (boxes[i][0], boxes[i][1])
			(w, h) = (boxes[i][2], boxes[i][3])

			# update our results list to consist of the person
			# prediction probability, bounding box coordinates,
			# and the centroid
			r = (confidences[i], (x, y, x + w, y + h), centroids[i])
			results.append(r)

	# return the list of results
	return results
The purpose of non-maxima suppression is to suppress weak, overlapping bounding boxes. Line 62 applies this method (it is built-in to OpenCV) and results in the idxs of the detections.
Assuming the result of NMS yields at least one detection (Line 65), we loop over them, extract bounding box coordinates, and update our results list consisting of the:
- Confidence of each person detection
- Bounding box of each person
- Centroid of each person
Finally, we return the results to the calling function.
Implementing a social distancing detector with OpenCV and deep learning
We are now ready to implement our social distancing detector with OpenCV.
Open up a new file, name it social_distance_detector.py, and insert the following code:
# import the necessary packages
from pyimagesearch import social_distancing_config as config
from pyimagesearch.detection import detect_people
from scipy.spatial import distance as dist
import numpy as np
import argparse
import imutils
import cv2
import os
The most notable imports on Lines 2-9 include our config, our detect_people function, and the Euclidean distance metric (shortened to dist and to be used to determine the distance between centroids).
With our imports taken care of, let’s handle our command line arguments:
# construct the argument parse and parse the arguments
ap = argparse.ArgumentParser()
ap.add_argument("-i", "--input", type=str, default="",
	help="path to (optional) input video file")
ap.add_argument("-o", "--output", type=str, default="",
	help="path to (optional) output video file")
ap.add_argument("-d", "--display", type=int, default=1,
	help="whether or not output frame should be displayed")
args = vars(ap.parse_args())
This script requires the following arguments to be passed via the command line/terminal:
--input: The path to the optional video file. If no video file path is provided, your computer’s first webcam will be used by default.--output--display0to process the stream in the background.
Now we have a handful of initializations to take care of:
# load the COCO class labels our YOLO model was trained on
labelsPath = os.path.sep.join([config.MODEL_PATH, "coco.names"])
LABELS = open(labelsPath).read().strip().split("\n")

# derive the paths to the YOLO weights and model configuration
weightsPath = os.path.sep.join([config.MODEL_PATH, "yolov3.weights"])
configPath = os.path.sep.join([config.MODEL_PATH, "yolov3.cfg"])
Here, we load our load COCO labels (Lines 22 and 23) as well as define our YOLO paths (Lines 26 and 27).
Using the YOLO paths, now we can load the model into memory:
# load our YOLO object detector trained on COCO dataset (80 classes)
print("[INFO] loading YOLO from disk...")
net = cv2.dnn.readNetFromDarknet(configPath, weightsPath)

# check if we are going to use GPU
if config.USE_GPU:
	# set CUDA as the preferable backend and target
	print("[INFO] setting preferable backend and target to CUDA...")
	net.setPreferableBackend(cv2.dnn.DNN_BACKEND_CUDA)
	net.setPreferableTarget(cv2.dnn.DNN_TARGET_CUDA)
Using OpenCV’s DNN module, we load our YOLO net into memory (Line 31). If you have the USE_GPU option set in the config, then the backend processor is set to be your NVIDIA CUDA-capable GPU. If you don’t have a CUDA-capable GPU, ensure that the configuration option is set to False so that your CPU is the processor used.
Next, we’ll perform three more initializations:
# determine only the *output* layer names that we need from YOLO
ln = net.getLayerNames()
ln = [ln[i[0] - 1] for i in net.getUnconnectedOutLayers()]

# initialize the video stream and pointer to output video file
print("[INFO] accessing video stream...")
vs = cv2.VideoCapture(args["input"] if args["input"] else 0)
writer = None
Here, Lines 41 and 42 gather the output layer names from YOLO; we’ll need them in order to process our results.
We then start our video stream (either a video file via the --input command line argument or a webcam stream) Line 46.
For now, we initialize our output video writer to None. Further setup occurs in the frame processing loop.
Finally, we’re ready to begin processing frames and determining if people are maintaining safe social distance:
# loop over the frames from the video stream
while True:
	# read the next frame from the file
	(grabbed, frame) = vs.read()

	# if the frame was not grabbed, then we have reached the end
	# of the stream
	if not grabbed:
		break

	# resize the frame and then detect people (and only people) in it
	frame = imutils.resize(frame, width=700)
	results = detect_people(frame, net, ln,
		personIdx=LABELS.index("person"))

	# initialize the set of indexes that violate the minimum social
	# distance
	violate = set()
Lines 50-52 begins a loop over frames from our video stream.
The dimensions of our input video for testing are quite large, so we resize each frame while maintaining aspect ratio (Line 60).
Using our detect_people function implemented in the previous section, we grab results of YOLO object detection (Lines 61 and 62). If you need a refresher on the input parameters required or the format of the output results for the function call, be sure to refer to the listing in the previous section.
We then initialize our violate set on Line 66; this set maintains a listing of people who violate social distance regulations set forth by public health professionals.
We’re now ready to check the distances among the people in the frame:
	# ensure there are *at least* two people detections (required in
	# order to compute our pairwise distance maps)
	if len(results) >= 2:
		# extract all centroids from the results and compute the
		# Euclidean distances between all pairs of the centroids
		centroids = np.array([r[2] for r in results])
		D = dist.cdist(centroids, centroids, metric="euclidean")

		# loop over the upper triangular of the distance matrix
		for i in range(0, D.shape[0]):
			for j in range(i + 1, D.shape[1]):
				# check to see if the distance between any two
				# centroid pairs is less than the configured number
				# of pixels
				if D[i, j] < config.MIN_DISTANCE:
					# update our violation set with the indexes of
					# the centroid pairs
					violate.add(i)
					violate.add(j)
Assuming that at least two people were detected in the frame (Line 70), we proceed to:
- Compute the Euclidean distance between all pairs of centroids (Lines 73 and 74)
- Loop over the upper triangular of distance matrix (since the matrix is symmetrical) beginning on Lines 77 and 78
- Check to see if the distance violates our minimum social distance set forth by public health professionals (Line 82). If two people are too close, we add them to the
violateset
What fun would our app be if we couldn’t visualize results?
No fun at all, I say! So let’s annotate our frame with rectangles, circles, and text:
	# loop over the results
	for (i, (prob, bbox, centroid)) in enumerate(results):
		# extract the bounding box and centroid coordinates, then
		# initialize the color of the annotation
		(startX, startY, endX, endY) = bbox
		(cX, cY) = centroid
		color = (0, 255, 0)

		# if the index pair exists within the violation set, then
		# update the color
		if i in violate:
			color = (0, 0, 255)

		# draw (1) a bounding box around the person and (2) the
		# centroid coordinates of the person,
		cv2.rectangle(frame, (startX, startY), (endX, endY), color, 2)
		cv2.circle(frame, (cX, cY), 5, color, 1)

	# draw the total number of social distancing violations on the
	# output frame
	text = "Social Distancing Violations: {}".format(len(violate))
	cv2.putText(frame, text, (10, frame.shape[0] - 25),
		cv2.FONT_HERSHEY_SIMPLEX, 0.85, (0, 0, 255), 3)
Looping over the results on Line 89, we proceed to:
- Extract the bounding box and centroid coordinates (Lines 92 and 93)
- Initialize the color of the bounding box to green (Line 94)
- Check to see if the current index exists in our
violateset, and if so, update thecolorto red (Lines 98 and 99) - Draw both the bounding box of the person and their object centroid (Lines 103 and 104). Each is
color-coordinated, so we’ll see which people are too close. - Display information on the total number of social distancing violations (the length of our
violateset (Lines 108-110)
Let’s wrap up our OpenCV social distance detector:
	# check to see if the output frame should be displayed to our
	# screen
	if args["display"] > 0:
		# show the output frame
		cv2.imshow("Frame", frame)
		key = cv2.waitKey(1) & 0xFF

		# if the `q` key was pressed, break from the loop
		if key == ord("q"):
			break

	# if an output video file path has been supplied and the video
	# writer has not been initialized, do so now
	if args["output"] != "" and writer is None:
		# initialize our video writer
		fourcc = cv2.VideoWriter_fourcc(*"MJPG")
		writer = cv2.VideoWriter(args["output"], fourcc, 25,
			(frame.shape[1], frame.shape[0]), True)

	# if the video writer is not None, write the frame to the output
	# video file
	if writer is not None:
		writer.write(frame)
To close out, we:
- Display the frame to the screen if required (Lines 114-116) while waiting for the
q(quit) key to be pressed (Lines 117-121) - Initialize our video
writerif necessary (Lines 125-129) - Write the processed (annotated)
frameto disk (Lines 133 and 134)
OpenCV social distancing detector results
We are now ready to test our OpenCV social distancing detector.
Make sure you use the “Downloads” section of this tutorial to download the source code and example demo video.
From there, open up a terminal, and execute the following command:
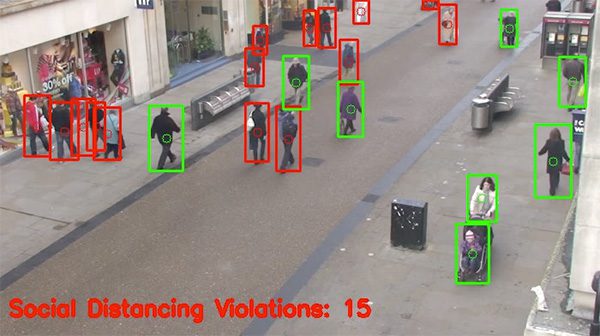
$ time python social_distance_detector.py --input pedestrians.mp4  \
	--output output.avi --display 0
[INFO] loading YOLO from disk...
[INFO] accessing video stream...

real    3m43.120s
user    23m20.616s
sys     0m25.824s
Here, you can see that I was able to process the entire video in 3m43s on my CPU, and as the results show, our social distancing detector is correctly marking people who violate social distancing rules.
The problem with this current implementation is speed. Our CPU-based social distancing detector is obtaining ~2.3 FPS, which is far too slow for real-time processing.
You can obtain a higher frame processing rate by (1) utilizing an NVIDIA CUDA-capable GPU and (2) compiling/installing OpenCV’s “dnn” module with NVIDIA GPU support.
Provided you already have OpenCV installed with NVIDIA GPU support, all you need to do is set USE_GPU = True in your social_distancing_config.py file:
# boolean indicating if NVIDIA CUDA GPU should be used
USE_GPU = True
Again, make sure USE_GPU = True if you wish to use your GPU.
From there, you can re-run the social_distance_detector.py script:
$ time python social_distance_detector.py --input pedestrians.mp4 \
	--output output.avi --display 0
[INFO] loading YOLO from disk...
[INFO] setting preferable backend and target to CUDA...
[INFO] accessing video stream...

real    0m56.008s
user    1m15.772s
sys     0m7.036s
Here, we processed the entire video in only 56 seconds, amounting to ~9.38 FPS, which is a 307% speedup!
Limitations and future improvements
As already mentioned earlier in this tutorial, our social distancing detector did not leverage a proper camera calibration, meaning that we could not (easily) map distances in pixels to actual measurable units (i.e., meters, feet, etc.).
Therefore, the first step to improving our social distancing detector is to utilize a proper camera calibration.
Doing so will yield better results and enable you to compute actual measurable units (rather than pixels).
Secondly, you should consider applying a top-down transformation of your viewing angle, as this implementation has done:
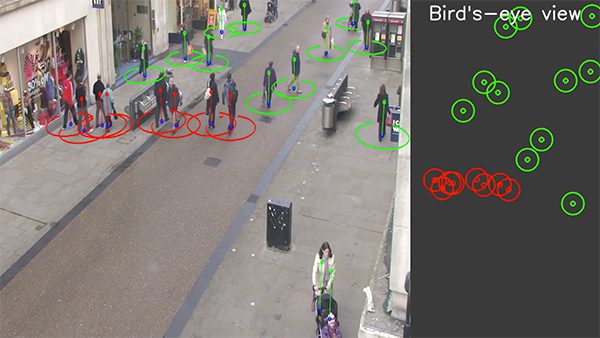
From there, you can apply the distance calculations to the top-down view of the pedestrians, leading to a better distance approximation.
My third recommendation is to improve the people detection process.
OpenCV’s YOLO implementation is quite slow not because of the model itself but because of the additional post-processing required by the model.
To further speedup the pipeline, consider utilizing a Single Shot Detector (SSD) running on your GPU — that will improve frame throughput rate considerably.
To wrap up, I’d like to mention that there are a number of social distancing detector implementations you’ll see online — the one I’ve covered here today should be considered a template and starting point that you can build off of.
If you would like to learn more about implementing social distancing detectors with computer vision, check out some of the following resources:
- Automatic social distance measurement
- Social distancing in the workplace
- Rohit Kumar Srivastava’s social distancing implementation
- Venkatagiri Ramesh’s social distancing project
- Mohan Morkel’s social distancing application (which I think may be based on Venkatagiri Ramesh’s)
If you have implemented your own OpenCV social distancing project and I have not linked to it, kindly accept my apologies — there are simply too many implementations for me to keep track of at this point.
What’s next?
This tutorial focused on a timely application of deep learning amid the worldwide COVID-19 emergency.
My hope is that you are inspired to pursue and solve complex project ideas of your own using artificial intelligence and computer vision.
But where should you begin?
If you don’t already know the fundamentals (let alone, advanced concepts) of deep learning, now would be a good time to learn them so that you can make your next app or service a reality.
To get a head start, you should read my book, Deep Learning for Computer Vision with Python.
Inside the book, you will learn:
- Deep learning fundamentals and theory without unnecessary mathematical fluff. I present the basic equations and back them up with code walkthroughs that you can implement and easily understand. You don’t need a degree in advanced mathematics to understand this book
- How to implement your own custom neural network architectures. Not only will you learn how to implement state-of-the-art architectures, including ResNet, SqueezeNet, etc., but you’ll also learn how to create your own custom CNNs
- How to train CNNs on your own datasets. Most deep learning tutorials don’t teach you how to work with your own custom datasets. Mine do. You’ll be training CNNs on your own datasets in no time
- Object detection (Faster R-CNNs, Single Shot Detectors, and RetinaNet) and instance segmentation (Mask R-CNN). Use these chapters to create your own custom object detectors and segmentation networks
If you’re interested in learning more, simply click the button below. I’m happy to send you the full table of contents and a few sample chapters so you can see if the book is for you.
Summary
In this tutorial, you learned how to implement a social distancing detector using OpenCV, computer vision, and deep learning.
Our implementation worked by:
- Using the YOLO object detector to detect people in a video stream
- Determining the centroids for each detected person
- Computing the pairwise distances between all centroids
- Checking to see if any pairwise distances were < N pixels apart, and if so, indicating that the pair of people violated social distancing rules
Furthermore, by using an NVIDIA CUDA-capable GPU, along with OpenCV’s dnn module compiled with NVIDIA GPU support, our method was able to run in real-time, making it usable as a proof-of-concept social distancing detector.
To download the source code to this post (and be notified when future tutorials are published here on PyImageSearch), simply enter your email address in the form below!

Download the Source Code and FREE 17-page Resource Guide
Enter your email address below to get a .zip of the code and a FREE 17-page Resource Guide on Computer Vision, OpenCV, and Deep Learning. Inside you’ll find my hand-picked tutorials, books, courses, and libraries to help you master CV and DL!
The post OpenCV Social Distancing Detector appeared first on PyImageSearch.