Image may be NSFW.
Clik here to view.
In this tutorial you’ll discover the difference between Keras and
tf.keras, including what’s new in TensorFlow 2.0.
Today’s tutorial is inspired from an email I received last Tuesday from PyImageSearch reader, Jeremiah.
Jeremiah asks:
Hi Adrian, I saw that TensorFlow 2.0 was released a few days ago.
TensorFlow developers seem to be promoting Keras, or rather, something called tf.keras, as the recommended high-level API for TensorFlow 2.0.
But I thought Keras was its own separate package?
I’m so confused on “which Keras package” I should be using when training my own networks.
Secondly, is TensorFlow 2.0 worth upgrading to?
I’ve seen a few tutorials in the deep learning blogosphere discussing TensorFlow 2.0 but with all the confusion regarding Keras,
tf.keras, and TensorFlow 2.0, I’m at a loss for where to start.Could you shed some light on this area?
Great questions, Jeremiah.
Just in case you didn’t hear, the long-awaited TensorFlow 2.0 was officially released on September 30th.
And while it’s certainly a time for celebration, many deep learning practitioners such as Jeremiah are scratching their heads:
- What does the TensorFlow 2.0 release mean for me as a Keras user?
- Am I supposed to use the
keras
package for training my own neural networks? - Or should I be using the
tf.keras
submodule inside TensorFlow 2.0 instead? - Are there TensorFlow 2.0 features that I should care about as a Keras user?
The transition from TensorFlow 1.x to TensorFlow 2.0 is going to be a bit of a rocky one, at least to start, but with the right understanding, you’ll be able to navigate the migration with ease.
Inside the rest of this tutorial, I’ll be discussing the similarities between Keras,
tf.keras, and the TensorFlow 2.0 release, including the features you should care about.
To learn the difference between Keras, tf.keras, and TensorFlow 2.0, just keep reading!
Keras vs. tf.keras: What’s the difference in TensorFlow 2.0?
In the first part of this tutorial, we’ll discuss the intertwined history between Keras and TensorFlow, including how their joint popularities fed each other, growing and nurturing each other, leading us to where we are today.
I’ll then discuss why you should be using
tf.kerasfor all your future deep learning projects and experiments.
Next, I’ll discuss the concept of a “computational backend” and how TensorFlow’s popularity enabled it to become Keras’ most prevalent backend, paving the way for Keras to be integrated into the
tf.kerassubmodule of TensorFlow.
Finally, we’ll discuss some of the most popular TensorFlow 2.0 features you should care about as a Keras user, including:
- Sessions and eager execution
- Automatic differentiation
- Model and layer subclassing
- Better multi-GPU/distributed training support
Included in TensorFlow 2.0 is a complete ecosystem comprised of TensorFlow Lite (for mobile and embedded devices) and TensorFlow Extended for development production machine learning pipelines (for deploying production models).
Let’s get started!
The intertwined relationship between Keras and TensorFlow
Clik here to view.
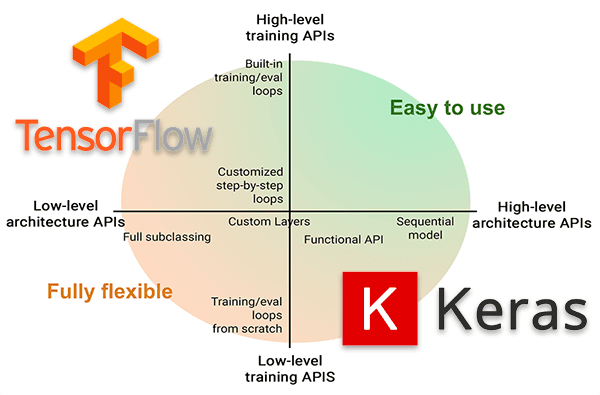
Figure 1: Keras and TensorFlow have a complicated history together. Read this section for the Cliff’s Notes of their love affair. With TensorFlow 2.0, you should be using tf.keras rather than the separate Keras package.
Understanding the complicated, intertwined relationship between Keras and TensorFlow is like listening to the love story of two high school sweethearts who start dating, break up, and eventually find their way together — it’s long, detailed, and at some points even contradictory.
Instead of recalling the full love story for you, instead we’ll review the CliffsNotes:
- Keras was originally created and developed by Google AI Developer/Researcher, Francois Chollet.
- Francois committed and released the first version of Keras to his GitHub on March 27th, 2015.
- Initially, Francois developed Keras to facilitate his own research and experiments.
- However, with the explosion of deep learning popularity, many developers, programmers, and machine learning practitioners flocked to Keras due to its easy-to-use API.
- Back then, there weren’t too many deep learning libraries available — the popular ones included Torch, Theano, and Caffe.
- The problem with these libraries was that it was like trying to write assembly/C++ to perform your experiments — tedious, time-consuming, and inefficient.
- Keras, on the other hand, was extremely easy to use, making it possible for researchers and developers to iterate on their experiments faster.
- In order to train your own custom neural networks, Keras required a backend.
- A backend is a computational engine — it builds the network graph/topology, runs the optimizers, and performs the actual number crunching.
- To understand the concept of a backend, consider building a website from scratch. Here you may use the PHP programming language and a SQL database. Your SQL database is your backend. You could use MySQL, PostgreSQL, or SQL Server as your database; however, your PHP code used to interact with the database will not change (provided you’re using some sort of MVC paradigm that abstracts the database layer, of course). Essentially, PHP doesn’t care what database is being used, as long as it plays with PHP’s rules.
- The same is true with Keras. You can think of the backend as your database and Keras as your programming language used to access the database. You can swap in whatever backend you like, and as long as it abides by certain rules, your code doesn’t have to change.
- Therefore, you can think of Keras as a set of abstractions that makes it easier to perform deep learning (side note: While Keras always enabled rapid prototyping, it was not flexible enough for researchers. That’s changing in TensorFlow 2.0 — more on that later in this article).
- Originally, Keras’ default backend was Theano and was the default until v1.1.0.
- At the same time, Google had released TensorFlow, a symbolic math library used for machine learning and training neural networks.
- Keras started supporting TensorFlow as a backend, and slowly but surely, TensorFlow became the most popular backend, resulting in TensorFlow being the default backend starting from the release of Keras v1.1.0.
- Once TensorFlow became the default backend for Keras, by definition, both TensorFlow and Keras usage grew together — you could not have Keras without TensorFlow, and if you installed Keras on your system, you were also installing TensorFlow.
- Similarly, TensorFlow users were becoming increasingly more drawn to the simplicity of the high-level Keras API.
- The
tf.keras
submodule was introduced in TensorFlow v1.10.0, the first step in integrating Keras directly within the TensorFlow package itself.- The
tf.keras
package is/was separate from thekeras
package you would install via pip (i.e.,pip install keras
). - The original
keras
package was not subsumed intotensorflow
to ensure compatibility and so that they could both organically develop.
- The
- However, that’s now changing — when Google announced TensorFlow 2.0 in June 2019, they declared that Keras is now the official high-level API of TensorFlow for quick and easy model design and training.
- With the release of Keras 2.3.0, Francois has stated that:
- This is the first release of Keras that brings the
keras
package in sync withtf.keras
- It is the final release of Keras that will support multiple backends (i.e., Theano, CNTK, etc.).
- And most importantly, going forward all deep learning practitioners should switch their code to TensorFlow 2.0 and the
tf.keras
package. - The original
keras
package will still receive bug fixes, but moving forward, you should be usingtf.keras
.
- This is the first release of Keras that brings the
As you can tell, the history between Keras and TensorFlow is long, complicated, and intertwined.
But the most important takeaway for you, as a Keras user, is that you should be using TensorFlow 2.0 and
tf.kerasfor future projects.
Start using tf.keras in all future projects
Clik here to view.
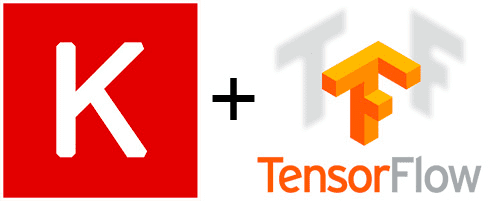
Figure 2: What’s the difference between Keras and tf.keras in TensorFlow 2.0?
On September 17th, 2019 Keras v2.3.0 was officially released — in the release Francois Chollet (the creator and chief maintainer of Keras), stated that:
Keras v2.3.0 is the first release of Keras that brings
kerasin sync withtf.kerasIt will be the the last major release to support backends other than TensorFlow (i.e., Theano, CNTK, etc.)
And most importantly, deep learning practitioners should start moving to TensorFlow 2.0 and the
tf.keraspackage
For the majority of your projects, that’s as simple as changing your
importlines from:
from keras... import ...
To prefacing the
importwith
tensorflow:
from tensorflow.keras... import ...
If you are using custom training loops or using
Sessionsthen you’ll have to update your code to use the new
GradientTapefeature, but overall, it’s fairly easy to update your code.
To help you in (automatically) updating your code from
kerasto
tf.keras, Google has released a script named
tf_upgrade_v2script, which, as the name suggests, analyzes your code and reports which lines need to be updated — the script can even perform the upgrade process for you.
You can refer here to learn more about automatically updating your code to TensorFlow 2.0.
Computational “backends” for Keras
Clik here to view.
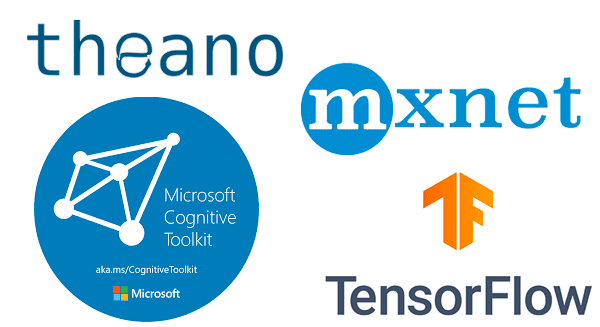
Figure 3: What computational backends does Keras support? What does it mean to use Keras directly in TensorFlow via tf.keras?
As I mentioned earlier in this post, Keras relies on the concept of a computational backend.
The computational backend performs all the “heavy lifting” in terms of constructing a graph of the model, numeric computation, etc.
Keras then sits on top of this computational engine as an abstraction, making it easier for deep learning developers/practitioners to implement and train their models.
Originally, Keras supported Theano as its preferred computational backend — it then later supported other backends, including CNTK and mxnet, to name a few.
However, the most popular backend, by far, was TensorFlow which eventually became the default computation backend for Keras.
As more and more TensorFlow users started using Keras for its easy to use high-level API, the more TensorFlow developers had to seriously consider subsuming the Keras project into a separate module in TensorFlow called
tf.keras.
TensorFlow v1.10 was the first release of TensorFlow to include a branch of
kerasinside
tf.keras.
Now that TensorFlow 2.0 is released both
kerasand
tf.kerasare in sync, implying that
kerasand
tf.kerasare still separate projects; however, developers should start using
tf.kerasmoving forward as the
keraspackage will only support bug fixes.
To quote Francois Chollet, the creator and maintainer of Keras:
This is also the last major release of multi-backend Keras. Going forward, we recommend that users consider switching their Keras code to
tf.kerasin TensorFlow 2.0.It implements the same Keras 2.3.0 API (so switching should be as easy as changing the Keras import statements), but it has many advantages for TensorFlow users, such as support for eager execution, distribution, TPU training, and generally far better integration between low-level TensorFlow and high-level concepts like
LayerandModel.It is also better maintained.
If you’re a both a Keras and TensorFlow user, you should consider switching your code over to TensorFlow 2.0 and
tf.keras.
Sessions and Eager Execution in TensorFlow 2.0
Clik here to view.
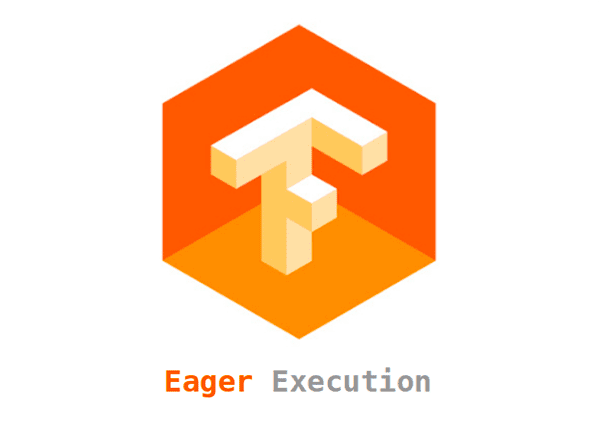
Figure 4: Eager execution is a more Pythonic way of working dynamic computational graphs. TensorFlow 2.0 supports eager execution (as does PyTorch). You can take advantage of eager execution and sessions with TensorFlow 2.0 and tf.keras. (image source)
TensorFlow 1.10+ users that utilize the Keras API within
tf.keraswill be familiar with creating a
Sessionto train their model:
with tf.Session() as session:
	session.run(tf.global_variables_initializer())
	session.run(tf.tables_initializer())
	model.fit(X_train, y_train, validation_data=(X_valid, y_valid),
		epochs=10, batch_size=64)
Creating the
Sessionobject and requiring the entire model graph to be built ahead of time was a bit of a pain, so TensorFlow 2.0 introduced the concept of Eager Execution, thereby simplifying the code to:
model.fit(X_train, y_train, validation_data=(X_valid, y_valid),
	epochs=10, batch_size=64)
The benefit of Eager Execution is that the entire model graph does not have to be built.
Instead, operations are evaluated immediately, making it easier to get started building your models (as well as debugging them).
For more details on Eager Execution, including how to use it with TensorFlow 2.0, refer to this article.
And if you want a comparison on Eager Execution vs. Sessions and the impact it has on the speed of training a model, refer to this page.
Automatic differentiation and GradientTape with TensorFlow 2.0
Clik here to view.
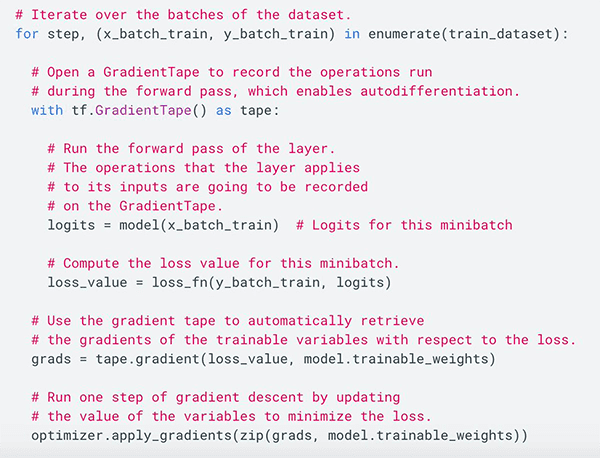
Figure 5: How is TensorFlow 2.0 better at handling custom layers or loss functions? The answer lies in automatic differentiation and GradientTape. (image source)
If you’re a researcher who needed to implement custom layers or loss functions, you likely didn’t like TensorFlow 1.x (and rightfully so).
TensorFlow 1.x’s custom implementations were clunky to say the least — a lot was left to be desired.
With the release of TensorFlow 2.0 that is starting to change — it’s now far easier to implement your own custom losses.
One way it’s becoming easier is through automatic differentiation and the
GradientTapeimplementation.
To utilize
GradientTapeall we need to do is implement our model architecture:
# Define our model architecture
model = tf.keras.Sequential([
    tf.keras.layers.Dropout(rate=0.2, input_shape=X.shape[1:]),
    tf.keras.layers.Dense(units=64, activation='relu'),
    tf.keras.layers.Dropout(rate=0.2),
    tf.keras.layers.Dense(units=1, activation='sigmoid')
])
Define our loss function and optimizer:
# Define loss and optimizer
loss_func = tf.keras.losses.BinaryCrossentropy()
optimizer = tf.keras.optimizers.Adam()
Create the function responsible for performing a single batch update:
def train_loop(features, labels):
    # Define the GradientTape context
    with tf.GradientTape() as tape:
        # Get the probabilities
        predictions = model(features)
        # Calculate the loss
        loss = loss_func(labels, predictions)
    # Get the gradients
    gradients = tape.gradient(loss, model.trainable_variables)
    # Update the weights
    optimizer.apply_gradients(zip(gradients, model.trainable_variables))
    return loss
And then train the model:
# Train the model
def train_model():
    start = time.time()
    for epoch in range(10):
        for step, (x, y) in enumerate(dataset):
            loss = train_loop(x, y)
            print('Epoch %d: last batch loss = %.4f' % (epoch, float(loss)))
    print("It took {} seconds".format(time.time() - start))

# Initiate training
train_model()
The
GradientTapemagic handles differentiation for us behind the scenes, making it far easier to work with custom losses and layers.
And speaking of custom layer and model implementations, be sure to refer to the next section.
Model and layer subclassing in TensorFlow 2.0
TensorFlow 2.0 and
tf.kerasprovide us with three separate methods to implement our own custom models:
- Sequential
- Function
- Subclassing
Both the sequential and functional paradigms have been inside Keras for quite a while, but the subclassing feature is still unknown to many deep learning practitioners.
I’ll be doing a dedicated tutorial on the three methods next week, but for the time being, let’s take a look at how to implement a simple CNN based on the seminal LeNet architecture using (1) TensorFlow 2.0, (2)
tf.keras, and (3) the model subclassing feature:
class LeNet(tf.keras.Model):
    def __init__(self):
        super(LeNet, self).__init__()
        self.conv2d_1 = tf.keras.layers.Conv2D(filters=6,
                           kernel_size=(3, 3), activation='relu',
                           input_shape=(32,32,1))
        self.average_pool = tf.keras.layers.AveragePooling2D()
        self.conv2d_2 = tf.keras.layers.Conv2D(filters=16,
                           kernel_size=(3, 3), activation='relu')
        self.flatten = tf.keras.layers.Flatten()
        self.fc_1 = tf.keras.layers.Dense(120, activation='relu')
        self.fc_2 = tf.keras.layers.Dense(84, activation='relu')
        self.out = tf.keras.layers.Dense(10, activation='softmax')

    def call(self, input):
        x = self.conv2d_1(input)
        x = self.average_pool(x)
        x = self.conv2d_2(x)
        x = self.average_pool(x)
        x = self.flatten(x)
        x = self.fc_2(self.fc_1(x))
        return self.out(x)

lenet = LeNet()
Notice how the
LeNetclass is a subclass of
Model.
The constructor (i.e., the
init) of
LeNetdefines each of the individual layers inside the model.
The
callmethod then performs the forward-pass, enabling you to customize the forward pass as you see fit.
The benefit of using model subclassing is that your model:
- Becomes fully-customizable.
- Enables you to implement and utilize your own custom loss implementations.
And since your architecture inherits the
Modelclass, you can still call methods like
.fit(),
.compile(), and
.evaluate(), thereby maintaining the easy-to-use (and familiar) Keras API.
If you’re interested in learning more about LeNet, you can refer to this previous article.
TensorFlow 2.0 introduces better multi-GPU and distributed training support
Clik here to view.
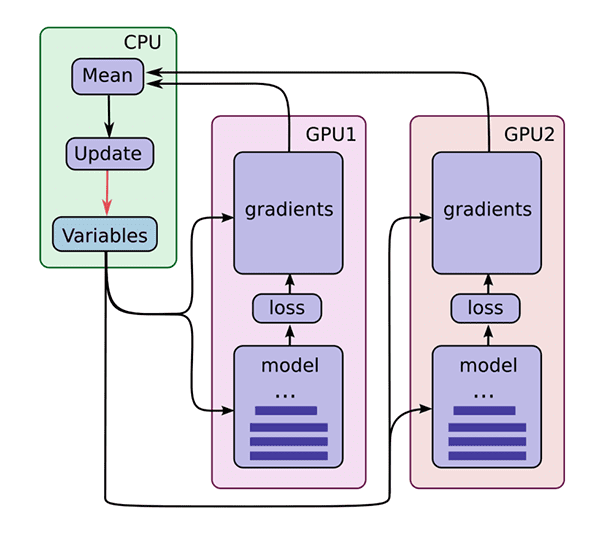
Figure 6: Is TenorFlow 2.0 better with multiple GPU training? Yes, with the single worker MirroredStrategy. (image source)
TensorFlow 2.0 and
tf.kerasprovide better multi-GPU and distributed training through their
MirroredStrategy.
To quote the TensorFlow 2.0 documentation, “The
MirroredStrategysupports synchronous distributed training on multiple GPUs on one machine”.
If you want to use multiple machines (each having potentially multiple GPUs), you should take a look at the MultiWorkerMirroredStrategy.
Or, if you are using Google’s cloud for training, check out the TPUStrategy.
For now though, let’s assume you are on a single machine that has multiple GPUs and you want to ensure all of your GPUs are used for training.
You can accomplish this by first creating your
MirroredStrategy:
strategy = tf.distribute.MirroredStrategy()
print ('Number of devices: {}'.format(strategy.num_replicas_in_sync))
You then need to declare your model architecture and compile it within the scope of the
strategy:
# Call the distribution scope context manager
with strategy.scope():
    # Define a model to fit the above data
    model = tf.keras.Sequential([
        tf.keras.layers.Dropout(rate=0.2, input_shape=X.shape[1:]),
        tf.keras.layers.Dense(units=64, activation='relu'),
        tf.keras.layers.Dropout(rate=0.2),
        tf.keras.layers.Dense(units=1, activation='sigmoid')
    ])

    # Compile the model
    model.compile(loss='binary_crossentropy',
                optimizer='adam',
                metrics=['accuracy'])
And from there you can call
.fitto train the model:
# Train the model
model.fit(X, y, epochs=5)
Provided your machine has multiple GPUs, TensorFlow will take care of the multi-GPU training for you.
TensorFlow 2.0 is an ecosystem, including TF 2.0, TF Lite, TFX, quantization, and deployment
Clik here to view.
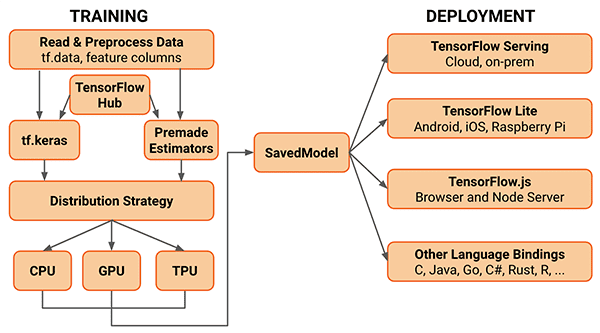
Figure 7: What is new in the TensorFlow 2.0 ecosystem? Should I use Keras separately or should I use tf.keras?
TensorFlow 2.0 is more than a computational engine and a deep learning library for training neural networks — it’s so much more.
With TensorFlow Lite (TF Lite) we can train, optimize, and quantize models that are designed to run on resource-constrained devices such as smartphones and other embedded devices (i.e., Raspberry Pi, Google Coral, etc.).
Or, if you need to deploy your model to production, you can use TensorFlow Extended (TFX), an end-to-end platform for model deployment.
Once your research and experiments are complete, you can leverage TFX to prepare the model for production and scale your model using Google’s ecosystem.
With TensorFlow 2.0 we are truly starting to see a better, more efficient bridge between research, experimentation, model preparation/quantization, and deployment to production.
I’m truly excited about the release of TensorFlow 2.0 and the impact it will have on the deep learning community.
Credits
All code examples from this post came from TensorFlow 2.0’s official examples. Be sure to refer to the complete code examples provided by Francois Chollet for more details.
Additionally, definitely check out Sayak Paul’s Ten Important Updates from TensorFlow 2.0 article which helped inspire today’s blog post.
Summary
In this tutorial, you learned about Keras,
tf.keras, and TensorFlow 2.0.
The first important takeaway is that deep learning practitioners using the
keraspackage should start using
tf.kerasinside TensorFlow 2.0.
Not only will you enjoy the added speed and optimization of TensorFlow 2.0, but you’ll also receive new feature updates — the latest release of the
keraspackage (v2.3.0) will be the last release to support multiple backends and feature updates. Moving forward, the
keraspackage will receive only bug fixes.
You should seriously consider moving to
tf.kerasand TensorFlow 2.0 in your future projects.
The second takeaway is that TensorFlow 2.0 is that it’s more than a GPU-accelerated deep learning library.
Not only do you have the ability to train your own models using TensorFlow 2.0 and
tf.keras, but you can now:
- Take those models and prepare them for mobile/embedded deployment using TensorFlow Lite (TF Lite).
- Deploy the models to production using TensorFlow Extended (TF Extended).
From my perspective, I’ve already started porting my original
kerascode to
tf.keras. I would suggest you start doing the same.
I hope you enjoyed today’s tutorial — I’ll be back with new TensorFlow 2.0 and
tf.kerastutorials soon.
To be notified when future tutorials are published here on PyImageSearch (and receive my free 17-page Resource Guide PDF on Computer Vision, Deep Learning, and OpenCV), just enter your email address in the form below!
The post Keras vs. tf.keras: What’s the difference in TensorFlow 2.0? appeared first on PyImageSearch.