In this tutorial you will learn the basics of augmented reality with OpenCV.
Augmented reality takes real-world environments and then enhances these environments through computer-generated procedures that perpetually enrich the environment. Typically, this is done using some combination of visual, auditory, and tactile/haptic interactions.
Since PyImageSearch is a computer vision blog, we’ll be primarily focusing on the vision side of augmented reality, and more specifically:
- Taking an input image
- Detecting markers/fiducials
- Seamlessly transforming new images into the scene
This tutorial focuses on the fundamentals of augmented reality with OpenCV. Next week I’ll show you how to perform real-time augmented reality with OpenCV.
To learn how to perform augmented reality with OpenCV, just keep reading.
OpenCV Augmented Reality (AR)
In the first part of this tutorial, we’ll briefly discuss what augmented reality is, including how OpenCV can help facilitate augmented reality.
From there we’ll configure our development environment for augmented reality and then review our directory structure for the project.
We’ll then implement a Python script to perform basic augmented reality with OpenCV.
The tutorial will wrap up with a discussion of our results.
What is augmented reality?

We used to see the world only through our five senses: sight, hearing, smell, taste, and touch.
That’s changing now.
Smartphones are transforming the world, both literally and figuratively, for three of those senses: sight, hearing, and touch. Perhaps one day augmented reality will be able to enhance smell and taste as well.
Augmented reality, as the name suggests, augments the real world around us with computer-generated perceptual information.
Perhaps the biggest augmented reality success story in recent years is the Pokemon Go app (Figure 2).
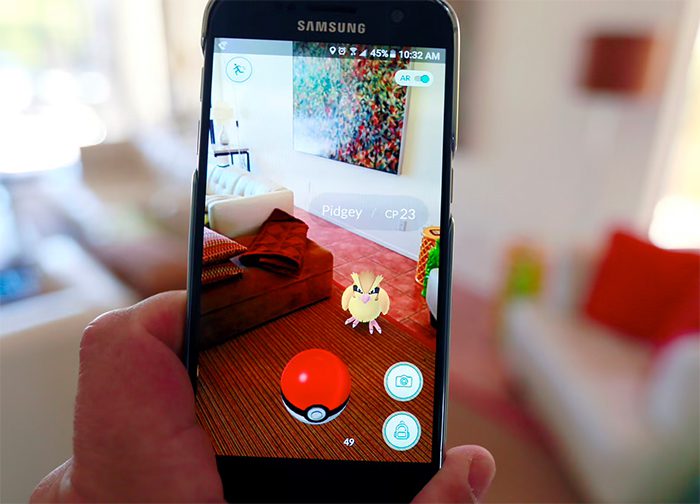
To play Pokemon Go, users open the app on their smartphone, which then accesses their camera. Players then observe the world through their camera, walking through real-world environments, including city streets, tranquil parks, and crowded bars and restaurants.
The Pokemon Go app places creatures (called Pokemon) inside this virtual world. Players then must capture these Pokemon and collect all of them.
Entire companies have been built surrounding augmented reality and virtual reality applications, including Oculus and MagicLeap.
While augmented reality (as we understand it today) has existed since the late 1980s/early 1990s, it’s still very much in its infancy.
We’ve made incredible strides in a short amount of time — and I believe the best is yet to come (and will likely be coming in the next 10-20 years).
But before we can start building state-of-the-art augmented reality applications, we first need to learn the fundamentals.
In this tutorial you will learn the basics of augmented reality with OpenCV.
Configuring your development environment
In order to learn the basics of augmented reality, you need to have the OpenCV library installed.
Luckily, OpenCV is pip-installable:
$ pip install opencv-contrib-python
If you need help configuring your development environment for OpenCV, I highly recommend that you read my pip install OpenCV guide — it will have you up and running in a matter of minutes.
Having problems configuring your development environment?
All that said, are you:
- Short on time?
- Learning on your employer’s administratively locked system?
- Wanting to skip the hassle of fighting with the command line, package managers, and virtual environments?
- Ready to run the code right now on your Windows, macOS, or Linux system?
Then join PyImageSearch Plus today!
Gain access to Jupyter Notebooks for this tutorial and other PyImageSearch guides that are pre-configured to run on Google Colab’s ecosystem right in your web browser! No installation required.
And best of all, these Jupyter Notebooks will run on Windows, macOS, and Linux!
Project structure
Before we can implement augmented reality with OpenCV, we first need to review our project directory structure.
Start by making sure you use the “Downloads” section of this tutorial to download the source code and example images.
$ tree . --dirsfirst
.
├── examples
│   ├── input_01.jpg
│   ├── input_02.jpg
│   └── input_03.jpg
├── sources
│   ├── antelope_canyon.jpg
│   ├── jp.jpg
│   └── squirrel.jpg
├── markers.pdf
└── opencv_ar_image.py

2 directories, 7 files
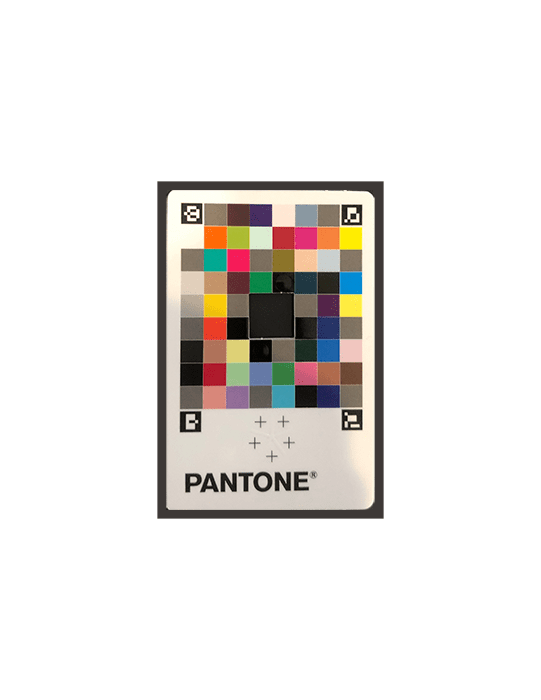
Inside the examples directory you will find a number of images containing a Pantone color match card with ArUco markers on it:
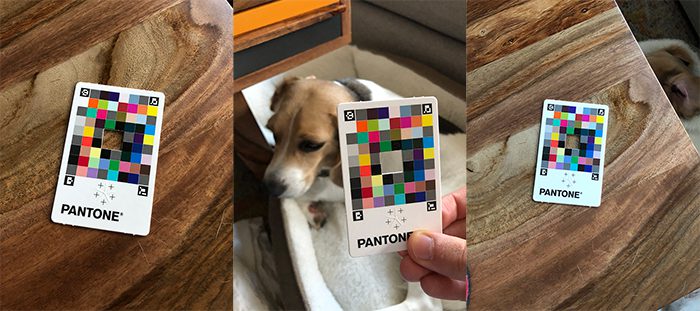
Just like we did in our series on ArUco markers, our goal is to detect each of the four ArUco tags, sort them in top-left, top-right, bottom-left, and bottom-right order, and then apply augmented reality by transforming a source image onto the card.
Speaking of source images, we have a total of three source images in our sources directory:
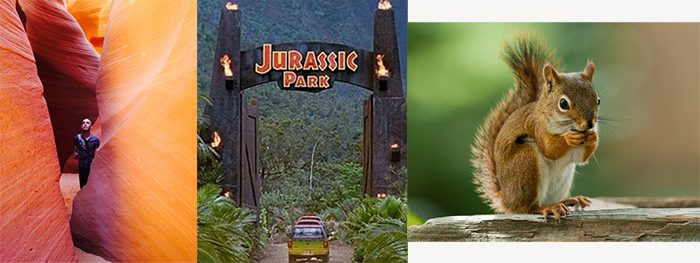
Once we’ve detected our surface, we’ll use OpenCV to transform each of these source images onto the card, resulting in an output similar to below:
Our opencv_ar_image.py
If you wish to purchase your own Pantone color correction card, you can do so on Pantone’s official website.
But if you don’t want to purchase one, don’t sweat, you can still follow along with this guide!
Inside our project directory structure, you’ll see that I’ve included markers.pdf
While it won’t help you perform color matching, you can still use it for the purposes of this example (i.e., detecting ArUco markers on it and then transforming the source image onto the input).
Simply print markers.pdf
With our directory structure reviewed, let’s move on to implementing augmented reality with OpenCV.
Implementing augmented reality with OpenCV
We are now ready to implement augmented reality with OpenCV!
Open up the opencv_ar_image.py
# import the necessary packages
import numpy as np
import argparse
import imutils
import sys
import cv2
Lines 2-6 handle importing our required Python packages. We’ll use NumPy for numerical processing, argparse for parsing command line arguments, and imutils for basic image operations (such as resizing).
The sys package will allow us to gracefully exit our script (in the event if/when we cannot find the Pantone card in the input image), while cv2
With our imports taken care of, let’s move on to our command line arguments:
# construct the argument parser and parse the arguments
ap = argparse.ArgumentParser()
ap.add_argument("-i", "--image", required=True,
	help="path to input image containing ArUCo tag")
ap.add_argument("-s", "--source", required=True,
	help="path to input source image that will be put on input")
args = vars(ap.parse_args())
We have two command line arguments here:
--image--source: The path to the source image that will be transformed onto the input image surface, thus creating our augmented reality output
Let’s load both of these images now:
# load the input image from disk, resize it, and grab its spatial
# dimensions
print("[INFO] loading input image and source image...")
image = cv2.imread(args["image"])
image = imutils.resize(image, width=600)
(imgH, imgW) = image.shape[:2]

# load the source image from disk
source = cv2.imread(args["source"])
Lines 19 and 20 load the input image from disk and resize it to have a width of 600px.
We grab the spatial dimensions (width and height) from the image after the resizing operation on Line 21. We’ll need these dimensions later in this script when we perform a perspective warp.
Line 24 then loads the original --source image from disk.
With our images loaded from disk, let’s move on to detecting ArUco markers in the input image:
# load the ArUCo dictionary, grab the ArUCo parameters, and detect
# the markers
print("[INFO] detecting markers...")
arucoDict = cv2.aruco.Dictionary_get(cv2.aruco.DICT_ARUCO_ORIGINAL)
arucoParams = cv2.aruco.DetectorParameters_create()
(corners, ids, rejected) = cv2.aruco.detectMarkers(image, arucoDict,
	parameters=arucoParams)

# if we have not found four markers in the input image then we cannot
# apply our augmented reality technique
if len(corners) != 4:
	print("[INFO] could not find 4 corners...exiting")
	sys.exit(0)
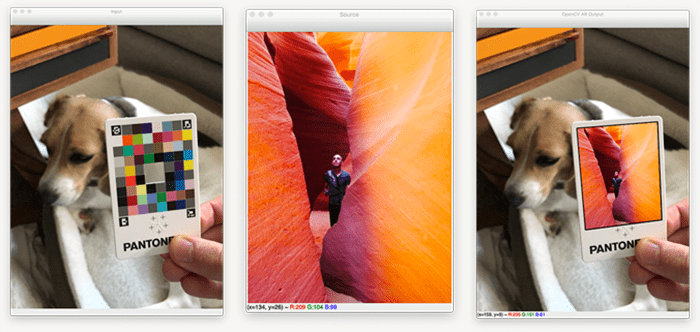
For reference, our input image looks like the following:
Our goal is to detect the four ArUco markers on the Pantone card. Once we have the card and its ArUco markers, we can take the source
The entire augmented reality process hinges on finding these ArUco markers first. If you haven’t yet, go back and read my previous tutorials on ArUco markers — those guides will help you get up to speed. From here on out I will assume you are comfortable with ArUco markers.
Lines 29-32 proceed to:
- Load our ArUco dictionary (from our previous set of tutorials on ArUco markers we know the Pantone card was generated using the
DICT_ARUCO_ORIGINAL - Initialize our ArUco detector parameters
- Detect the ArUco markers in the input
image
In the event that the four ArUco markers were not found, we gracefully exit the script (Lines 36-38). Again, our augmented reality process here depends on all four markers being successfully found.
Provided that our script is still executing, we can safely assume that all four ArUco markers were successfully detected.
From there, we can grab the IDs of the ArUco markers and initialize refPts
# otherwise, we've found the four ArUco markers, so we can continue
# by flattening the ArUco IDs list and initializing our list of
# reference points
print("[INFO] constructing augmented reality visualization...")
ids = ids.flatten()
refPts = []

# loop over the IDs of the ArUco markers in top-left, top-right,
# bottom-right, and bottom-left order
for i in (923, 1001, 241, 1007):
	# grab the index of the corner with the current ID and append the
	# corner (x, y)-coordinates to our list of reference points
	j = np.squeeze(np.where(ids == i))
	corner = np.squeeze(corners[j])
	refPts.append(corner)
On Line 49 we loop over our four ArUco marker IDs in the Pantone color image. These IDs were obtained using our ArUco marker detection blog post. If you are using your own ArUco marker IDs, you will need to update this list and insert the IDs.
Line 52 grabs the index, jcorner and add it to the refPts list (Lines 53 and 54).
We’re almost ready to perform our perspective warp!
The next step is to unpack our reference point coordinates:
# unpack our ArUco reference points and use the reference points to
# define the *destination* transform matrix, making sure the points
# are specified in top-left, top-right, bottom-right, and bottom-left
# order
(refPtTL, refPtTR, refPtBR, refPtBL) = refPts
dstMat = [refPtTL[0], refPtTR[1], refPtBR[2], refPtBL[3]]
dstMat = np.array(dstMat)

# grab the spatial dimensions of the source image and define the
# transform matrix for the *source* image in top-left, top-right,
# bottom-right, and bottom-left order
(srcH, srcW) = source.shape[:2]
srcMat = np.array([[0, 0], [srcW, 0], [srcW, srcH], [0, srcH]])

# compute the homography matrix and then warp the source image to the
# destination based on the homography
(H, _) = cv2.findHomography(srcMat, dstMat)
warped = cv2.warpPerspective(source, H, (imgW, imgH))
In order to perform augmented reality with OpenCV, we need to compute a homography matrix that is then used to perform a perspective warp.
However, in order to compute the homography, we need both a source matrix and destination matrix.
Lines 60-62 construct our destination matrix, dstMat
Next, we do the same for the source matrix (Lines 67 and 68), but as you can see, the process here is more simple. All we need to do is provide the (x, y)-coordinates of the top-left, top-right, bottom-right, and bottom-left coordinates of the sourcesource.
The next step is to take the source and destination matrices and use them to compute our homography matrix, H
The homography matrix tells OpenCV’s cv2.warpPerspective function how to take the source image and then warp it such that it can fit into the area provided in the destination matrix. This warping process takes place on Line 73, the output of which can be seen below:
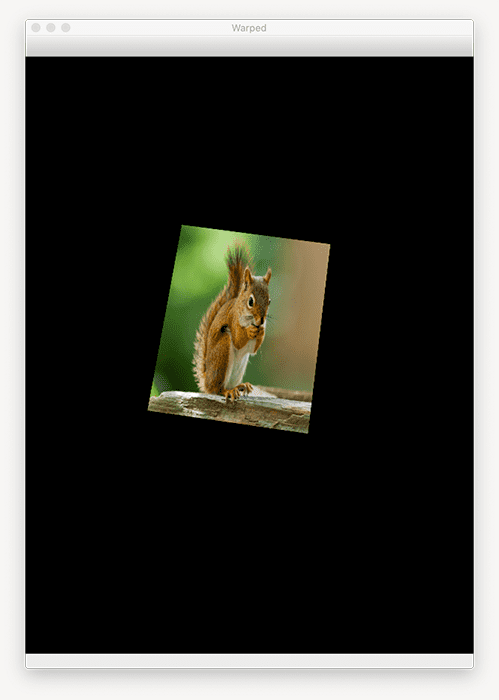
Notice how the input source has now been warped to the surface of the input image!
Now that we have our warped image, we need to overlay it on the original input image
# construct a mask for the source image now that the perspective warp
# has taken place (we'll need this mask to copy the source image into
# the destination)
mask = np.zeros((imgH, imgW), dtype="uint8")
cv2.fillConvexPoly(mask, dstMat.astype("int32"), (255, 255, 255),
	cv2.LINE_AA)

# this step is optional, but to give the source image a black border
# surrounding it when applied to the source image, you can apply a
# dilation operation
rect = cv2.getStructuringElement(cv2.MORPH_RECT, (3, 3))
mask = cv2.dilate(mask, rect, iterations=2)

# create a three channel version of the mask by stacking it depth-wise,
# such that we can copy the warped source image into the input image
maskScaled = mask.copy() / 255.0
maskScaled = np.dstack([maskScaled] * 3)

# copy the warped source image into the input image by (1) multiplying
# the warped image and masked together, (2) multiplying the original
# input image with the mask (giving more weight to the input where
# there *ARE NOT* masked pixels), and (3) adding the resulting
# multiplications together
warpedMultiplied = cv2.multiply(warped.astype("float"), maskScaled)
imageMultiplied = cv2.multiply(image.astype(float), 1.0 - maskScaled)
output = cv2.add(warpedMultiplied, imageMultiplied)
output = output.astype("uint8")
First, we create an empty mask with the same spatial dimensions as the input image (Line 78). We then fill the polygon area with white, implying that the area we just drew is foreground and the rest is background (Lines 79 and 80).
The output mask
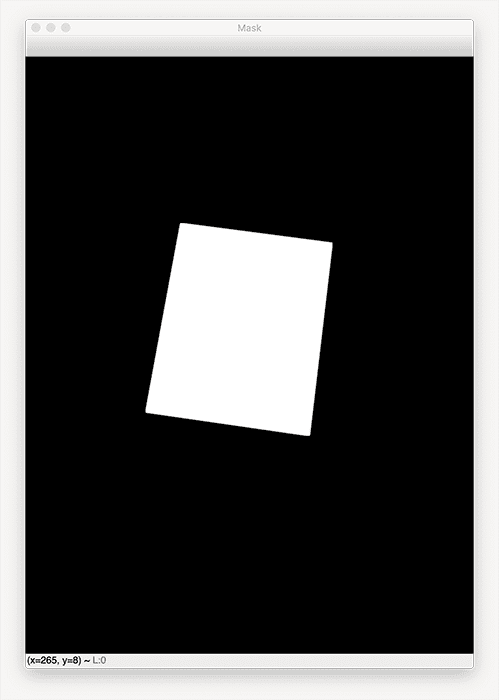
Lines 85 and 86 are optional, but I like to dilate the mask, thereby enlarging it slightly. Doing so creates a nice little black border surrounding the area where the warpedimage
Next, we take the mask, scale it from the range [0, 255] to [0, 1]. We then stack the mask depth-wise, creating a 3-channel representation of the mask. We perform this operation so we can copy the warped source image into the input image.
All that’s left now is to:
- Multiply the warped image and the masked together (Line 98)
- Multiply the original input image with the mask, giving more weight to the input areas where there are not masked pixels (Line 99)
- Add the resulting multiplications together to form our output augmented reality image (Line 100)
- Convert the
output
Finally, we can display the input image, source, and output to our screen:
# show the input image, source image, output of our augmented reality
cv2.imshow("Input", image)
cv2.imshow("Source", source)
cv2.imshow("OpenCV AR Output", output)
cv2.waitKey(0)
These three images will be displayed to our screen until a window opened by OpenCV is clicked on and a key on your keyboard is pressed.
OpenCV augmented reality results
We are now ready to perform augmented reality with OpenCV! Start by using the “Downloads” section of this tutorial to download the source code and example images.
From there, open up a terminal, and execute the following command:
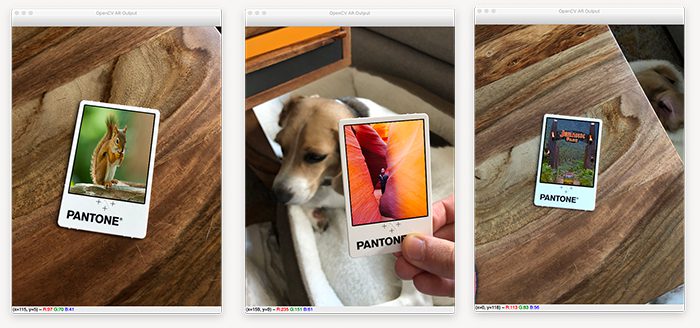
$ python opencv_ar_image.py --image examples/input_01.jpg \
	--source sources/squirrel.jpg
[INFO] loading input image and source image...
[INFO] detecting markers...
[INFO] constructing augmented reality visualization...
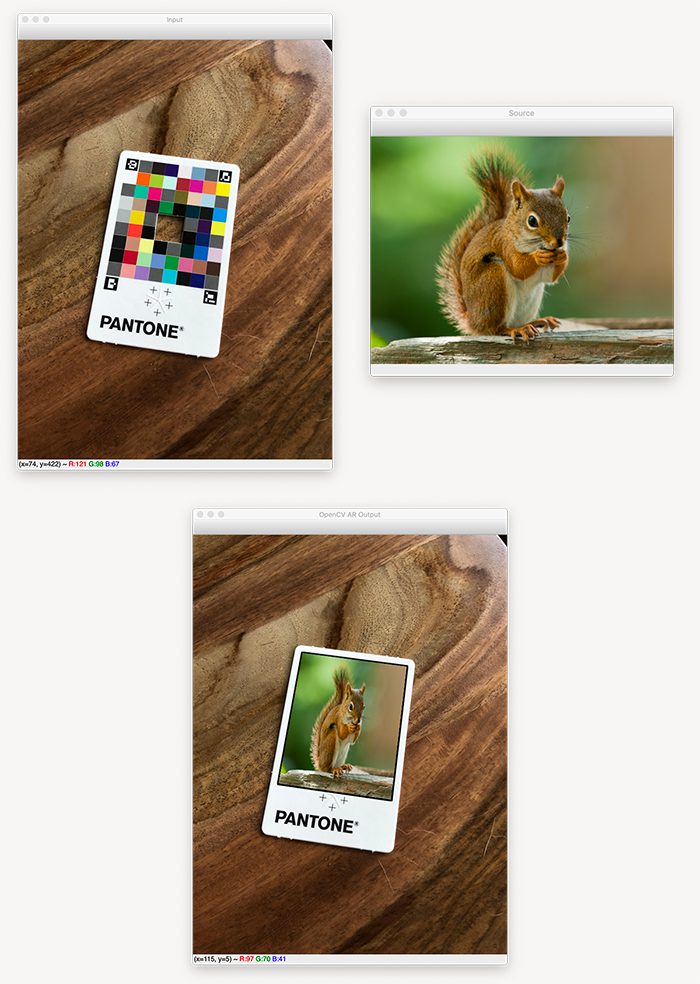
On the right you can see our source image of a squirrel. This source image will be transformed into the scene (via augmented reality) on the left.
The left image contains an input color correction card with ArUco markers (i.e., markers/fiducial tags) that our opencv_ar_image.py script detects.
Once the markers are found, we apply a transform that warps the source image into the input, thus generating the output (bottom).
Notice how the squirrel image has been transformed onto the color correction card itself, perfectly maintaining the aspect ratio, scale, viewing angle, etc. of the color correction card.
Let’s try another example, this one with difference source and input images:
$ python opencv_ar_image.py --image examples/input_02.jpg \
	--source sources/antelope_canyon.jpg
[INFO] loading input image and source image...
[INFO] detecting markers...
[INFO] constructing augmented reality visualization...

On the right (Figure 12) we have an example image from a few years back of myself exploring Antelope Canyon in Page, AZ.
The image on the left contains our input image, where our input source image will be applied to construct the augmented reality scene.
Our Python script is able to detect the four ArUco tag markers and then apply a transform, thus generating the image on the bottom.
Again, notice how the source image has been perfectly transformed to the input, maintaining the scale, aspect ratio, and most importantly, viewing angle, of the input image.
Let’s look at one final example:
$ python opencv_ar_image.py --image examples/input_03.jpg \
	--source sources/jp.jpg
[INFO] loading input image and source image...
[INFO] detecting markers...
[INFO] constructing augmented reality visualization...
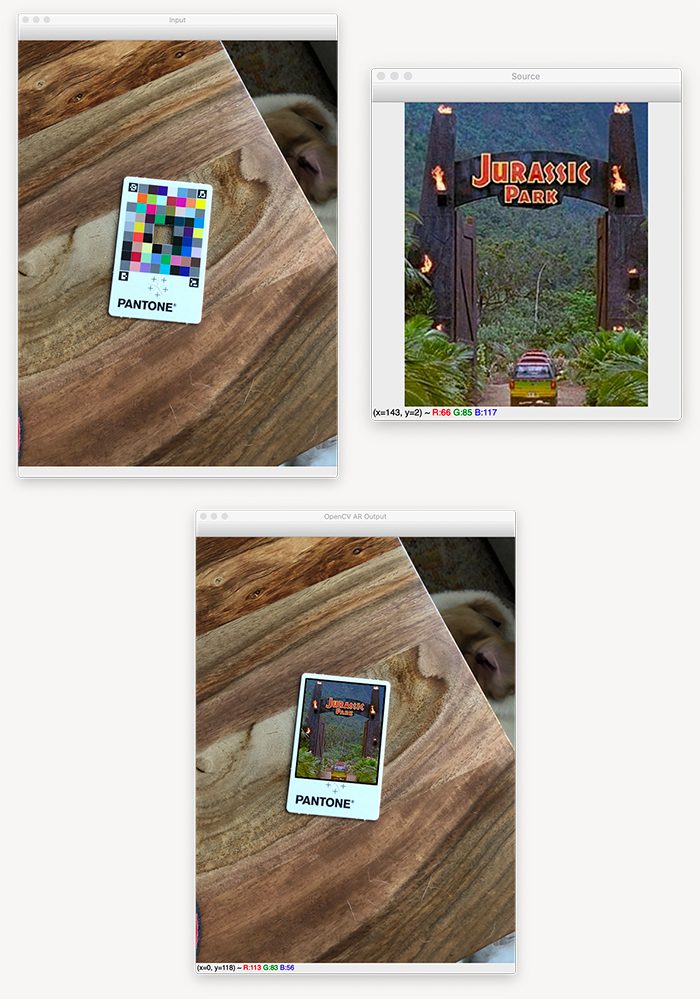
Figure 13 displays our results.
This time we have a source image of my favorite movie, Jurassic Park (right).
We then detect the AprilTag markers in the input image (left) and then apply a transform to construct our augmented reality image (bottom).
Next week you’ll learn how to perform this same technique, only in real time, thus creating a more seamless and thus more interesting and immersive augmented reality experience.
Credits
The code used to perform the perspective warp and masking was inspired by Satya Mallick’s implementation at LearnOpenCV. I took their implementation as a reference and then modified it to work for my example images along with providing additional details and commentary within the code and article. Check out Satya’s article if you feel so inclined.
What’s next?
If this blog post has piqued your interest in the fundamentals of AR with OpenCV, then now is the perfect time for you to start learning more about computer vision.
If you want to dive into AR, though, you’ll need to dig deep into the fundamentals first. And the best way to do that is to learn concepts and code through practical application and hands-on experience.
PyImageSearch Gurus is a highly actionable course that systematically takes you through everything you need to know.
It’s also an incredible community of students, developers, researchers, entrepreneurs, and hobbyists who are active participants in the most comprehensive computer vision course available online today.
I’ve pulled in content from my personal vault of code and years of experience and knowledge that will enable you to quickly get to grips with the fundamentals and learn other advanced computer vision techniques such as:
- Automatic License/Number Plate Recognition (ANPR)
- Face recognition
- Training your own custom object detector
- Deep learning and Convolutional Neural Networks
- Content-based Image Retrieval (CBIR)
- … and much more!
Inside PyImageSearch Gurus you’ll get:
- An actionable, real-world course on Computer Vision, Deep Learning, and OpenCV. Each lesson is delivered in the same hands-on, easy-to-understand style you expect from PyImageSearch.
- A community of like-minded developers, researchers, and students to learn from and collaborate with. PyImageSearch Gurus are just like you – eager to learn computer vision, level-up their skills, and work together on projects. I’m in there nearly every day answering questions too.
- The most comprehensive computer vision education online today. This is the course I wish I’d had in College when I was wading through all those research papers. You won’t find a more detailed or easy-to-apply online computer vision course. Guaranteed.
If you’re not quite ready to join the community yet, you can check out 10 free sample lessons and see what you think.
Also, take a look at what these PyImageSearch Gurus have been able to achieve, simply because they decided to invest in themselves and learn more about computer vision. You could be next!
Summary
In this tutorial you learned the basics of augmented reality using OpenCV.
However, to construct a true augmented reality experience, we need to create a more immersive environment, one that leverages real-time video streams.
And in fact, that’s exactly what we’ll be covering next week!
To download the source code to this post (and be notified when future tutorials are published here on PyImageSearch), simply enter your email address in the form below!

Download the Source Code and FREE 17-page Resource Guide
Enter your email address below to get a .zip of the code and a FREE 17-page Resource Guide on Computer Vision, OpenCV, and Deep Learning. Inside you'll find my hand-picked tutorials, books, courses, and libraries to help you master CV and DL!
The post OpenCV Augmented Reality (AR) appeared first on PyImageSearch.