In this tutorial you will learn how to detect low contrast images using OpenCV and scikit-image.
Whenever I teach the fundamentals of computer vision and image processing to students eager to learn, one of the first things I teach is:
“It’s far easier to write code for images captured in controlled lighting conditions than in dynamic conditions with no guarantees.”
If you are able to control the environment and, most importantly, the lighting when you capture an image, the easier it will be to write code to process the image.
With controlled lighting conditions you’re able to hard-code parameters, including:
- Amount of blurring
- Edge detection bounds
- Thresholding limits
- Etc.
Essentially, controlled conditions allow you to take advantage of your a priori knowledge of an environment and then write code that handles that specific environment rather than trying to handle every edge case or condition.
Of course, controlling your environment and lighting conditions isn’t always possible …
… so what do you do then?
Do you try to code a super complex image processing pipeline that handles every edge case?
Well … you could do that — and probably waste weeks or months doing it and still likely not capture every edge case.
Or, you can instead detect when low quality images, specifically low contrast images, are presented to your pipeline.
If a low contrast image is detected, you can throw the image out or alert the user to capture an image in better lighting conditions.
Doing so will make it far easier for you to develop image processing pipelines (and reduce your headaches along the way).
To learn how to detect low contrast images with OpenCV and scikit-image, just keep reading.
Detecting low contrast images with OpenCV, scikit-image, and Python
In the first part of this tutorial, we’ll discuss what low contrast images are, the problems they cause for computer vision/image processing practitioners, and how we can programmatically detect these images.
From there we’ll configure our development environment and review our project directory structure.
With our project structure reviewed, we’ll move on to coding two Python scripts:
- One to detect low contrast in static images
- And another to detect low contrast frames in real-time video streams
We’ll wrap up our tutorial with a discussion of our results.
What problems do low contrast images/frames create? And how can we detect them?

A low contrast image has very little difference between light and dark regions, making it hard to see where the boundary of an object begins and the background of the scene starts.
An example of a low contrast image is shown in Figure 1 (left). Here you can see a color matching/correction card on a background. Due to poor lighting conditions (i.e., not enough light), the boundaries of the card against the background are not well defined — by itself, an edge detection algorithm, such as the Canny edge detector, may struggle to detect the boundary of the card, especially if the Canny edge detector parameters are hard-coded.
Figure 1 (right) shows an example image of “normal contrast”. We have more detail in this image due to better lighting conditions. Notice that the white of the color matching card sufficiently contrasts the background — it would be far easier for an image processing pipeline to detect the edges of the color matching card (compared to the right image).
Whenever you’re tackling a computer vision or image processing problem, always start with the environment the image/frame is captured in. The more you can control and guarantee the lighting conditions, the easier a time you will have writing code to process the scene.
However, there will be times when you cannot control the lighting conditions and any parameters you hard-coded into your pipeline (ex., blur sizes, thresholding limits, Canny edge detection parameters, etc.) may result in incorrect/unusable output.
When that inevitably happens, don’t throw in the towel. And certainly don’t start going down the rabbit hole of coding up complex image processing pipelines to handle every edge case.
Instead, leverage low contrast image detection.
Using low contrast image detection, you can programmatically detect images that are not sufficient for your image processing pipeline.
In the remainder of this tutorial, you’ll learn how to detect low contrast images in both static scenes and real-time video streams.
We’ll throw out images/frames that are low contrast and not suitable for our pipeline, while keeping only the ones that we know will produce usable results.
By the end of this guide, you’ll have a good understanding of low contrast image detection, and you’ll be able to apply it to your own projects, thereby making your own pipelines easier to develop and more stable in production.
Configuring your development environment
In order to detect low contrast images, you need to have the OpenCV library as well as scikit-image installed.
Luckily, both of these are pip-installable:
$ pip install opencv-contrib-python
$ pip install scikit-image
If you need help configuring your development environment for OpenCV and scikit-image, I highly recommend that you read my pip install OpenCV guide — it will have you up and running in a matter of minutes.
Having problems configuring your development environment?

All that said, are you:
- Short on time?
- Learning on your employer’s administratively locked system?
- Wanting to skip the hassle of fighting with the command line, package managers, and virtual environments?
- Ready to run the code right now on your Windows, macOS, or Linux system?
Then join PyImageSearch Plus today!
Gain access to Jupyter Notebooks for this tutorial and other PyImageSearch guides that are pre-configured to run on Google Colab’s ecosystem right in your web browser! No installation required.
And best of all, these Jupyter Notebooks will run on Windows, macOS, and Linux!
Project structure
Before we get too far in this guide, let’s take a second to inspect our project directory structure.
Start by using the “Downloads” section of this tutorial to download the source code, example images, and sample video:
$ tree . --dirsfirst
.
├── examples
│   ├── 01.jpg
│   ├── 02.jpg
│   └── 03.jpg
├── detect_low_contrast_image.py
├── detect_low_contrast_video.py
└── example_video.mp4

1 directory, 6 files
We have two Python scripts to review today:
detect_low_contrast_image.py: Performs low contrast detection in static images (i.e., images inside theexamplesdirectory)detect_low_contrast_video.py: Applies low contrast detection to real-time video streams (in this case,example_video.mp4)
You can of course substitute in your own images and video files/streams as you see fit.
Implementing low contrast image detection with OpenCV
Let’s learn how to detect low contrast images with OpenCV and scikit-image!
Open up the detect_low_contrast_image.py file in your project directory structure, and insert the following code.
# import the necessary packages
from skimage.exposure import is_low_contrast
from imutils.paths import list_images
import argparse
import imutils
import cv2
We start off on Lines 2-6 importing our required Python packages.
Take special note of the is_low_contrast import from the scikit-image library. This function is used to detect low contrast images by examining an image’s histogram and then determining if the range of brightness spans less than a fractional amount of the full range.
We’ll see how to use the is_low_contrast function later in this example.
We then import list_images to grab the paths to our images in the examplesargparse for command line arguments, imutils for image processing routines, and cv2 for our OpenCV bindings.
Let’s move on to parsing our command line arguments:
# construct the argument parser and parse the arguments
ap = argparse.ArgumentParser()
ap.add_argument("-i", "--input", required=True,
	help="path to input directory of images")
ap.add_argument("-t", "--thresh", type=float, default=0.35,
	help="threshold for low contrast")
args = vars(ap.parse_args())
We have two command line arguments, the first of which is required and the second optional:
--input: Path to our input image residing on disk--thresh
I’ve set the --thresh parameter to a default of 0.35, implying that an image will be considered low contrast “when the range of brightness spans less than this fraction of its data type’s full range” (official scikit-image documentation).
Essentially, what this means is that if less than 35% of the range of brightness occupies the full range of the data type, then the image is considered low contrast.
To make this a concrete example, consider that an image in OpenCV is represented by an unsigned 8-bit integer that has a range of values [0, 255]. If the distribution of pixel intensities occupies less than 35% of this [0, 255] range, then the image is considered low contrast.
You can of course tune the --thresh parameter to whatever percentage you deem fitting for your application, but I’ve found that 35% is a good starting point.
Moving on, let’s grab the image paths from our --input directory:
# grab the paths to the input images
imagePaths = sorted(list(list_images(args["input"])))

# loop over the image paths
for (i, imagePath) in enumerate(imagePaths):
	# load the input image from disk, resize it, and convert it to
	# grayscale
	print("[INFO] processing image {}/{}".format(i + 1,
		len(imagePaths)))
	image = cv2.imread(imagePath)
	image = imutils.resize(image, width=450)
	gray = cv2.cvtColor(image, cv2.COLOR_BGR2GRAY)

	# blur the image slightly and perform edge detection
	blurred = cv2.GaussianBlur(gray, (5, 5), 0)
	edged = cv2.Canny(blurred, 30, 150)

	# initialize the text and color to indicate that the input image
	# is *not* low contrast
	text = "Low contrast: No"
	color = (0, 255, 0)
Line 17 grabs the paths to our images in the examples directory. We then loop over each of these individual imagePaths on Line 20.
For each imagePath we proceed to:
- Load the
imagefrom disk - Resize it to have a width of 450 pixels
- Convert the image to grayscale
From there we apply blurring (to reduce high frequency noise) and then apply the Canny edge detector (Lines 30 and 31) to detect edges in the input image.
Lines 35 and 36 make the assumption that the image is not low contrast, setting the text and color.
The following code block handles the if/else condition if a low contrast image is detected:
	# check to see if the image is low contrast
	if is_low_contrast(gray, fraction_threshold=args["thresh"]):
		# update the text and color
		text = "Low contrast: Yes"
		color = (0, 0, 255)

	# otherwise, the image is *not* low contrast, so we can continue
	# processing it
	else:
		# find contours in the edge map and find the largest one,
		# which we'll assume is the outline of our color correction
		# card
		cnts = cv2.findContours(edged.copy(), cv2.RETR_EXTERNAL,
			cv2.CHAIN_APPROX_SIMPLE)
		cnts = imutils.grab_contours(cnts)
		c = max(cnts, key=cv2.contourArea)

		# draw the largest contour on the image
		cv2.drawContours(image, [c], -1, (0, 255, 0), 2)

	# draw the text on the output image
	cv2.putText(image, text, (5, 25), cv2.FONT_HERSHEY_SIMPLEX, 0.8,
		color, 2)

	# show the output image and edge map
	cv2.imshow("Image", image)
	cv2.imshow("Edge", edged)
	cv2.waitKey(0)
Line 39 makes a call to scikit-image’s is_low_contrast function to detect whether our gray image is low contrast or not. Note how we are passing in the fraction_threshold, which is our --thresh command line argument.
If the image is indeed low contrast, then we update our text and color variables (Lines 41 and 42).
Otherwise, the image is not low contrast, so we can proceed with our image processing pipeline (Lines 46-56). Inside this code block we:
- Find contours in our edge map
- Find the largest contour in our
cntslist (which we assume will be our card in the input image) - Draw the outline of the card on the image
Finally, we draw the text on the image and display both the image and edge map to our screen.
Low contrast image detection results
Let’s now apply low contrast image detection to our own images!
Start by using the “Downloads” section of this tutorial to download the the source code and example images:
$ python detect_low_contrast_image.py --input examples
[INFO] processing image 1/3
[INFO] processing image 2/3
[INFO] processing image 3/3
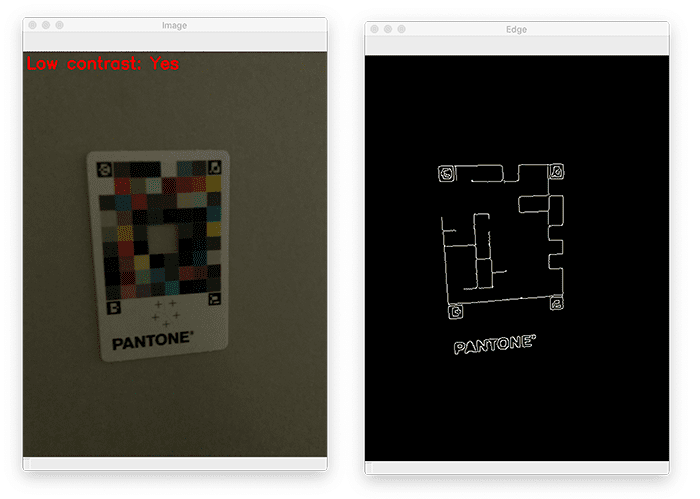
Our first image here is labeled as “low contrast”. As you can see, applying the Canny edge detector to the low contrast image results in us being unable to detect the outline of the card in the image.
If we tried to process this image further and detected the card itself, we would end up detecting some other contour. Instead, by applying low contrast detection, we can simply ignore the image.
Our second image has sufficient contrast, and as such, we are able to accurately compute the edge map and extract the contour associated with the card outline:
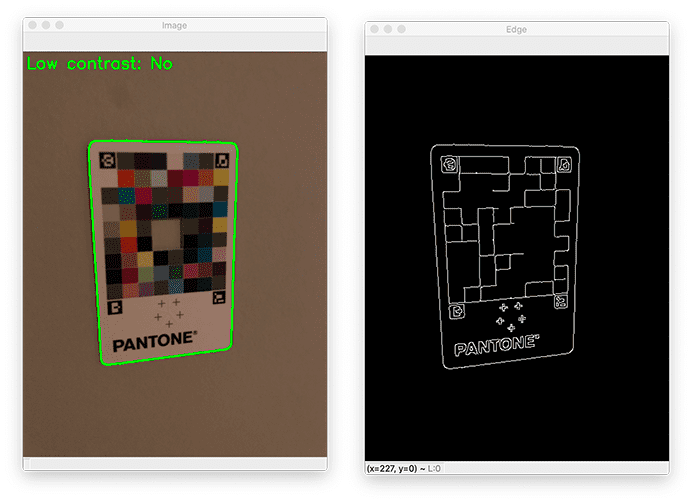
Our final image is also labeled as having sufficient contrast:

We are again able to compute the edge map, perform contour detection, and extract the contour associated with the outline of the card.
Implementing low contrast frame detection in real-time video streams
In this section you will learn how to implement low contrast frame detection in real-time video streams using OpenCV and Python.
Open up the detect_low_contrast_video.py file in your project directory structure, and let’s get to work:
# import the necessary packages
from skimage.exposure import is_low_contrast
import numpy as np
import argparse
import imutils
import cv2
Our import statements here are near identical to our previous script. Note that again we are using scikit-image’s is_low_contrast function to detect low contrast frames.
We then have our command line arguments, both of which are optional:
# construct the argument parser and parse the arguments
ap = argparse.ArgumentParser()
ap.add_argument("-i", "--input", type=str, default="",
	help="optional path to video file")
ap.add_argument("-t", "--thresh", type=float, default=0.35,
	help="threshold for low contrast")
args = vars(ap.parse_args())
The --input switch points to a (optional) video file on disk. By default this script will access your webcam, but if you want to supply a video file, you can do so here.
The --thresh parameter is identical to that of our previous script. This argument controls the fraction_threshold parameter to the is_low_contrast function. Refer to the “Implementing low contrast image detection with OpenCV” for a detailed description of this parameter.
Let’s now access our video stream:
# grab a pointer to the input video stream
print("[INFO] accessing video stream...")
vs = cv2.VideoCapture(args["input"] if args["input"] else 0)

# loop over frames from the video stream
while True:
	# read a frame from the video stream
	(grabbed, frame) = vs.read()

	# if the frame was not grabbed then we've reached the end of
	# the video stream so exit the script
	if not grabbed:
		print("[INFO] no frame read from stream - exiting")
		break

	# resize the frame, convert it to grayscale, blur it, and then
	# perform edge detection
	frame = imutils.resize(frame, width=450)
	gray = cv2.cvtColor(frame, cv2.COLOR_BGR2GRAY)
	blurred = cv2.GaussianBlur(gray, (5, 5), 0)
	edged = cv2.Canny(blurred, 30, 150)

	# initialize the text and color to indicate that the current
	# frame is *not* low contrast
	text = "Low contrast: No"
	color = (0, 255, 0)
Line 18 instantiates a point to our video stream. By default we’ll use our webcam; however, if you are a video file, you can supply the --input command line argument.
We then loop over frames from the video stream on Line 21. Inside the loop we:
- Read the next
frame - Detect whether we’ve reached the end of the video stream, and if so,
breakfrom the loop - Preprocess the frame by converting it to grayscale, blurring it, and applying the Canny edge detector
We also initialize our text and color variables with the assumption that the image is not low contrast.
Our next code block is essentially identical to our previous script:
	# check to see if the frame is low contrast, and if so, update
	# the text and color
	if is_low_contrast(gray, fraction_threshold=args["thresh"]):
		text = "Low contrast: Yes"
		color = (0, 0, 255)

	# otherwise, the frame is *not* low contrast, so we can continue
	# processing it
	else:
		# find contours in the edge map and find the largest one,
		# which we'll assume is the outline of our color correction
		# card
		cnts = cv2.findContours(edged.copy(), cv2.RETR_EXTERNAL,
			cv2.CHAIN_APPROX_SIMPLE)
		cnts = imutils.grab_contours(cnts)
		c = max(cnts, key=cv2.contourArea)

		# draw the largest contour on the frame
		cv2.drawContours(frame, [c], -1, (0, 255, 0), 2)
Lines 45-47 check to see if the image is low contrast, and if so, we update our text and color variables.
Otherwise, we proceed to:
- Detect contours
- Find the largest contour
- Draw the largest contour on the
frame
Our final code block draws the text on the output frame:
	# draw the text on the output frame
	cv2.putText(frame, text, (5, 25), cv2.FONT_HERSHEY_SIMPLEX, 0.8,
		color, 2)

	# stack the output frame and edge map next to each other
	output = np.dstack([edged] * 3)
	output = np.hstack([frame, output])

	# show the output to our screen
	cv2.imshow("Output", output)
	key = cv2.waitKey(1) & 0xFF

	# if the `q` key was pressed, break from the loop
	if key == ord("q"):
		break
We also stack the edge map and frame side-by-side so we can more easily visualize the output.
The output frame is then displayed to our screen.
Detecting low contrast frames in real-time
We are now ready to detect low contrast images in real-time video streams!
Use the “Downloads” section of this tutorial to download the source code, example images, and sample video file.
From there, open up a terminal, and execute the following command:
$ python detect_low_contrast_video.py --input example_video.mp4
[INFO] accessing video stream...
[INFO] no frame read from stream - exiting
As our output shows, our low contrast frame detector is able to detect frames with low contrast and prevent them from proceeding down the rest of our image processing pipeline.
Conversely, images with sufficient contrast are allowed to proceed. We then apply edge detection to each of these frames, compute contours, and extract the contour/outline associated with the color correction card.
You can use low contrast detection in video streams in the same manner.
What’s next?
Now that you know how to detect low contrast images using OpenCV and scikit-image, it’ll be much easier for you to develop effective image processing pipelines. And you can go deeper into the world of computer vision and add even more advanced techniques to your arsenal.
Inside the PyImageSearch Gurus course you’ll learn:
- Automatic License/Number Plate Recognition (ANPR)
- Face recognition
- Training your own custom object detector
- Deep learning and Convolutional Neural Networks
- Content-based Image Retrieval (CBIR)
- … and much more!
PyImageSearch Gurus is different from other computer vision courses because it is:
- Highly actionable. You’ll learn concepts and code through practical application and hands-on experience. And it’s all delivered in the same easy-to-understand style you’ve already experienced in the PyImageSearch blog. No unnecessary mathematical fluff. Just actionable content.
- Comprehensive. In fact, I guarantee you won’t find a more detailed computer vision course online. You get access to the best content from my personal vault of code and years of experience. So you’ll be able to take what you learn and put it into practice immediately.
- Collaborative. The PyImageSearch Gurus is a community of like-minded developers, researchers, and students who are eager to level-up their computer vision skills and collaborate on projects – just like you. The forums are also a great place to get expert advice from me and the more experienced students.
Interested to find out more? Grab the syllabus and 10 free sample lessons here.
And be sure to check out what these Gurus students did with the knowledge they gained in the program. Soon you could be enjoying similar success!
If you’re ready to take action and level-up your computer vision skills, join us inside PyImageSearch Gurus.
Summary
In this tutorial you learned how to detect low contrast images in both static scenes and real-time video streams. We used both the OpenCV library and the scikit-image package to develop our low contrast image detector.
While simple, this method can be extremely effective when used in computer vision and image processing pipelines.
One of the easiest ways to use this method is to provide feedback to your user. If a user provides your application with a low contrast image, alert them and request that they provide a higher-quality image.
Taking this approach allows you to place “guarantees” on the environment used to capture images that are ultimately presented to your pipeline. Furthermore, it helps the user understand that your application can only be used in certain scenarios and it’s on them to ensure they conform to your standards.
The gist here is to not overcomplicate your image processing pipelines. It’s far easier to write OpenCV code when you can place guarantees on the lighting conditions and environment — try to enforce these standards any way you can.
To download the source code to this post (and be notified when future tutorials are published here on PyImageSearch), simply enter your email address in the form below!

Download the Source Code and FREE 17-page Resource Guide
Enter your email address below to get a .zip of the code and a FREE 17-page Resource Guide on Computer Vision, OpenCV, and Deep Learning. Inside you'll find my hand-picked tutorials, books, courses, and libraries to help you master CV and DL!
The post Detecting low contrast images with OpenCV, scikit-image, and Python appeared first on PyImageSearch.