In this tutorial, you will learn how to resize an image using OpenCV and the cv2.resize function.
Scaling, or simply resizing, is the process of increasing or decreasing the size of an image in terms of width and height.
When resizing an image, it’s important to keep in mind the aspect ratio — which is the ratio of an image’s width to its height. Ignoring the aspect ratio can lead to resized images that look compressed and distorted:
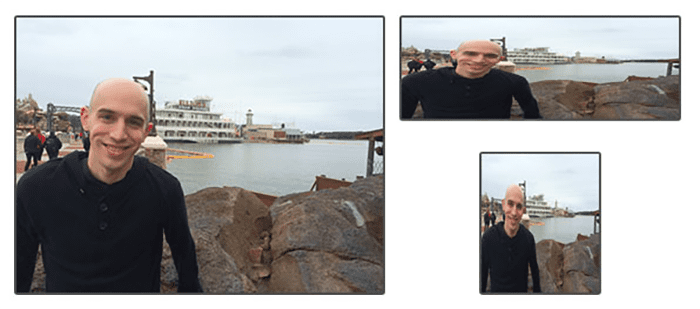
On the left, we have our original image. And on the right, we have two images that have been distorted by not preserving the aspect ratio. They have been resized by ignoring the ratio of the width to the height of the image.
In general, you’ll want to preserve the images’ aspect ratio when resizing — especially if these images are presented as output to the user. Exceptions most certainly do apply, though. As we explore machine learning/deep learning techniques, we’ll find that our internal algorithms often ignore the aspect ratio of an image; but more on that once we understand the fundamentals of computer vision.
We also need to keep in mind the interpolation method of our resizing function. The formal definition of interpolation is:
A method of constructing new data points within the range of a discrete set of known data points.
— Interpolation, Wikipedia
In this case, the “known points” are the pixels of our original image. And the goal of an interpolation function is to take these neighborhoods of pixels and use them to either increase or decrease the size of the image.
In general, it’s far more beneficial (and visually appealing) to decrease the size of the image. This is because the interpolation function simply has to remove pixels from an image. On the other hand, if we were to increase the size of the image, the interpolation function would have to “fill in the gaps” between pixels that previously did not exist.
For example, take a look at the image in Figure 2:
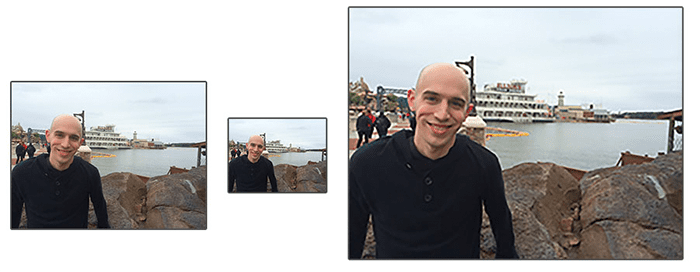
On the left, we have our original image. In the middle, we have resized the image to half its size — and other than the image being resized, there is no loss in image “quality.” However, on the right, we have dramatically increased the image size. It now looks “pixelated” and “blown up.”
As I mentioned above, you’ll generally be decreasing the size of an image rather than increasing (exceptions do apply, of course). By decreasing the image size, we have fewer pixels to process (not to mention less “noise” to deal with), which leads to faster and more accurate image processing algorithms.
Keep in mind that while high-resolution images are visually appealing to the human eyes, they harm computer vision and image processing pipelines:
- By definition, the larger the image, the more the data, and therefore the longer it takes for algorithms to process the data
- High-resolution images are highly detailed — but from a computer vision/image processing perspective, we’re more interested in the structural components of the images, not so much the super fine-grained details
- Large resolution images are almost always downsampled to help image processing systems run faster and be more accurate
By the end of this tutorial, you’ll understand how to resize images with OpenCV.
To learn how to resize an image using OpenCV and the cv2.resize method, just keep reading.
OpenCV Resize Image ( cv2.resize )
In the first part of this tutorial, we’ll configure our development environment and review our project directory structure.
I’ll then show you:
- The basics of resizing an image with OpenCV and
cv2.resize(non-aspect ratio aware) - How to resize images using
imutils.rotate(aspect ratio aware) - The interpolation methods in OpenCV available to you (useful for when you need to downsample or upsample an image)
Configuring your development environment
To follow this guide, you need to have the OpenCV library installed on your system.
Luckily, OpenCV is pip-installable:
$ pip install opencv-contrib-python
If you need help configuring your development environment for OpenCV, I highly recommend that you read my pip install OpenCV guide — it will have you up and running in a matter of minutes.
Having problems configuring your development environment?
All that said, are you:
- Short on time?
- Learning on your employer’s administratively locked system?
- Wanting to skip the hassle of fighting with the command line, package managers, and virtual environments?
- Ready to run the code right now on your Windows, macOS, or Linux systems?
Then join PyImageSearch Plus today!
Gain access to Jupyter Notebooks for this tutorial and other PyImageSearch guides that are pre-configured to run on Google Colab’s ecosystem right in your web browser! No installation required.
And best of all, these Jupyter Notebooks will run on Windows, macOS, and Linux!
Project structure
Resizing an image is relatively straightforward using OpenCV’s cv2.rotate function, but before reviewing any code, let’s first review our project directory structure.
Start by accessing the “Downloads” section of this tutorial to retrieve the source code and example image.
From there, the project folder should look like this:
$ tree . --dirsfirst
.
├── adrian.png
└── opencv_resize.py

0 directories, 2 files
Our opencv_resize.py file will load the input adrian.png image and then perform several resizing operations, thus demonstrating how to use OpenCV’s cv2.resize function to resize an image.
Implementing basic image resizing with OpenCV
So far in this series, we’ve covered two image transformations: translation and rotation. Now, we are going to explore how to resize an image.
Perhaps, not surprisingly, we use the cv2.resize function to resize our images. As I mentioned above, we’ll need to keep in mind the image aspect ratio when using this function.
But before we get too deep into the details, let’s jump into an example:
# import the necessary packages
import argparse
import imutils
import cv2

# construct the argument parser and parse the arguments
ap = argparse.ArgumentParser()
ap.add_argument("-i", "--image", type=str, default="adrian.png",
	help="path to the input image")
args = vars(ap.parse_args())
We start on Lines 2-4 and import our required Python packages.
Lines 7-10 parse our command line arguments. We only need a single argument, --image, the path to the input image we want to resize.
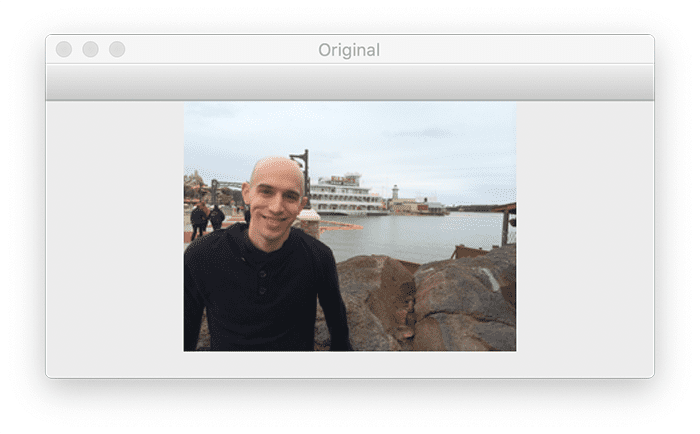
Let’s now load this image from disk:
# load the original input image and display it on our screen
image = cv2.imread(args["image"])
cv2.imshow("Original", image)
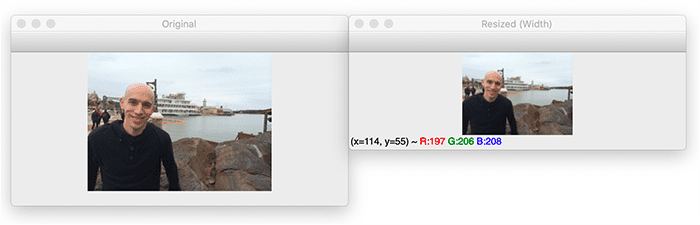
# let's resize our image to be 150 pixels wide, but in order to
# prevent our resized image from being skewed/distorted, we must
# first calculate the ratio of the *new* width to the *old* width
r = 150.0 / image.shape[1]
dim = (150, int(image.shape[0] * r))
# perform the actual resizing of the image
resized = cv2.resize(image, dim, interpolation=cv2.INTER_AREA)
cv2.imshow("Resized (Width)", resized)
Lines 13 and 14 load our input image from disk and display it on our screen:
When resizing an image, we need to keep in mind the image’s aspect ratio. The aspect ratio is the proportional relationship of the width and the height of the image:
aspect_ratio = image_width / image_height
If we aren’t mindful of the aspect ratio, our resizing will return results that look distorted (see Figure 1).
Computing the resized ratio is handled on Line 19. In this line of code, we define our new image width to be 150 pixels. To compute the new height ratio to the old height, we simply define our ratio r to be the new width (150 pixels) divided by the old width, which we access using image.shape[1].
Now that we have our ratio, we can compute the image’s new dimensions on Line 20. Again, the width of the new image will be 150 pixels. The height is then calculated by multiplying the old height by our ratio and converting it to an integer. By performing this operation, we preserve the image’s original aspect ratio.
The actual resizing of the image takes place on Line 23. The first argument is the image we wish to resize, and the second is our computed dimensions for the new image. The last parameter is our interpolation method, which is the algorithm working behind the scenes to handle how we resized the actual image. We’ll discuss the various interpolation methods that OpenCV provides later in this tutorial.
Finally, we show our resized image on Line 24:
cv2.resize.In the example we explored, we only resized the image by specifying the width. But what if we wanted to resize the image by setting the height? All that requires is a change to computing the resize ratio used to maintain the aspect ratio:
# let's resize the image to have a height of 50 pixels, again keeping
# in mind the aspect ratio
r = 50.0 / image.shape[0]
dim = (int(image.shape[1] * r), 50)

# perform the resizing
resized = cv2.resize(image, dim, interpolation=cv2.INTER_AREA)
cv2.imshow("Resized (Height)", resized)
cv2.waitKey(0)
On Line 28, we redefine our ratio, r. Our new image will have a height of 50 pixels. To determine the ratio of the new height to the old height, we divide 50 by the old height.
Then, we define the dimensions of our new image. We already know that the new image will have a height of 50 pixels. The new width is obtained by multiplying the old width by the ratio, allowing us to maintain the image’s original aspect ratio.
We then perform the actual resizing of the image on Line 32 and show it on Line 33:
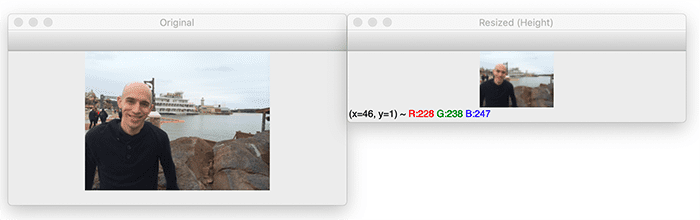
Here, we can see that we have resized our original image in terms of both width and height while maintaining the aspect ratio. If we did not preserve the aspect ratio, our image would look distorted, as demonstrated in Figure 1.
Resizing an image is simple enough, but having to compute the aspect ratio, define the dimensions of the new image, and then perform the resizing takes three lines of code. These three lines of code, while they don’t seem like much, can make our code quite verbose and messy.
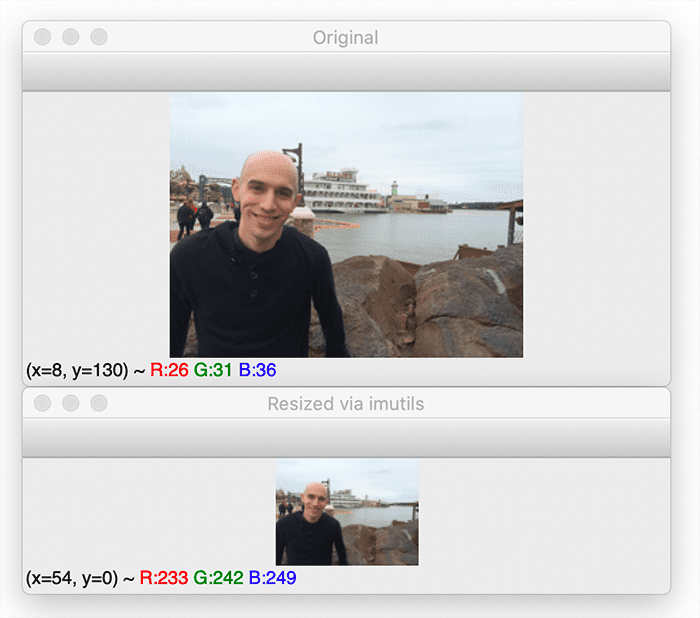
Instead, we can use the imutils.resize function, which automatically handles computing and maintaining aspect ratios for us:
# calculating the ratio each and every time we want to resize an
# image is a real pain, so let's use the imutils convenience
# function which will *automatically* maintain our aspect ratio
# for us
resized = imutils.resize(image, width=100)
cv2.imshow("Resized via imutils", resized)
cv2.waitKey(0)
In this example, you can see that a single function handles image resizing: imutils.resize.
The first argument we pass in is the image we want to resize. Then, we specify the keyword argument width, which is our new image’s target width. The function then handles the resizing for us:
Of course, we could also resize via the height of the image by changing the function call to:
resized = imutils.resize(image, height=75)
The result of which can be seen in Figure 8:
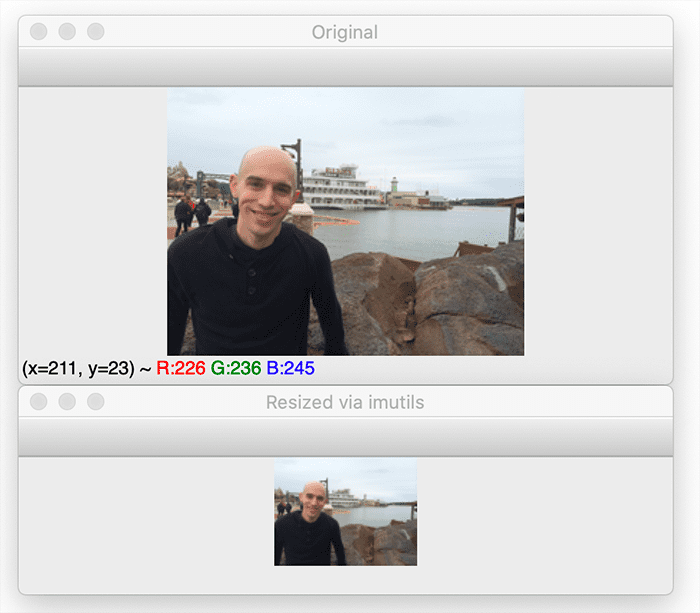
Notice how our output resized image is now significantly smaller than the original, but the aspect ratio is still maintained.
Comparing OpenCV interpolation methods
Until now, we have used only the cv2.INTER_AREA method for interpolation. And as I mentioned at the top of this article, an interpolation function’s goal is to examine neighborhoods of pixels and use these neighborhoods to optically increase or decrease the size of the image without introducing distortions (or at least as few distortions as possible).
The first method is the nearest-neighbor interpolation, specified by the cv2.INTER_NEAREST flag. This method is the simplest approach to interpolation. Instead of calculating weighted averages of neighboring pixels or applying complicated rules, this method simply finds the “nearest” neighboring pixel and assumes the intensity value. While this method is fast and simple, the resized image’s quality tends to be relatively poor and can lead to “blocky” artifacts.
Secondly, we have the cv2.INTER_LINEAR method, which performs bilinear interpolation — this is the method that OpenCV uses by default when resizing images. The general idea behind bilinear interpolation can be found in any elementary school math textbook — slope-intercept form:

Obviously, I am generalizing quite a bit. Still, the takeaway is that we are doing more than simply finding the “nearest” pixel and assuming its value (like in nearest-neighbor interpolation). We are now taking neighboring pixels and using this neighborhood to calculate the interpolated value (rather than just assuming the nearest pixel value).
Thirdly, we have the cv2.INTER_AREA interpolation method. Performing a full review of how this method works is outside the scope of this tutorial. Still, I suggest you read this article, which provides a high-level overview of this method’s general coefficient rules.
Finally, we have cv2.INTER_CUBIC and cv2.INTER_LANCZOS4.
These methods are slower (since they no longer use simple linear interpolation and instead use splines) and utilize bicubic interpolation over square pixel neighborhoods.
The cv2.INTER_CUBIC method operates on a 4 x 4 pixel neighbor and cv2.INTER_LANCZOS4 over an 8 x 8 pixel neighborhood. In general, I rarely see the cv2.INTER_LANCZOS4 method used in practice.
So now that we have discussed the interpolation methods that OpenCV provides, let’s write some code to test them out:
# construct the list of interpolation methods in OpenCV
methods = [
	("cv2.INTER_NEAREST", cv2.INTER_NEAREST),
	("cv2.INTER_LINEAR", cv2.INTER_LINEAR),
	("cv2.INTER_AREA", cv2.INTER_AREA),
	("cv2.INTER_CUBIC", cv2.INTER_CUBIC),
	("cv2.INTER_LANCZOS4", cv2.INTER_LANCZOS4)]

# loop over the interpolation methods
for (name, method) in methods:
	# increase the size of the image by 3x using the current
	# interpolation method
	print("[INFO] {}".format(name))
	resized = imutils.resize(image, width=image.shape[1] * 3,
		inter=method)
	cv2.imshow("Method: {}".format(name), resized)
	cv2.waitKey(0)
We start by defining our list of interpolation methods on Lines 45-50.
From there, we loop over each of the interpolation methods and resize the image (upsampling, making it 3x larger than the original image) on Lines 57 and 58.
The resizing result is then displayed on our screen on Line 60.
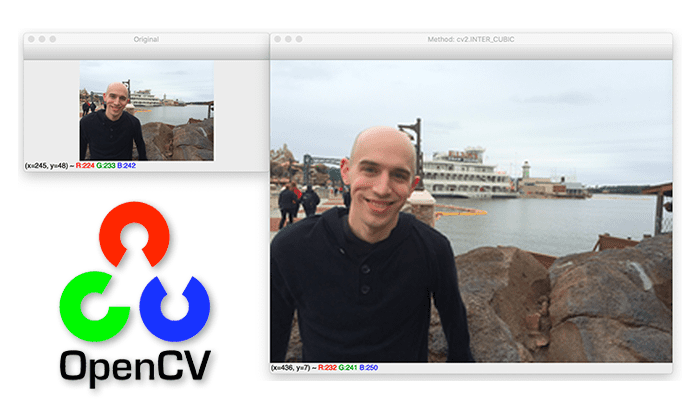
Let’s take a look at the output of the nearest-neighbor interpolation:

Notice in Figure 9 how there are “blocky” artifacts in the resized image.
From here, we can look at bilinear interpolation:
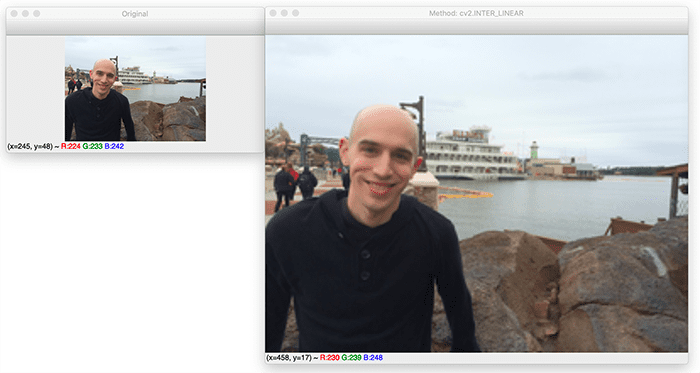
Notice how the block-like artifacts are gone, and the image appears to be more smooth.
Next up, area interpolation:

Again the block-like artifacts are back. As far as I can tell, the cv2.INTER_AREA performs very similarly to cv2.INTER_NEAREST.
Then we move on to bicubic interpolation:
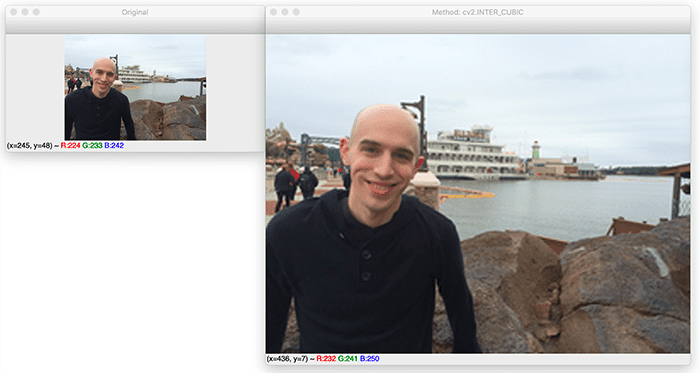
Bicubic interpolation further removes the block-like artifacts.
And lastly, the cv2.LANCOSZ4 method, which appears to be very similar to the bicubic method:
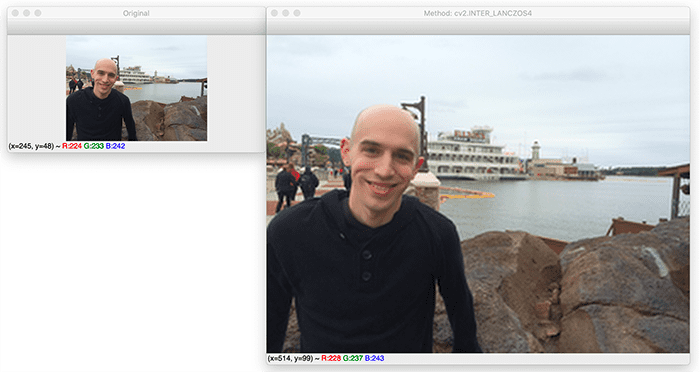
8 x 8 pixel neighborhood. Note: I discuss which interpolation methods you should use in your own projects later in this article.
OpenCV image resizing results
To resize images with OpenCV, be sure to access the “Downloads” section of this tutorial to retrieve the source code and example image.
We have already reviewed the results of our opencv_resize.py script in a preceding section, but if you would like to execute this script via your terminal, just use the following command:
$ python opencv_resize.py
[INFO] cv2.INTER_NEAREST
[INFO] cv2.INTER_LINEAR
[INFO] cv2.INTER_AREA
[INFO] cv2.INTER_CUBIC
[INFO] cv2.INTER_LANCZOS4
Your OpenCV resizing results should match mine from the previous sections.
Which OpenCV interpolation method should you use?
Now that we’ve reviewed how to resize images with OpenCV, you’re probably wondering:
What interpolation method should I be using when resizing images with OpenCV?
In general, cv2.INTER_NEAREST is quite fast but does not provide the highest quality results. So in very resource-constrained environments, consider using nearest-neighbor interpolation. Otherwise, you probably won’t use this interpolation method much (especially if you try to increase the image size).
When increasing (upsampling) the size of an image, consider using cv2.INTER_LINEAR and cv2.INTER_CUBIC. The cv2.INTER_LINEAR method tends to be slightly faster than the cv2.INTER_CUBIC method, but go with whichever method provides the best results for your images.
When decreasing (downsampling) the size of an image, the OpenCV documentation suggests using cv2.INTER_AREA. Again, you could also use cv2.INTER_NEAREST for downsampling as well, but cv2.INTER_AREA typically yields more aesthetically pleasing results.
Finally, as a general rule, the cv2.INTER_LINEAR interpolation method is recommended as the default for whenever you’re upsampling or downsampling — it merely provides the highest quality results at a modest computation cost.
What’s next?

Would you enjoy learning how to successfully and confidently apply OpenCV to your projects?
Are you worried that configuring your development environment for Computer Vision, Deep Learning, and OpenCV will be too challenging, resulting in confusing, hard to debug error messages?
Concerned that you’ll get lost sifting through endless tutorials and video guides as you struggle to master Computer Vision?
No problem, because I’ve got you covered. PyImageSearch University is your chance to learn from me at your own pace.
You’ll find everything you need to master the basics (like we did together in this tutorial) and move on to advanced concepts.
Don’t worry about your operating system or development environment. I’ve got you covered with pre-configured Jupyter Notebooks in Google Colab for every tutorial on PyImageSearch, including Jupyter Notebooks for our new weekly tutorials as well!
Best of all, these Jupyter Notebooks will run on your machine, regardless of whether you are using Windows, macOS, or Linux! Irrespective of the operating system used, you will still be able to follow along and run the code in every lesson (all inside the convenience of your web browser).
Additionally, you can massively accelerate your progress by watching the video lessons accompanying each post. Every lesson at PyImageSearch University includes a detailed, step-by-step video guide.
You may feel that learning Computer Vision, Deep Learning, and OpenCV is too hard. Don’t worry; I’ll guide you gradually through each lecture and topic, so we build a solid foundation and you grasp all the content.
When you think about it, PyImageSearch University is almost an unfair advantage compared to self-guided learning. You’ll learn more efficiently and master Computer Vision faster.
Oh, and did I mention you’ll also receive Certificates of Completion as you progress through each course at PyImageSearch University?
I’m sure PyImageSearch University will help you master OpenCV drawing and all the other computer vision skills you will need. Why not join today?
Summary
In this tutorial, you learned how to resize images using OpenCV and the cv2.resize function.
When resizing an image, it’s important to keep in mind:
- The aspect ratio of your image, so your resized image does not look distorted
- The interpolation method you are using to perform the resizing (see the section entitled “Comparing OpenCV interpolation methods” above to help you decide which interpolation method you should use)
In general, you’ll find that cv2.INTER_LINEAR is a good default choice for your interpolation method.
Finally, it’s important to note that if you are concerned about image quality, it’s almost always preferable to go from a larger image to a smaller image. Increasing the size of an image normally introduces artifacts and reduces its quality.
You could use super-resolution algorithms to increase image size if you find yourself in a situation where your algorithms are not performing well on a low-resolution image. Consider upgrading the camera you are using to capture your photos instead of making low-quality images work inside your algorithm.
To download the source code to this post (and be notified when future tutorials are published here on PyImageSearch), simply enter your email address in the form below!

Download the Source Code and FREE 17-page Resource Guide
Enter your email address below to get a .zip of the code and a FREE 17-page Resource Guide on Computer Vision, OpenCV, and Deep Learning. Inside you'll find my hand-picked tutorials, books, courses, and libraries to help you master CV and DL!
The post OpenCV Resize Image ( cv2.resize ) appeared first on PyImageSearch.